


Garage Flooring Epoxy DIY Kit
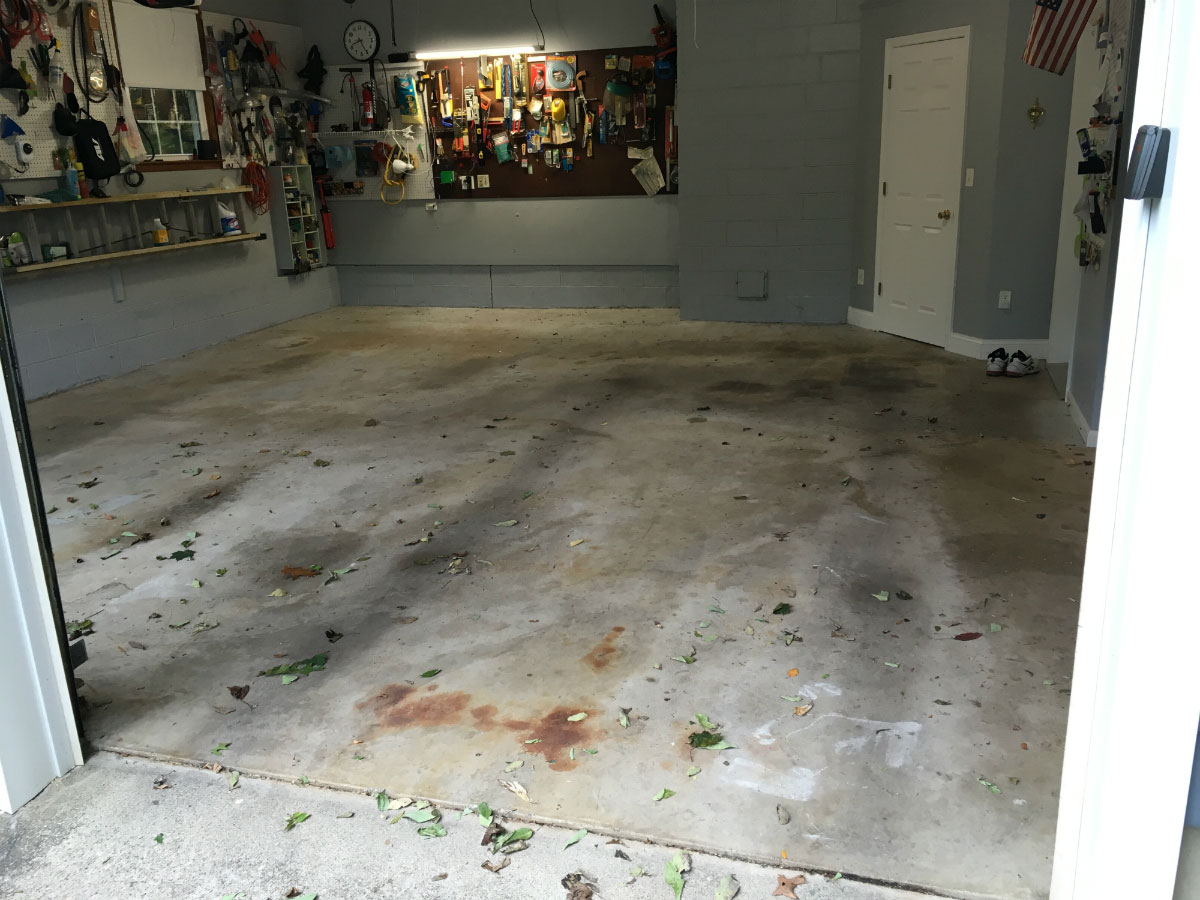
Complete Easy Do It Yourself Garage Floor Coating Kit FOR WHEN YOUR GARAGE FLOOR LOOKS LIKE THIS
FOR WHEN YOUR GARAGE FLOOR LOOKS LIKE THIS
AND YOU WANT IT TO LOOK LIKE THIS(Medium Gray Epoxy Coating With Military Topcoat)

This is the best DIY enhancement ever to our garage. Larry L, Very Happy Customer!"
PLUS ALL ARMOR CHIP KITS SHIP FREE!
You can paint your garage floor or commercial floor by going to your local Home Improvement store or going online to purchase a big name brand or some type of high solids epoxy and simply roll it on. If you take this approach and unfortunately many people do, your floor won't look half as good as the ArmorGarage floor above. Nor will it last a fraction as long. The destructive forces of abrasion from your tires will guarantee that, we show you exactly how that looks in the MUST READ TAB above. If saving a few dollars on your epoxy garage floor coating is your primary concern or main criteria in choosing a product, you're making a big mistake.
Armor Chip garage floor epoxy kits are designed with the first time epoxy novice in mind. We make it easy and straight forward for you to get professional results at a fraction of the cost. This is not the case with Cycloaliphalic epoxy floor coatings which bubble up as you apply it requiring you to use a leaf blower to blow out the bubbles causing all sorts of issues. We use only 100% pure Aliphatic epoxy with military grade resins, hardeners, polymers and the finest color pigments. Which means you get the best looking high gloss garage floor coating with no bubbles, is Hot Tire Lifting proof and has the best abrasion/durability rating. ArmorGarage are the only garage epoxy floor kits with a 5 year guarantee against wear. Non Aliphatic epoxies, non 100% solids epoxies, cycloaliphatic and water based epoxies cannot do that and therefore should only be used as primers or for temporary applications. When it comes to epoxy flooring you should only use the best and never anything that is almost as good!
Armor Chip comes complete with Everything you need to finish your floor to a beautiful high gloss Terrazzo like finish including the protective topcoat and free shipping. See what those other low priced kits really cost when you add in the topcoat, the proper amount of chips, an equally thick coating and shipping on our Epoxy Comparison Chart. Do the comparisons and you'll see Armor Chip Floors not only look better but dollar for dollar are by far the best quality & value when you really know what you're getting!
Only Armor Chip provides you with our unique calibrated squeegee(not just a cheap flat squeegee) to accurately spread the epoxy to the correct thickness. No guess work and no thin spots that can fail! We also include 3-epoxy rated rollers, jiffy mixer, nonslip additive, 8lbs of color flakes, etching solution, military grade epoxy and urethane based clear topcoat.
Armor Chip Floors are guaranteed for 10 years against "Hot Tire Lifting" and related damages such as yellowing, fading and cracking! Armor Chip is the ONLY product of it's kind guaranteed against Wear For 5 Years! Don't be fooled by exaggerated so called lifetime guarantees that exclude everything but peeling and are next to impossible to comply with. Plus they offer no guarantee against wear because they can't, their abrasion loss ratings are too high which means their epoxies are too soft.
Only Armor Chip provides you with 8 lbs of high quality colored chips(the most for any garage epoxy kit) and two coats of Ultra Clear urethane fortified protective top coating that will never yellow or fade. Unlike Cycloaliphatic and water based epoxies that will yellow no matter what additive you add to them.
Did you know that the "Colored Chips" do not fully embed themselves into the epoxy! So Chips that are not "Sealed In" with a topcoat have tiny exposed raised edges that will trap dust, dirt, oil and grease. You will be scrubbing your floor to get it clean versus simply wiping it clean in minutes with a damp mop or rag on a Tee stick! But even more importantly the color chips do embed enough to displace epoxy underneath them so that when you use a low solids, water based or polyurea type epoxies that are thin build to begin with you have very little epoxy between your floor and your hot tires.
Tires on your car can reach temperatures up to 180 degrees!What do you think is going to happened to those surface exposed plastic chips without a protective topcoat and the super thin layer of epoxy under the chips when hot tires with the weight of your car are twisting and turning on them? Coating over your epoxy with a clear version of the same epoxy with the same abrasion rating will not solve the problem, it can actually make it worse. Your topcoat must have an abrasion loss rating LOWER than your epoxy for it to be effective and you must have sufficient thickness of epoxy under the chips to avoid failures. Some companies tout their warranties but the whole idea is not to ever need to file a warranty claim in the first place.
If you've recently coated your floor with any of the other epoxies mentioned above it's most likely dulling, wearing off or peeling off already, see the Must Read Tab for applying our epoxy over an existing coating.
For proof that Armor Chip is tough enough to handle any abrasion from your twisting/turning tires watch this video. It was made by a customer who was so pleased with his Armor Chip results he made a video of his installation. No Big Box epoxy, water based epoxy or any epoxy without a topcoat would survive this unscathed! This is actually much more abusive than your car since it's 3700lbs on much smaller wheels which puts a lot more torque and grinding pressure into the coating as the wheels twist and turn. The floor installed was the Kahki Tan Armor Chip with the Military Grade Topcoat upgrade.Armor Chip can be applied to wood trim, concrete curbing, steps and block walls. Will not run or drip down vertical surfaces. You can also install prefabbed cove base from www.easycove.com or www.speedcove.com and run the epoxy across the floor and up the cove base to form a water proof tub installation. Or you can save yourself alot of money and make your own cove base with our Cove Base Kit.
 For workshops or workshop type garages select the single coat Military Grade Topcoat. With an extremely low abrasion loss rating that's the best in the industry this provides added protection via a chemically harder finish when working on a regular basis with heavy rolling tool chests, jack stands and hydraulic floor jacks. Also use the upgraded topcoat if you live in areas with severe winters that have heavy use of road salts, ash and or aggregate. It's also a good idea when parking our favorite toys in the garage or pole barn such as tractors, ATVs, rubber tracked equipment, golf carts or large boat trailers. Woodworking shops that use stationary type equipment are ok with the standard topcoat. While not required since our epoxy is self priming it's always a good idea to prime your floor as you would if you were painting your car or the interior or exterior of your house. This increases the level of adhesion, increase coverage of the epoxy by up to 25% and increases thickness up to 23 Mils thick! Plus we offer the primer at a discount when bought with the garage kit. For most floors choose the standard primer, for very old, poor condition floors or floors with extra heavy machinery choose our high solids primer which has 97% solids.
 Choose from one of our wife approved pre-selected Paint and Chip combinations from the images above or design your own custom Paint and Chip combination. To order chip colors other than what's in our standard packages simply order the kit in the base color of your choice then list the chip colors you want in the "Custom Chip Color Box". For Full Broadcast version please call, full broadcast requires a significantly larger amount of chips and additional topcoat. It also requires a different technique to achieve professional looking results. We want to make sure you know what to do so you do it right.
If you can't decide on which colors you want just give us a call and ask for Teri, she's our in house color expert and she'd be happy to go over which colors would be best for your floor.Armor Chip garage floor epoxy comes with everything for a complete job and contains enough material to do up to approx. 575 sf. For larger floors you can buy The Add On Half Kit. See the COVERAGE Tab for more detail. Armor Chip ships Free except to HI, AK or Canada.
MAIN GARAGE FLOOR EPOXY PAGE
CHECK OUT ONE OF OUR FAVORITE GARAGE EPOXY KIT REVIEWS BELOW FROM TONY IN MI
1. Wow great product everyone!!! If your thinking of doing it yourself this is the product for you. Very easy to apply. Make sure to take your time and research application. These are my steps. I live in Michigan did this on my own one person job. You'll want to make sure temp( under 98 degrees) and humidity(under 85%) are good before applying epoxy:
2. Move all your stuff out of the garage(hardest part of the job!), wash it out. I used a power-washer.
3. Find and fix all your cracks. I used the crack & joint repair compound.
4. PREP-CLEANING YOUR GARAGE FLOOR IS THE MOST IMPORTANT STEP TAKE YOUR TIME!!!!! Rented diamond grinder from home depot. I wet the concrete down all over the place instead of dry grinding it (too much dust). I wet ground it (no dust just slurry left behind). Power washed it out and then applied etching solution while floor was wet and let it fizz for 6 minutes or so and then power washed it out and let dry 1 day. Etch was an extra step I decided to do, ArmorGarage said it wasn't required since I diamond ground the floor. But since the floor was wet anyway I decided to use the etch that came with the kit. If I didn't wet grind I wouldn't have etched.
5. Tape edges of drywall all around. Tape off where garage door comes down in straight line. You want the epoxy under the garage door only and not leading to the outside.
6. I used their epoxy flooring primer. First cut in edges, paint steps and concrete lips with brush. Then used roller to roll on like regular paint. I also painted the expansion joint paper material in center the control joints I just brushed into them. Let dry for 7 hours or when primer not tacky (CRITICAL to mix the right amount of epoxy primer and coatings just follow ArmorGarage directions sent with product).
7. Get 2 large plastic measuring cups. I Poured 80 ounces part A in one and 40 ounces part B in another mix individually with mixing stick then combine A & B and mix for 2 to 3 min. Use paint stick to get unmixed parts on side and bottom of measuring container & bucket. Put on your spiked shoes if you purchased( wish I had!). Pour epoxy onto floor in a bead. Then use the calibrated squeeze to push it around, this is a must since the ArmorGarage epoxy is very thick. I used a brush to cut into corners again, if you're careful you can just roller up to the walls. After squeegee use roller to cross roll one direction first then the other, this spreads the epoxy out to the final correct thickness. Throw chips into air and let fall, I didn't have spikes to use the shaker jug method. Then repeat for other sections. (Make sure you have all necessary tools you need at your side when beginning the coating process, having spike soles would make easier to apply chips). Let dry for 12 hours.
8. I then applied military topcoat (WHEN I APPLIED IT ALL THE COLORS CAME OUT AND LOOKED AWESOME). Let dry for 8 hours for foot traffic. Waited 72 hours to park the car on it. Overall easy enough for anybody to do, lot less complicated than I thought and I've never done anything like this before.
Tony was also nice enough to include a Video of his completed floor in addition to his review above. Thanks Tony!
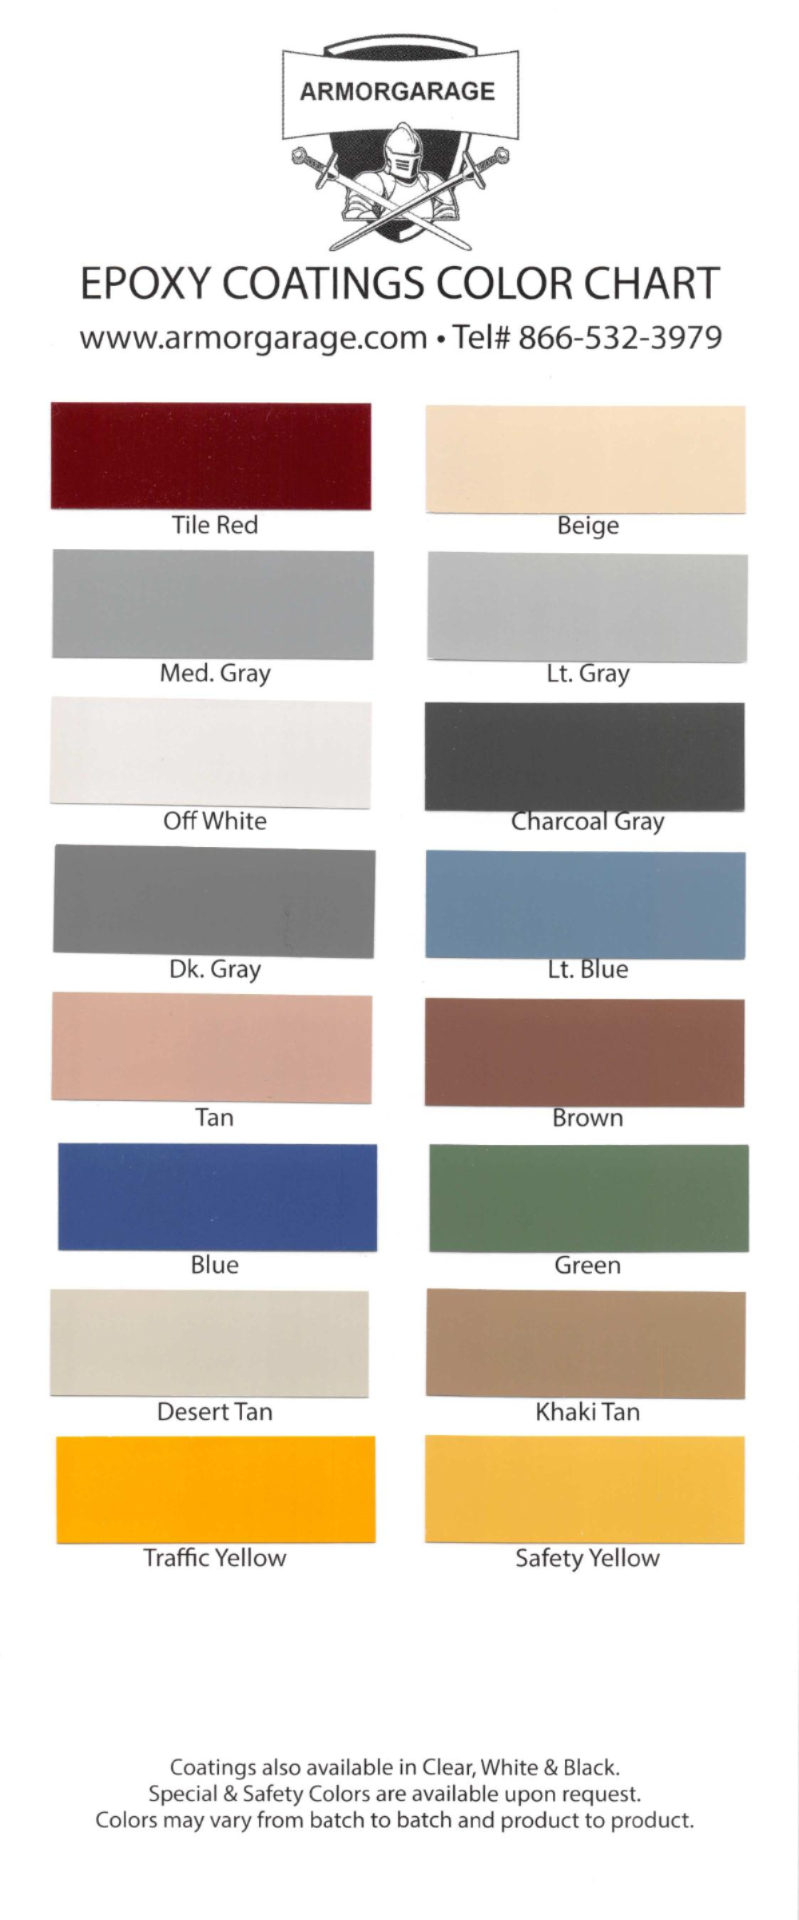
We have 15 standard epoxy and chip color combinations to choose from. See the description & images of each below. You can also make your own color combinations. It's simple to do. Just select the kit that has your base epoxy color and then choose the chip colors you want from the Chip Color Chart Link directly below this Epoxy Color Chart and list them in the "Custom Chip Color Box".
ONLY GREEN & BLUE GLOW IN THE DARK CHIPS ARE AVAILABLE AND THERE IS A $45.00/LB ADDITIONAL CHARGE(out of stock). METALLIC SILVER CHIPS ARE $30.00/LB ADDITIONAL. PLEASE INDICATE IN THE CUSTOM CHIP COMMENT BOX, COLOR AND QUANTITY.
Below are pictures of a black floor with Blue Glow flakes. We recommend 5-6lbs of glow In Dark Flakes for every 500 sf of floor to get the best effect. These pictures were taken at night so this is how the floor looks like in the dark, there are metallic silver and Lipstick Red Flakes in the floor which are visible during the day, the glow in the dark flakes are white during the day. 

Images at top of page are of our standard color combinations, for custom color combinations select your base color floor epoxy, then click on the Chip Color Chart Link above and select up to 5 chip colors. Order your kit in the base color you desire and then list the chip colors in the Custom Chip Color Order Box and we will process your custom order accordingly. Please allow 2-3 additional days for a custom color combinations.
Gray & Lt Gray kits have white, black and light blue chips.
Dk Gray & Charcoal Gray kit have black, white and primary blue chips.
Beige kit has black, white and brown chips. Primer is recommended.
Red kit comes with additional primer material for proper color coverage and has black, white and tan chips.
Tile Red kit(see epoxy color chart) is a design it yourself kit, pick up to 5 different chip colors from the chip color chart.
Harley Tan kit has 10lbs of brown, clay, chocolate, white and black chips.
Harley Tan Light kit has 10lbs of clay, buff, chocolate, white and black chips.
Blue & Light Blue kits have black, white and functional gray chips.
Racing Blue kit has black, white, gray and rustic red chips.
Harley Gray has Light Gray epoxy with 10 lbs. of neutral gray, charcoal gray, functional gray with hints of black and white chips.
Black- Standard black comes with 8lbs of gray white and red chips, optional black comes with 5lbs of metallic silver chips as pictured in the image above.
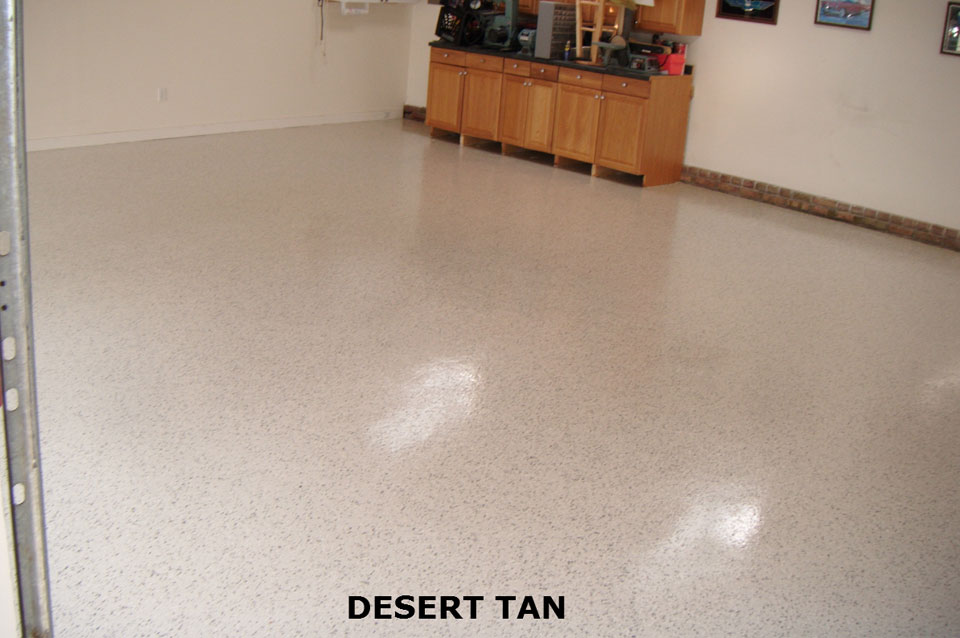
Desert Tan has burgundy, ivory, hunter green and navy chips.
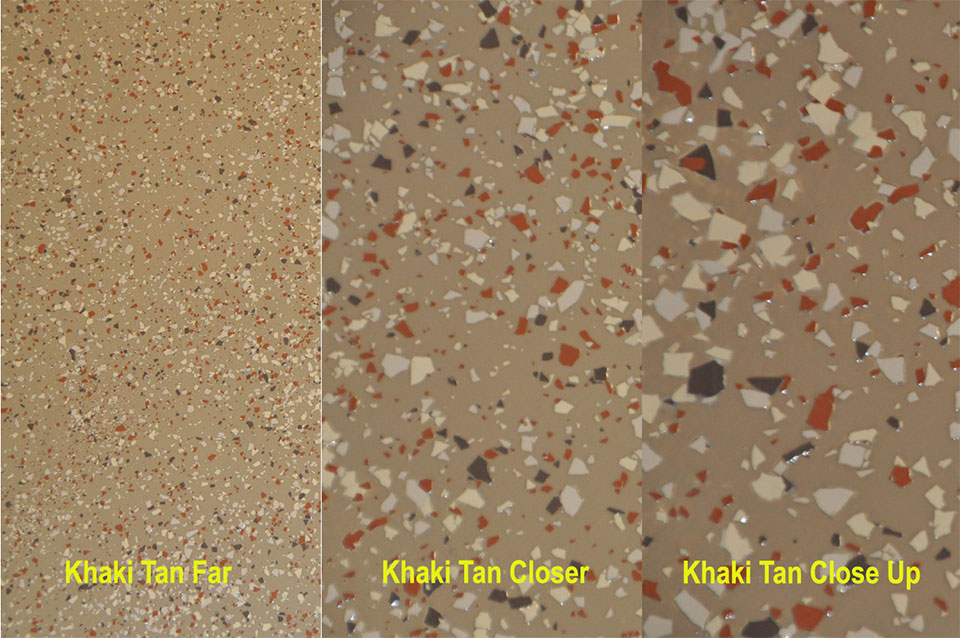
Kahki Tan kit has 10lbs of brown, beige, tan and coppertone chips.

 The following image is Lance's floor who used Dark Gray with Black,White,Dark Gray and the Military Topcoat.
  This is Kimberly's beautiful Charcoal Floor with Black, White & Whisper Gray flakes.
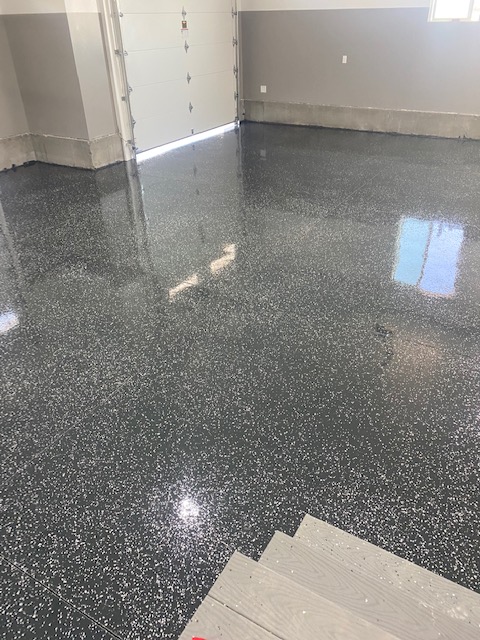
To order a custom Paint and Chip combination select one of the kits in the base color epoxy you want. In the Custom Chip Color Selection box indicate chip colors you'd like, you can request up to 5 different chip colors, we carry every basic color chip you can think of (glow in the dark chips are only available in Green or Blue Glow due to EPA restrictions).
EXAMPLE OF CUSTOM COLOR ORDER: You like the Light Gray kit but want red, black and white chips instead of the standard colors. Simply select Light Gray as your kit and then enter the colors red, black and white in the comment box, we will supply those chips.
Coverage for your Garage Epoxy Floor
Each kit will cover up to 575 sf. Rougher surfaces and more porous surfaces will yield less coverage. Lighter colors such as Beige will yield less coverage and it's a good idea to use a primer first when using Beige. Red comes with a primer to ensure a beautiful Bright Red finish without any concrete bleed through or streaks.
Always order enough material to cover your floor area plus 10% as a safety factor. Painting a concrete floor can sometimes be like painting a sheetrock wall, we've all had the experience of putting a coat of paint on a wall only to have it disappear completely into the wall and require a second coat. Some floors can be very absorbent so please do not try to order to the exact square footage of your floor. You can order an ADD ON HALF KIT that will provide an additional 250-275 sf of coverage to be sure you have enough material. If you end up not using it just send it back to us for a full refund. Also it's a good idea to have a little leftover that you can put into small jars in case of an emergency.
NOTE: If you are using a primer you can expect about a 20% increase in coverage from the epoxy since it is now going over a sealed surface. So if you are at or slightly over the size of the full kit you can do a primer as an option rather than ordering the add on half kit. A primer is always a good idea since you get an extra layer of high performance epoxy(our primers are better than most other epoxies) and even better adhesion. NOTE: When using a primer to extend coverage choose the larger sized primer so you have enough to cover the entire floor and the larger sized topcoat so you maintain the same durability.
You can mix and match full kit and half kits or primer to get to right match for your floor size. We even have a bulk sized kit which is the equivalent of 4 full sized kits.
The Armor Chip Floor Epoxy kit contains:
Etching solution 2 gallons of part A epoxy & 1 gal part B military grade solids epoxy8 LBS OF COLORED CHIPS.
Two coats of crystal clear urethane fortified protective topcoat.
For Fork Lift traffic or other heavy duty usage choose the single coat Military Grade Topcoat Option.
Cut in brush
Mixing sticks to mix individual cans.
Mixing bucket1-unit of non skid additive for areas where additional traction is desired. Won't affect high gloss finish!
1-notched squeegee for spreading epoxy evenly(not just a cheap flat squeegee)
3-9" epoxy roller covers (1 for epoxy & 2 for topcoats) 1-paddle mixer to mix combined epoxy parts A & B.Clear and Easy to follow detailed written instructions
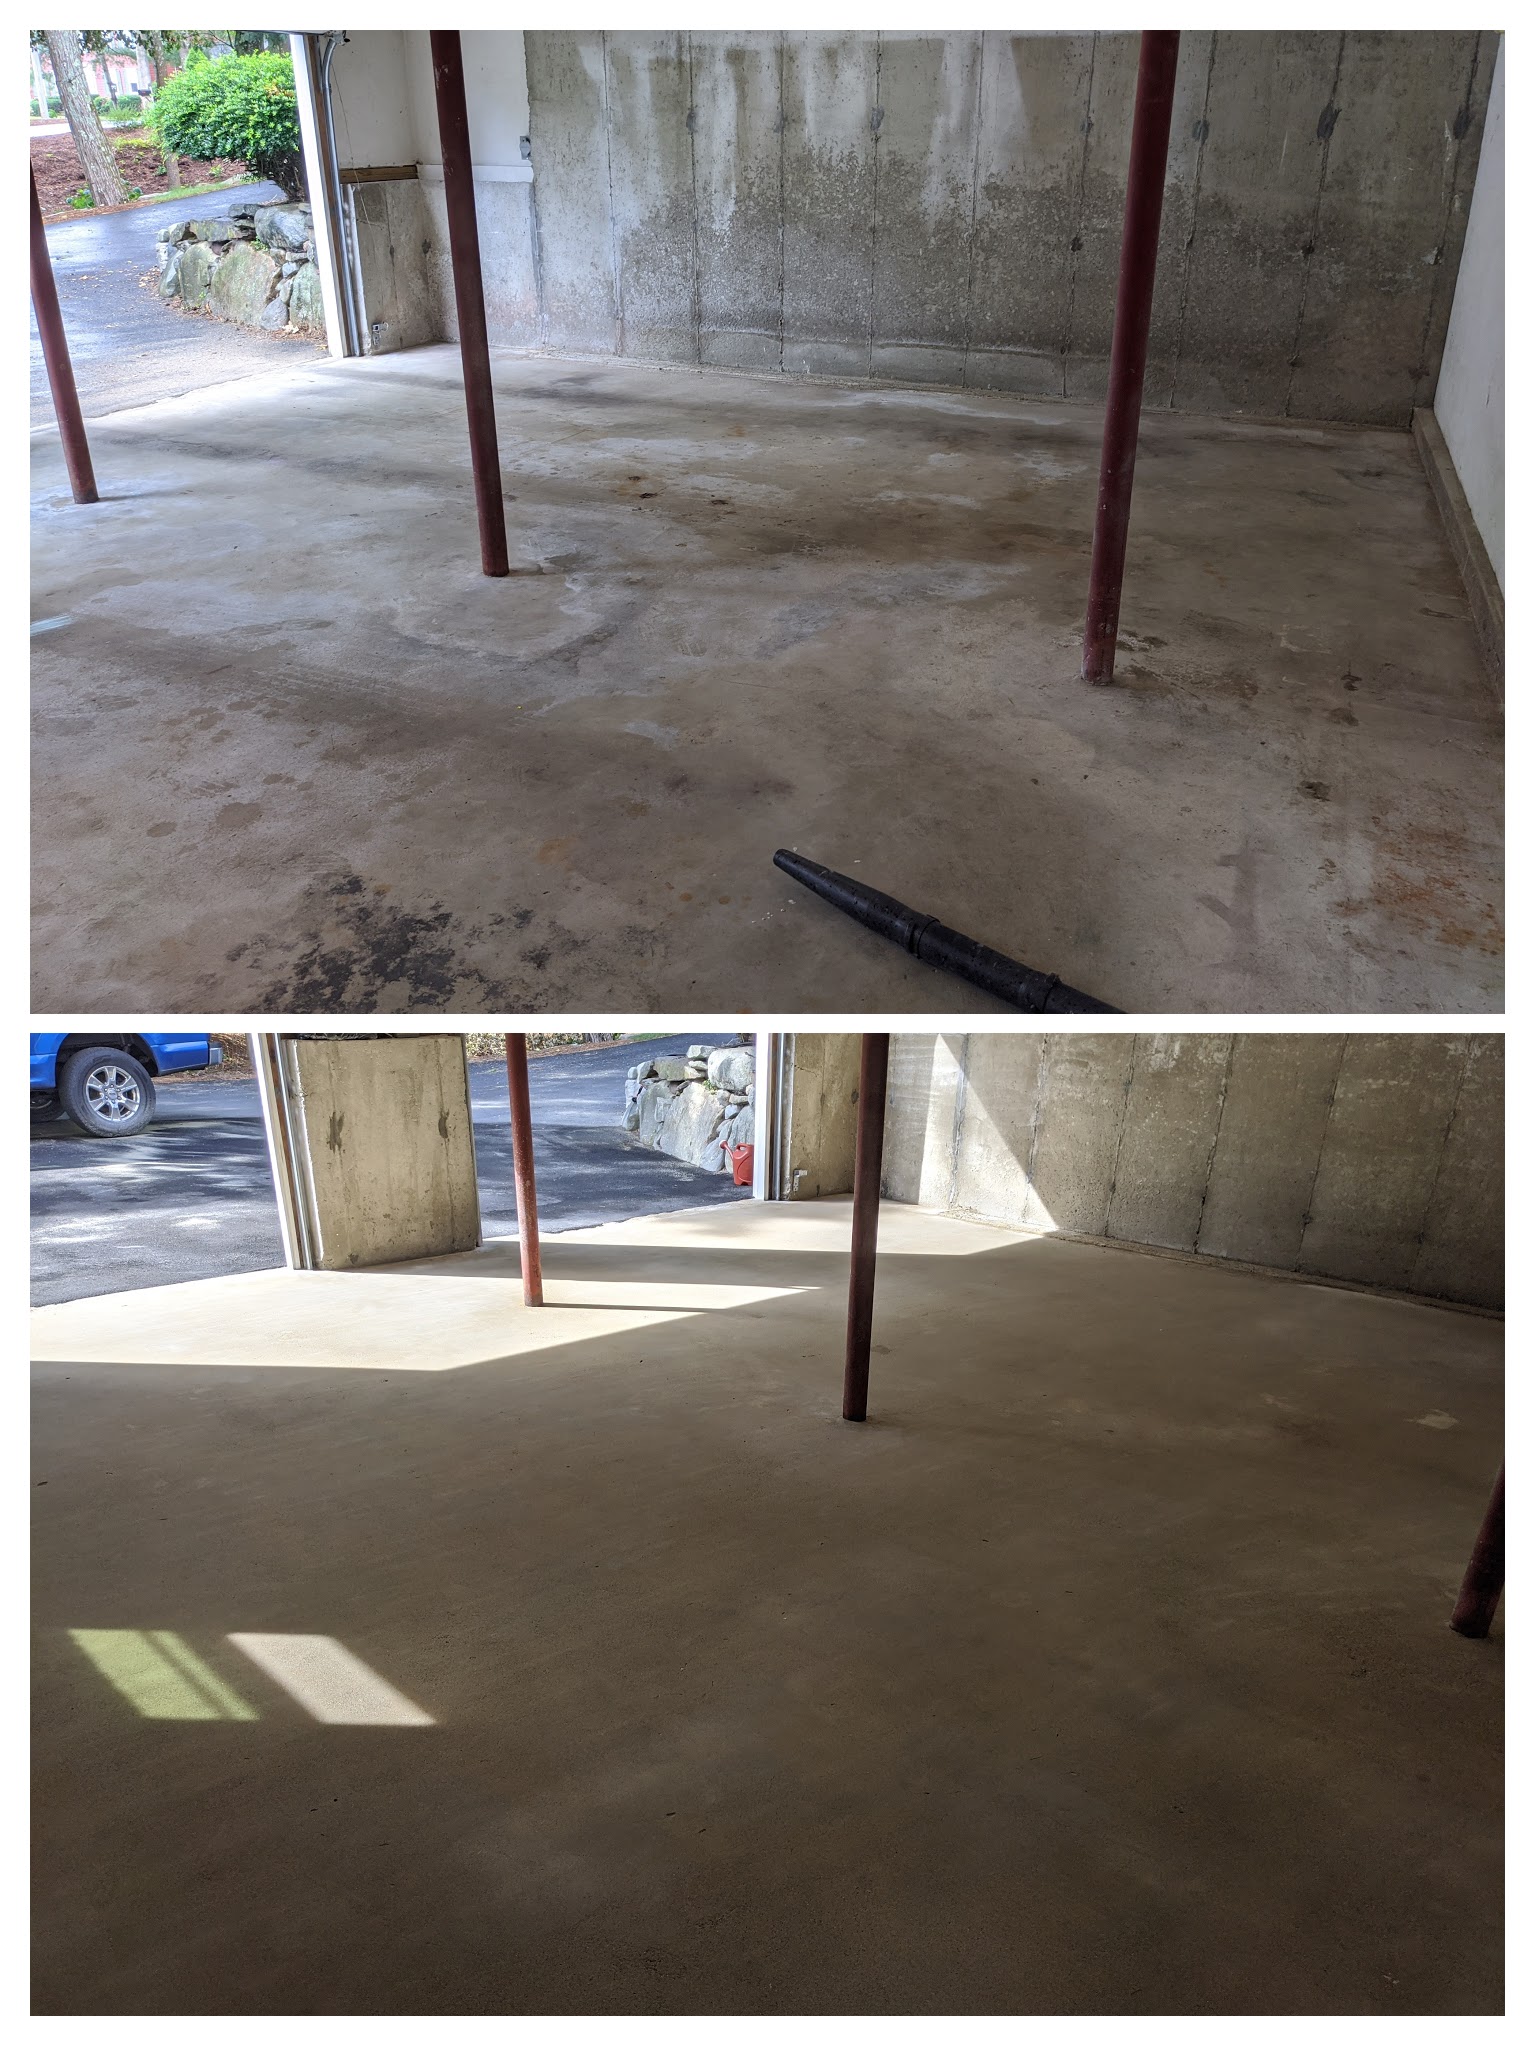
1.Clean/wash the floor well (power washing is preferred for best results)to remove ALL dirt, loose paint and any other contaminants. If your floor was previously coated with an inferior floor epoxy that has failed or is beginning to fail in a lot of areas it's best to remove the coating entirely, you can rent the Floor Prep machine from Home Depot that will quickly remove any of the existing epoxy prior to applying the Armor Chip or Armor Granite epoxy floor kits. If your epoxy happens to be of high quality and is still adhered to the floor properly and is just worn out or has minor flaking read this How To Coat Over An Existing Floor Epoxy. Please note that if a major percentage of the floor is peeling or flaking off it means that its only a matter of time before the entire floor fails and it's best to completely remove the coating.
Apply epoxy in floor temperature range of 55-95 degrees. Do not apply in heavy rain.
 Here's another great image of the epoxy going on a properly cleaned floor.
THE FLOOR PREP MACHINE FROM HOME DEPOT DID A GREAT JOB, OIL STAINS WERE CLEANED WITH LIQUID TIDE AND MURIATIC ACID
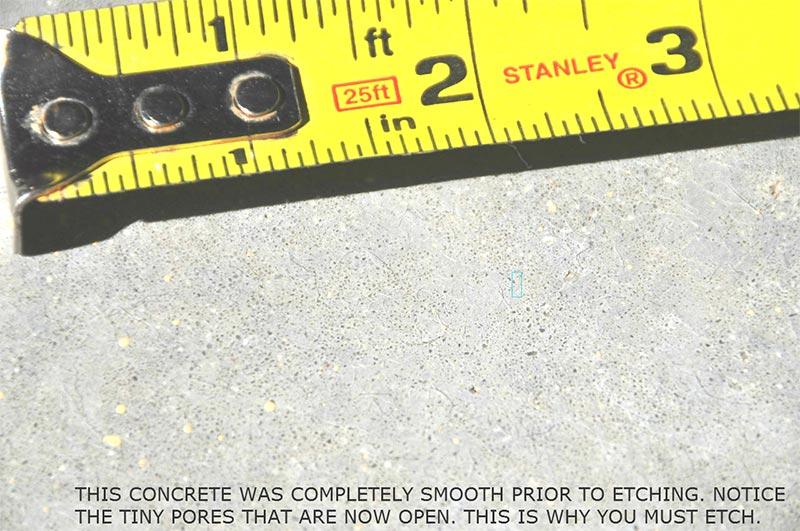
 If you are grinding your floor it is still recommended that you etch the floor as you are rinsing off the dust from grinding, this will ensure the concrete pores are clean and open. If you do not intend to rinse the grinding dust off then etching is not necessary. We recommend using a leaf blower to get off the last bit of grinding dust just prior to starting your application. Our epoxy will permanently bond into the open pores provided by etching, grinding or a combination of both. If applying over an existing coating see the link at the bottom of the MUST READ page for instructions on how to do it correctly.
 2A. Patching
If you are grinding your floor and have large cracks you should patch now with our Crack & Joint Filler. Once cured you can grind over it and smooth down further if needed. If you have small cracks use the Instant Crack Repair after you grind or etch. If your floor is pitted in small areas use our either one of our crack repair kits and trowel into the pitted areas. If your floor is mostly pitted you order our high solids primer and mix in some sand to make a slurry with sort of a loose grout consistency that you can spread over the pitted areas with a large flat squeegee.Then sand or grind smooth if necessary. 2B. If using the epoxy flooring primer mix 1/2 gallon of A & 1/2 gallon of B and roll onto floor. Repeat until done. Allow primer to dry aprox. 4-5 hrs(dry to the touch) but no more than 20 hrs. After 20 hrs lightly sand with 100 grit to rough up.
3. For the epoxy mix the contents of each individual can of the two part epoxy. Next mix the two parts together at a 2 parts A to 1 part B ratio. Use two measured containers to get accurate amounts of each epoxy part(2:1 ratio). Pour the container of A and the container of B into the 5 gallon bucket and mix thoroughly for 3-4 minutes. DO NOT mix all the epoxy at once, this is not like store bought epoxy paints that have a pot life of up to 8 hours. Armor Chip Garage Floor Epoxy is pure Military Spec epoxy that works on 100% catalytic reaction so the more you mix the more reaction you get. Armor Chip has a pot life of about 45 minutes. If you mix all the epoxy at once you will have a smoking bucket of concrete in about five minutes.
We recommend doing your floor in 3 batches per kit, the smaller batches will allow you to apply the epoxy and chips without rushing and still have plenty of work time left over as a safety margin. Apply a bead of the mixed base color coat from the container in a left to right direction directly to the floor do not use a roller pan. Spread evenly over a 4-5 ft wide strip(you can do much larger sections if purchasing the optional spiked soles) with supplied notched squeegee. Then roller over to smoothen squeegee ridges and spread out further. Armor Chip Epoxy will automatically be at the proper thickness. Don't worry about the epoxy drying on the roller or squeegee, when you mix the next batch up it will reactivate the epoxy for another 45 minutes of pot life. NOTE: Some of our kits come with the tint in a separate bottle, if you receive this version simply mix the tint into the Part A firs making sure to scrape out all the tint.
4. While the floor epoxy is wet, apply the supplied color chips by simply tossing them slightly up into the air and at a 45 degree angle away from you so that they freely rain down onto the epoxy in an even pattern. We give you the most amount of chips to achieve the look your eye thinks is best. You can use as much of the chips as you want without worrying about running out. Avoid tossing too many chips at a time so that you don't wind up with piles of chips which will spoil the the look of your new floor. Tossing a little at a time is best. Leave the last 6 inches of the epoxy without chips. You will overlap the epoxy from the next section onto this area and then apply the chips. All the sections will blend together to form a single monolithic seamless finished coating. If purchasing the spiked soles you can see an alternate method a customer shared with us for spreading the chips that works amazingly well on this page below. Using the spikes makes apply the flak much easier.
5. Once you have completed the first section repeat steps 3 & 4 until done. Note: After the first section you may do larger areas as you get comfortable working with the epoxy. When you mix a new batch of epoxy it reactivates the epoxy in the bucket and on the drill and the same for the wet edge you will be overlapping so don't worry about any of that. You should be done painting and applying chips in about 2 hrs per kit.
Note: for large areas use our spike shoe bottoms which allow walking on the wet epoxy. Use Xylene for any clean ups(available at Home Depot or Lowes). Be sure to clean up any epoxy while its wet that gets on anytime it's not suppose to including your hands. Once dried it can only be removed by grinding.
6. Let the floor epoxy & chips dry to the touch, usually in approximately 8-10 hrs, you can let the epoxy cure overnight also but don't let more then 20 hours pass before applying topcoat. Once dry to the touch sweep the floor good with a stiff shop broom or shovel with plastic edge to remove any loose chips or any chips that are sticking straight up. Don't worry about scratches, any scratches in the epoxy will disappear when the clear coat is applied. Apply half of the clear topcoat to seal in the chips and magnify the beautiful high gloss finish. The chips themselves give the floor some texture but if you desire to use the non skid additive supplied for added traction, mix it right into the second final clear coat. Allow first coat to dry to the touch before applying second coat. Clear coat dries to a touch/walk on, in about 2-3 hrs(you can move all your stuff back in at that point). If you are using the upgraded Military Topcoat you only have to do ONE COAT. Apply the Military Topcoat as soon as the floor epoxy is dry to the touch or first thing the next morning for best results. Do not exceed 20 hrs for either topcoat. Military Topcoat dries to the touch in 5-6 hrs to walk on and put your stuff back in. Let either topcoat cure for 48-72 hrs before driving on it. That's it!


Armor Chip Garage Floor Epoxy Features & Benefits
The following are the most important facts regarding Armor Chip Garage Floor Epoxy1. American made with all American sourced materials. Epoxy is 100% solids military grade aliphatic epoxy which cannot be compared to water based, hybrid cyclioalipahatic epoxies or high solids epoxies which we only use as primers.
2. Topcoats are unique and different from epoxy. They are urethane fortified and have abrasion loss ratings of 20mgs for the standard topcoat and 4mgs for the military upgrade topcoat. The abrasion rating is really the Durability rating of the epoxy coating you're using. So what that means is when you use a topcoat with the lowest abrasion rating. You are getting the best protection in the industry against corrosion from road salts and debris, the best protection against tire abrasion and everyday scratches that causes dulling and wear spots. We show an example of this on the web page. We recommend you read the paragraph in red on the web page for a full understanding of what a topcoat is and what it's supposed to do. It is very important that you know the difference between topcoats and epoxies. No epoxy can be made into a topcoat and high solids is not good enough. That is just marketing hype to sell a product cheaper. If saving a few dollars is your main concern than you are more likely to end up wasting your time and money rather than ending up with a beautiful long lasting epoxy floor. We offer a straight 5 year guarantee on everything including wear, no other company will guarantee your floor against wear. Because they can't, their topcoats and epoxies just don't perform to our level.
3. Coverage is up to 575 SF for Armor Chip kits & up to 525 SF for Armor Granite kits. We recommend that you allow a 10% safety factor when determining how much product to buy. Add on half kits are available for both Armor Chip and Armor Granite if your floor area is larger that the coverage of one of our standard kits. You can mix and match full kits, half kits and bulk kits to best meet the area of your floor. Please note that lighter colors such as Beige will yield less coverage.
4. Armor Chip is 20 mils thick with 1 coat of epoxy and 2 coats of clear topcoat. Armor Granite is 27 mils thick with one coat of extra thick epoxy and 3 coats of clear topcoat. When using the military grade topcoat one coat is all that is required with either Armor Chip or Armor Granite.
5. Armor chip comes with 8lbs of color flakes, the most amount out of any standard garage epoxy kit on the market. Armor Granite comes with an extra thick version of epoxy and 20lbs of color chips that provides your floor with a real granite look and the spike soles to make spreading the chips easier.
6. Both kits come with ArmorGarage Military Grade high build 100% solids epoxy, ArmorGarage high performance 20mg loss rated clear topcoat or a military grade topcoat with an industry best 4mg abrasion loss rating, etching solution to properly clean your floor, calibrated notched squeegee for an even distribution of the epoxy(not just a simple flat squeegee which can result in uneven epoxy thickness) 3 epoxy rated rollers, jiffy mixer, mixing bucket, gloves, cut in brush and nonslip additive. Using the right tools is important to getting the job done right. Free Shipping is included for all our epoxy kits.
7. You can choose one of our standard epoxy and chip color combinations or you can customize your kits any way you want with any color combination of epoxy and color chips. We have over a dozen epoxy colors and 500 different colors of chips.
8. We strongly recommend you read our information on prepping your floor properly. It is extremely important that your floor is clean and dry with the pores opened up. If your floor has been previously coated and failing badly you must remove it completely. If your previous epoxy was a good quality epoxy it should just be worn out and can be coated over with one of our kits using our bonding primer first. All the above info can be found on the "How To Prep And Paint Your Floor" page. Epoxy should end at the inside edge of the garage door.
9. Pot life is approx 45 minutes. We recommend not mixing more than one gallon at a time for each person rolling. This is pure military grade resins and hardeners, the more you mix the more catalytic reaction you get. Low quality epoxies typically have a very long pot life of several hours. This is your clue to avoid that epoxy at all costs.
10. Clean up is with Xylene(available at HD, Lowes or ACE Hardware), be sure to clean all spills or splatters off anything you don't want painted. Once the epoxy dries it can only be removed via grinding.
11.FREE SHIPPING
Questions on preparation, application, colors or anything else give us a call at 866-532-3979 or email us at info@armorgarage.com
How do I order different color chips than what's standard with your kits?
In the "Custom Chip Color Box simply list up to 5 colors that you choose from the Color Chart. There is no extra charge for custom colors.
My floor is bigger than the 575 sf coverage of the Armor Chip Kit. What do I do?
If your floor is less than a 120 sf larger than we recommend that you purchase the Epoxy Flooring Primer. This will do two things. It will extend the coverage of the epoxy and add another layer of coating which is never a bad thing. If your floor is more than a 120 sf larger than purchase the Add On Half Kit
How long do I need to wait before coating a new slab and do I still need to etch it?
New slabs need to cure for 28 days minimum and they need to be etched. In fact we like you to do an extra strong etch to make sure we burn out all the curing residues at the surface. You can do this buy simply buying a gallon of Muriatic Acid and mixing it with our etching solution. This will give our etch solution a little extra zing to clean and open the pores of your concrete slab. As you will undoubtedly see elsewhere on the site this is extremely important, it allows the epoxy to get into the open pores and make a molecular bond with the concrete.
How long do I need to let primer dry?
The Primer will dry in 5-8hrs depending on temperature and humidity conditions. Once the primer is dry to the touch you can apply the epoxy. Do not let more than 20 hrs pass before applying the epoxy. Otherwise you will need to lightly sand the primer with 120 grit to rough up the surface.
Should I fill in the saw cuts or expansion joints?
No we recommend that you do not. The last thing you want is to have a crack done the middle of your new high gloss epoxy floor. Once you've applied Armor Chip or Armor Granite the saw cuts will add dimension to the floor and they will look like big slabs of stone. If your floor is older than 10 years it's probably ok to fill them since the floor is done settling. But you never know for sure what can happen.
Can I extend the epoxy out past the Garage door?
No we don't recommend that. The epoxy should end at the inside or outside edge of the garage door.
When should I fill in the cracks and will the epoxy fill the cracks in?
If the cracks are surface hairline cracks the epoxy will cover them. If the cracks are deep they may run the depth of the slab in which case you will be consuming a lot of expensive epoxy to fill them. Better to use either the Crack & Joint Compound or the Instant Crack Filler. Crack & Joint Compound goes in before the cleaning and etching, the Instant Crack Filler goes in after.
How long do I need to let the floor dry after etching?
It's a matter of temperature and humidity, 23hrs is usually sufficient but you should let it dry for 48 hrs to be sure all the moisture has dried out of the floor.
When can I put the topcoat down?
As soon as the epoxy dries to the touch, usually the next morning.
When can I put my stuff back in my garage?
The topcoat will dry to the touch in 4-5 hours at which time you can walk on it and put your stuff back in, keep the car and other heavy rolling objects off for 3-4 days.
Should I get the Military Topcoat?
We always recommend the Military Topcoat. It's less work since you do only one coat and it's a much harder finish that will keep your floor looking new for 10-15 years even in harsh climates with lots of road salts. If you have smaller vehicles that go in and out of the garage seldom and you live in a mild climate then you're fine with the standard topcoat. Next to properly prepping the floor the topcoat is the most important thing.
I had an accident and scratched my floor, what can I do?
Scratches are easily fixed, see the Care & Maintenance page for the answers.
I've had my floor for many years and it's finally starting to wear out, what do I do?
Easy just give a light sanding and roll on a new topcoat, that will bring the floor right back to new. The epoxy and chips should stay indefinitely.
How long does this process take?
In actual hours it's not much at all but since you have dry times you should allow 3 days to get the job done. Total working hours should be no more than 4-5 hours.
Can I paint my curbs?
You can coat your curbs whether they are concrete or block. Just allow a little more material when doing block curbs since they absorb more material. You can also do wood molding and steps in your garage.
First some tips on ordering. If your floor is a little oversized, lets say 650sf, it's better to order the primer rather than the Add On Half Kit, a primer extends the coverage of the epoxy because it's now being applied over a sealed surface rather than porous concrete. You'll get a thicker overall coating with even better adhesion which is why its never a bad idea to use a primer in any case. But you must order the larger size primer, otherwise if you order the standard size primer you will run short or have to stretch it out so thin that you defeat the purpose of the primer. Same goes for the Military Topcoat, order the larger size if using a primer on your oversized floor to increase the coverage of the epoxy. Do not use the standard size topcoat on an oversized floor, you'll get less durability by not using the right sized topcoat. This is just another way we look out for you, other brands offer primer for additional coverage of their epoxy but don't offer a larger sized primer or topcoat for your oversized floor. That makes no sense since if you have a bigger floor you'll need more primer and more topcoat to do the job properly. The few extra dollars to do it right is well worth it to not have to do your floor over again later on.
If you haven't done so yet we encourage you to watch the video on the Home Page. It's a video of a car turning and twisting into a tight parking spot on the same floor below. There is no more destructive force on your epoxy floor than a turning tire while the car is not moving or barely moving. The video is great evidence how tough our military grade topcoat in that after 8 years of dead weight tire twists and turns on it the floor still looks brand new! That's the difference between us and everybody else. It's easy to look good when you first put your epoxy coating down, but whats it look like 6 months or year down the road never mind 8, 10 or 15 years down the road.
If you previously coated your floor with a water-based floor epoxy or any other type of epoxy without a true urethane fortified topcoat that's under 10 mils thick, it's more than likely your floor already resembles the worn out Blue Arrow in the images below.
The biggest mistake you can make is not using a topcoat! Did you know that ALL solids based epoxy coatings are NOT UV stable? Without a polyurethane epoxy topcoat, ALL solids based epoxies will yellow and lose their gloss. Real Topcoats are much more expensive to manufacture and have a much harder finish than epoxies! Moreover, any topcoat that does not have a 20mg or less abrasion rating will fade and wear out prematurely�that's an indisputable epoxy fact. This is especially true if a company's topcoat is just a clear version of their epoxy. This offers no additional abrasion or UV protection than the epoxy without a clear coat. Simply adding in a UV additive does not make an epoxy a topcoat! In other words, it's a waste of time and money to apply a clear epoxy over your color epoxy with chips. To be a real Topcoat it must be polyurethane fortified and have an Abrasion Rating LESS THAN the epoxy it's coating! Our standard topcoat as measured by the industry standard Taber CS-17 abrasion loss test has an abrasion loss rating of 20mg and the Military Grade option has an amazing 4mg loss rating(the lower the better), no other topcoat comes close. Typical epoxy abrasion loss ratings are 24-40mgs or higher which makes them much much softer our Armor Chip finish. This means they will wear out faster. To sum it up polyurethane is to epoxy what rebar is to concrete. Leave out either of those items and both epoxy and concrete will fail, it's just a matter of when.

 If you've applied an epoxy coating before you found us and your floor looks like the blue arrow CLICK HERE to learn how to coat over an existing floor coating or floor paint with one of our epoxy kits.
 Do you know what Primer you're buying? Most primers are water based. Our primer is a high performance solids based epoxy that actually out performs many other brand's actual epoxies. Some companies offer high solids product as the actual epoxy, we only offer a high solids epoxy as a primer and never as the main coat. Using the right product for your primer is key to achieving an unbreakable bond between your concrete and your epoxy coating system. If the primer you apply is inferior than everything you put on top of it is at risk of failing when the primer fails.
A word on doing Full Broadcast, we don't recommend it for the first timer. Besides it being double the cost and labor more often than not you will end up with unsightly piles, blotches, lumps that will need considerable remediation work and sanding. It's also not more durable than our Armor Granite even though it is being touted by some as being so. We assure you it's not! It's the quality of the epoxy and the topcoat that provides the durability.Read this post if you're thinking about a full broadcast epoxy floor?


