Armor Granite Garage Floor Epoxy Kit Is Best In Class With Fast Free Shipping & Great Customer Service!
We've formulated our pure solids "Military Ultra Epoxy" garage floor coating in an extra thick version with our decorative epoxy flooring chips to create the only DIY garage floor coating epoxy kit with a real Granite look! Similar installed floors by franchise companies cost $5000.00 and more! Armor Granite is our top of the line, garage floor coating kit and our best seller with FREE SHIPPING
.
Armor Granite garage floor coating is self leveling, skid-resistant, impact resistant, chemical & salt resistantand at 25 mils thick it's more than twice as thick as our closest competitor and over 10 times thicker than store bought garage flooring epoxy kits! With 18 lbs of color flakes for an extra heavy granite pattern, you get 90-95% floor coverage, no other kit comes even close! It makes any floor look gorgeous! We highly recommend this over a full broadcast system, much easier to install, less expensive and looks better. We've seen many DIY full broadcast disasters and is why we created this kit, take it from us full broadcast is much harder and is just not worth the extra time, money and risk of error.
Armor Granite's extra thickness makes it great for garages, work shops, retail stores and even commercial applications. Armor Granite comes standard with a 10 year warranty against wear. No other epoxy brand offers any warranty against wear! So no matter how much other epoxy types go on about how they're 20X stronger than epoxy and that they're industrial grade if they don't warranty against wear they're no such thing!
With 4 coats of high gloss clear topcoat Armor Granite's garage floor coating finished look and durability cannot be matched by store bought products or any other online epoxies such as cycloaliphatics, low solids epoxies which yellow and wear out easily. They all have a common problem they both have high abrasion loss ratings. For abrasion loss ratings you want the number to be as low as possible. Anything over 20mgs is not durable. Applying a clear version of the same epoxy as a topcoat does nothing to solve the problem. Simply adding in some UV additives does nothing either, your floor will still yellow. Also your topcoat must have a lower abrasion rating than the epoxy for it to be effective. Otherwise you are just wasting your time and money.
Although well marketed, brand name kits are prone to failures and cannot hold nearly the same amount of chips! That's why their garage floor coating have less than 3 lbs of chips! They don't have the necessary thickness to hold the proper amount of chips and if you try putting a large quantity of chips on them you will not be happy in a short period of time.
Armor Granite garage floor coating cures to a rock hard finish that has such incredible adhesion ability it actually becomes part of the first layer of your concrete floor. Plus you'll be amazed at how beautiful your floor looks! Similar to our Armor Chip flooring epoxy but with a thicker version epoxy, 12 more pounds of chips and four layers of topcoat instead of two, it's the top of the line garage floor coating kit! Each full kit will cover up to 550 sf and each Add On Half Kit will cover up to 275 sf. Please allow a safety factor when ordering, please see ordering guide lines In the COVERAGE tab at top of this page.
TO HAVE A FLOOR LIKE THIS ORDER PATTERN ONE AND WRITE DARK GRAY EPOXY IN THE CUSTOM NOTE BOX
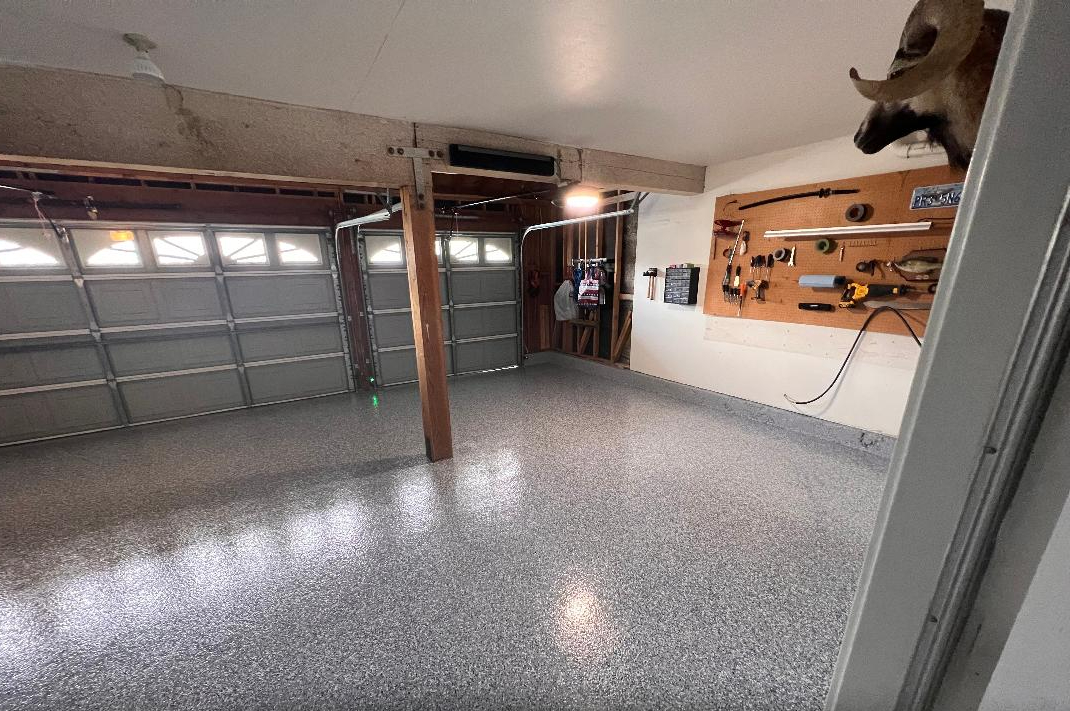
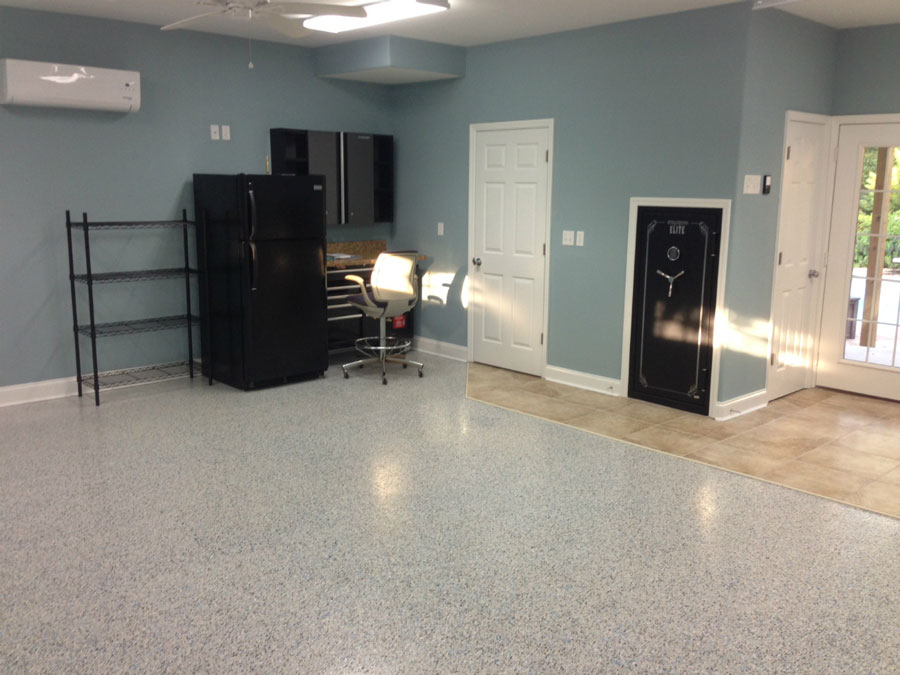
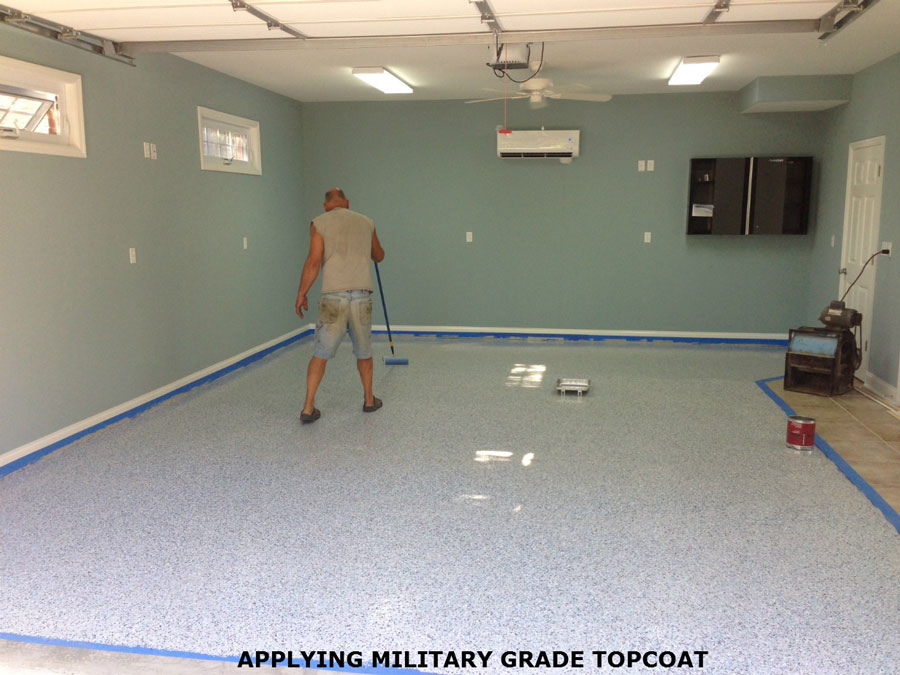
That's exactly what Greg did below in an amazing transformation of his ugly bare concrete floor to the pattern 1 with dk gray epoxy instead of the light gray epoxy. He used the military grade topcoat so he only had to do one topcoat instead of four.
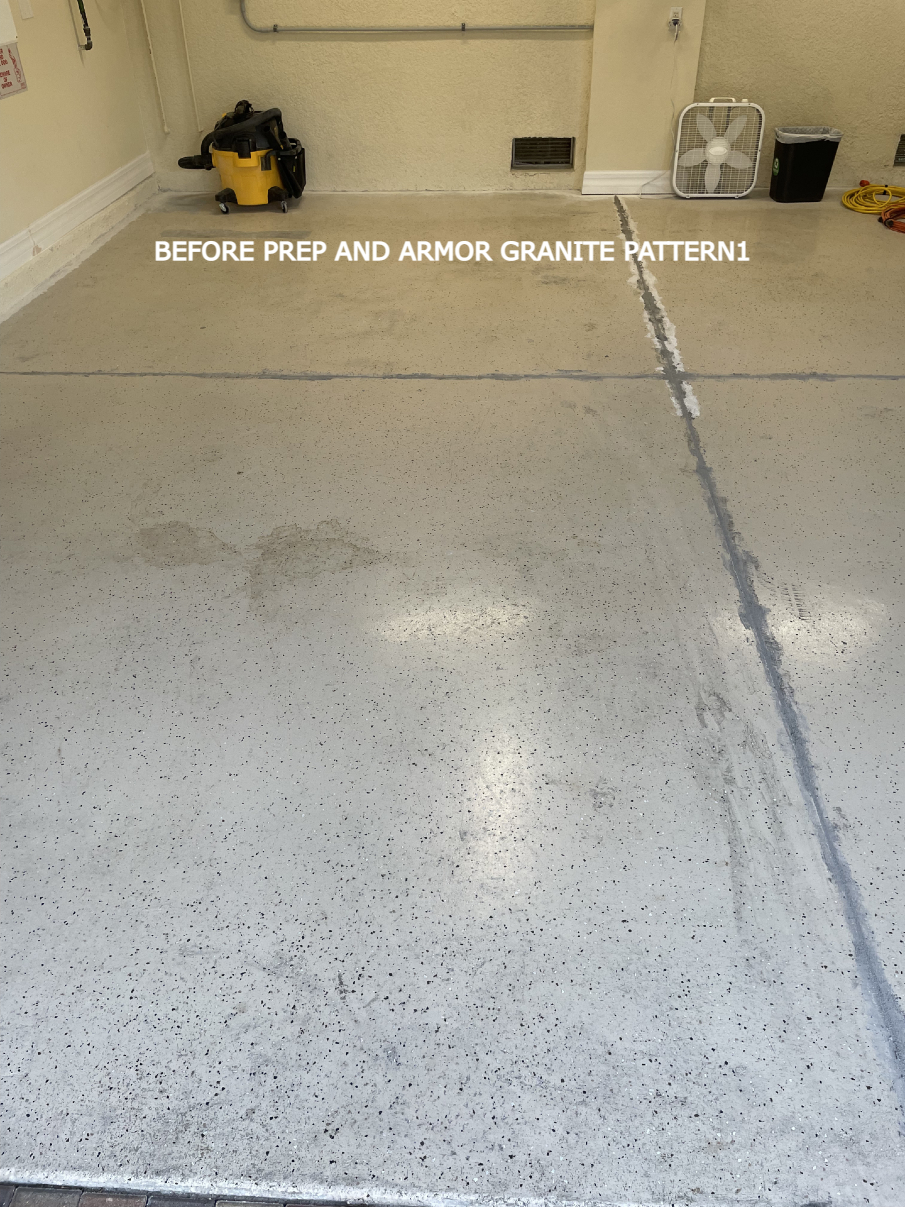

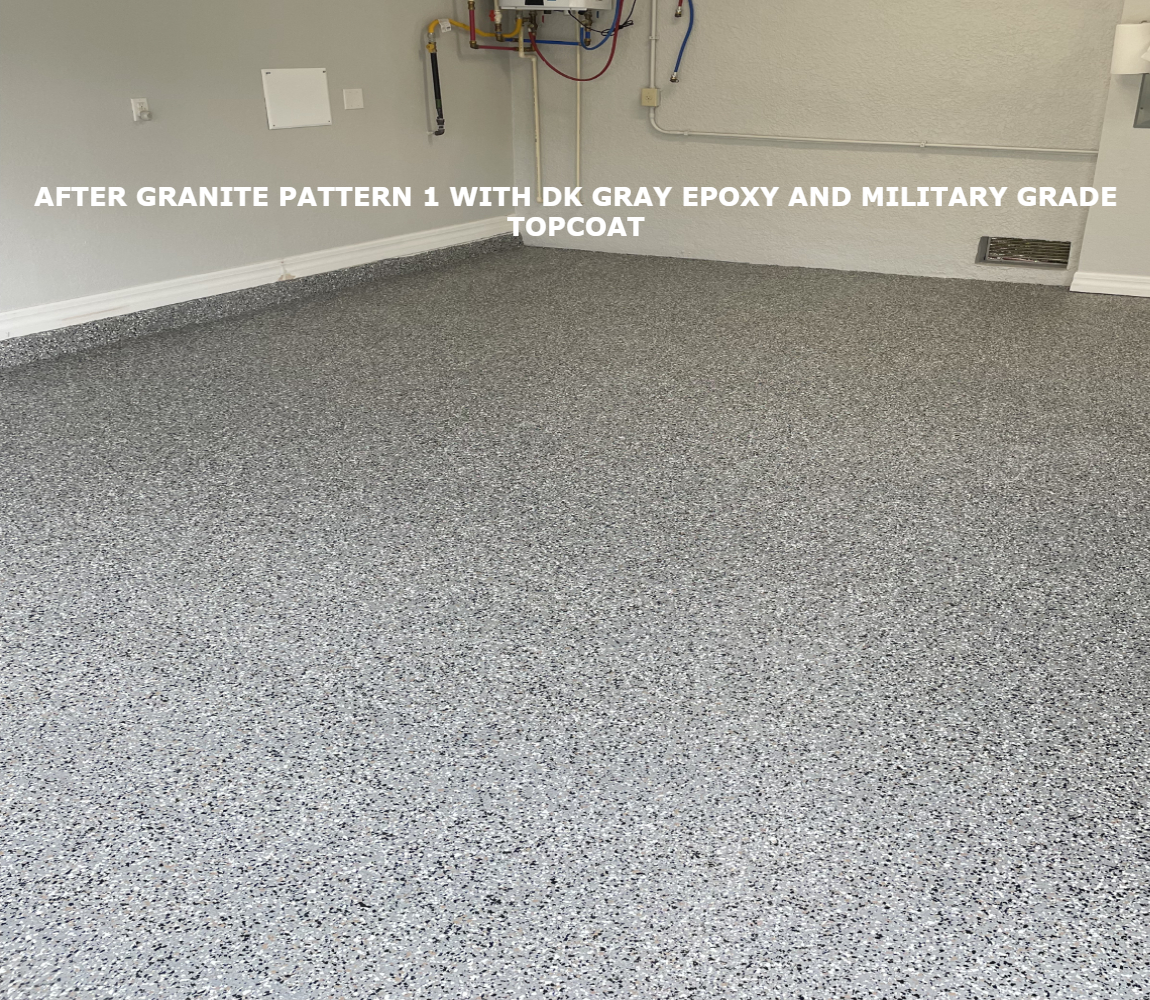 Below is a nice before & after using Armor Granite Harley Dark Gray. On the Application Instructions page you'll see an amazing before & after of a very nasty pitted floor into a beautiful Granite Epoxy floor.
Here's another testimony to our ArmorGranite Epoxy kit in the form of a two part video from Vick in Michigan who used our Harley Dark Gray Armor Granite Epoxy Floor kit with the military grade topcoat. This was his comment with the videos he sent with Part 1 which was right after a full winter season. "My garage after a harsh Michigan winter had a couple of rust and oil spots from brake jobs and oil changes. After sweeping out the all the accumulated trash I simply washed it with pressure washer and dish soap. All dirt, grime, oil and rust spots were completely gone and the floor looked brand new again.VERY HAPPY WITH PRODUCT!!!!!. No cracks no chips used heavily everyday, car repairs and storing all types of machines for home owner use..this product delivers! I would highly recommend it. Thx again from Macomb Michigan"
Armor Granite garage floor coating is guaranteed for 10 years against Hot Tire Lifting, Staining, Yellowing and the ONLY kit with a 5 year Brand New Look Guarantee in residential applications! A mistake many customers make is choosing an epoxy coating without know it's longevity factor, any epoxy can stick to your floor and look good right after applying it. It's how long your floor stays looking like the day you put it down that counts. ArmorGarage floors are the best because they still look the best 10,15 and even 20 years down the road!
For workshops or workshop type garages select the single coat Military Grade Topcoat. Our military grade topcoat allows you to do only one coat over the epoxy and has an abrasion loss rating of only 4mgs which is the best in the business. This provides added protection via a chemically hardened finish when working on a regular basis with heavy rolling tool chests, tools or equipment. Also use the upgraded topcoat when using vehicles such as tractors, ATVs, Golf Carts or rubber tracked equipment such as Bob Cats. Woodworking shops that use stationary type equipment are ok with the standard topcoat. For retail locations with normal foot traffic such as beauty salons, clothing stores or offices use the standard topcoat. For high volume foot traffic and or shopping carts use the upgraded topcoat for best results.
We provide you with everything needed to complete the job including easy to follow clearly written instructions with the first time users in mind. No experience needed to get the same beautiful results you see here. Unlike Cycloaliphatic epoxies which bubble as you apply them our 100% pure Aliphatic epoxy goes down smooth and self levels to a beautiful super high gloss finish.
Armor Granite garage floor coating is for use on concrete floors and curbing or wood trim and can be applied to previously painted floors if the paint is still in good condition. Please see the Must Read Tab above for a link on how to paint over an existing floor coating.
The Armor Granite garage floor coating system is 100% environmentally safe, no odor, fully government approved in all 50 states and ships Free except to HI, AK or Canada. If you have a question that is not addressed here feel free to give us a call toll free- 866-532-3979 or send us an email- info@armorgarage.com. It's best to ask as many questions as you can before purchasing and applying any epoxy product.
ARMOR GRANITE GARAGE FLOOR EPOXY COLORS
We have 12 standard epoxy and chip color patterns you can choose from. See the description of each below. You can also choose to make your own color combination. It's simple to do. Just select the kit that has your base epoxy color and then choose up to 5 chip colors you want from the Chip Color Chart Link right below this Epoxy Color Chart and list them in the "Custom Order Note Box".
Scroll towards bottom of page for full description of epoxy color and chip colors in each pattern.
USE CTRL AND MOUSE WHEEL TO ZOOM IN AND OUT
CLICK HERE FOR CUSTOM CHIP COLOR COMBOS
Please allow 2-3 additional days for a custom color combinations.
PATTERN COLOR DESCRIPTIONS ARE AS FOLLOWS:
Pattern #1 is Light Gray Epoxy with Black and White Chips.
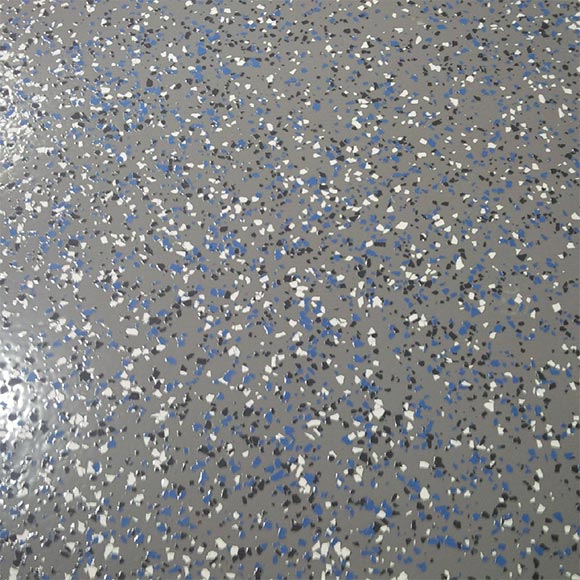
Pattern #2 is Medium Gray Floor Epoxy with Black, Primary Blue and White Chips.
Pattern #3 is Medium Gray Epoxy with Primary Blue, White and Olive chips..
Pattern #4 is Beige Floor Epoxy with Hunter Green, Light Green and White chips.
Pattern #5 is Beige epoxy with Black, Brown, Tan and Gray Chips.
Pattern #6 is Medium Gray Epoxy with Red & White chips.
Pattern #7 is Tan Epoxy with Chocolate, Clay, Buff, Black and White chips.
Pattern #8 is a darker version of Pattern 7. It's Tan epoxy with Brown, Chocolate, Clay, Black and White chips.
Pattern 9 is Charcoal Gray epoxy with Primary Blue, Black and White chips.
Pattern 10 is Charcoal epoxy with Charcoal, Functional Gray and Black chips.
Pattern 11 is Khaki Tan epoxy with Beige, Latte, Coco and brown flakes
Harley Gray is a custom Light Gray with Lt Blue, Black and White Chips
Harley Dark Gray version is our Dark Gray base coat with Primary Blue, Black and White chips.
Please note that the image above is an extreme close up view with a zoom lens and that you cannot see the nonslip additive normally nor would you notice flakes on top of each other unless you get down on your hands and knees to stare at the floor.
For detailed instructions on how to do custom epoxy flooring designs see, How To Do Custom Epoxy Flooring Page
Armor Granite Garage Floor Epoxy Coating Coverage
Coverage is approximately 550 sq. ft. per kit at 25mils thick, enough to do a typical 2 1/2 car garage. Coverage may vary depending on texture of floor, porosity of floor and if a lighter color such as Beige is used. Please allow a margin of safety of 10% to allow for different floor porosities. If your floor size is close to or over the 550 sf we recommend using the primer to extend the coverage of the epoxy up to 675 sf. This will give you a thicker overall coating and even better adhesion. If your floor is over 675sf order the Granite Add On Half Kit, you can return it for full credit if not needed. TO ORDER SELECT PATTERN AND THEN IN THE SIZE DROP DOWN BOX SELECT THE PROPER SIZE KIT. THEN SELECT THE PROPER TYPE AND SIZE PRIMER IF USING A PRIMER. SAME FOR THE TOPCOAT. BE SURE TO MATCH THE PRIMER AND TOPCOAT SIZE TO YOUR FLOOR SIZE, NOT DOING SO WILL RESULT IN LESS DURABILITY.DIY Garage floor epoxy instructions
COMPLETE AND EASY TO FOLLOW INSTRUCTIONS Our unique system is easy to apply and can be installed by anyone who can paint with a roller. Its simple and easy! 1.Clean/wash the floor well (power washing is preferred for best results)to remove ALL dirt, loose paint and any other contaminants. If your garage floor was previously coated with inferior garage floor epoxy that has failed or is beginning to fail please refer to these set of images on how to properly redo your floor with Armor Granite garage floor epoxy. How To Coat Over An Existing Garage Floor Epoxy. Please note that if a major percentage of the floor is peeling or flaking off it means that its only a matter of time before the entire floor fails and it's best to completely remove the coating.
Apply epoxy in floor temperature range of 55-95 degrees. Do not apply if raining.
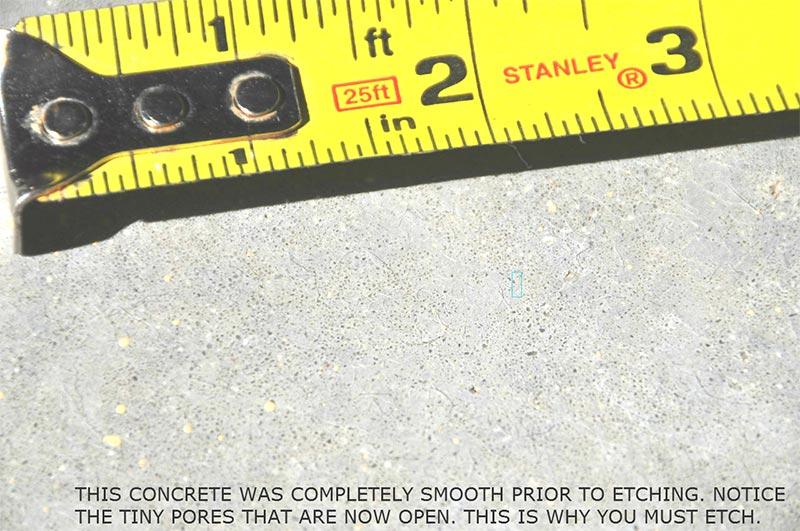
This is usually the result of using an insufficient amount of acid!
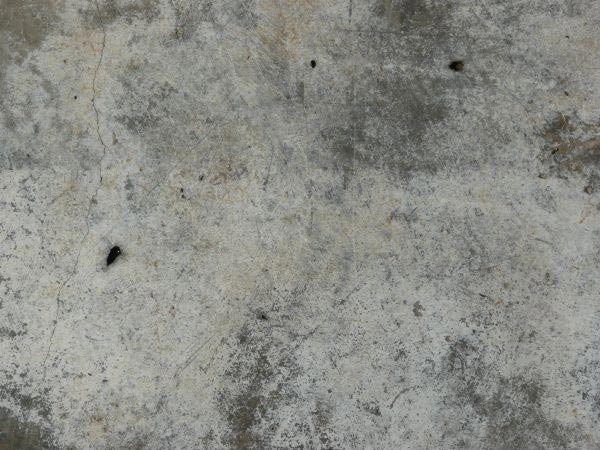
THE FLOOR PREP MACHINE FROM HOME DEPOT DID A GREAT JOB, OIL STAINS WERE CLEANED WITH LIQUID TIDE AND MURIATIC ACID
2B. If using the epoxy flooring primer mix 1/2 gallon of A & 1/2 gallon of B and roll onto floor. Repeat until done. Allow primer to dry aprox. 4-5 hrs(dry to the touch) but no more than 20 hrs. After 20 hrs lightly sand with 100 grit to rough up. I
Priming is optional and not required, even though the Armor Chip epoxy is self priming it's always a good idea to prime your floor. Our primer is not really a primer in the typical sense. It's actually a high performance epoxy that we thin a bit so it can soak into the open pores of your slab and lock in. It will outperform 95% of epoxies sold as primary floor coatings.
If you need to stretch your coverage a bit you should prime, if your floor is old in poorer condition you should prime, if you're going over an existing coating you need to prime with our Bonding Primer or our Instant No Prep Primer, if you have limited time and don't want to etch or grind use the No Prep Instant Primer. If you have any questions on primers please email or call us.
3. For the epoxy mix the contents of each individual can of the two part epoxy and then mix the two parts together at a 2 parts A to 1 part B ratio. Our new epoxy jugs have calibrated measurements on each side to get accurate amounts of each part of epoxy (2:1 ratio). Pour 80 ounces of A and 40 ounces of B into the supplied 6 gallon bucket and mix thoroughly for 3-4 minutes. DO NOT mix all the garage floor epoxy at once, this is not like store bought epoxy paints that have a pot life of up to 8 hours. Armor Granite garage floor epoxy is pure Military Spec epoxy that works on 100% catalytic reaction so the more you mix the more reaction you get. Armor Granite has a pot life of about 45 minutes. If you mix all the epoxy at once you will have a bucket of concrete in about five minutes.
We recommend doing your floor in 3-4 batches per kit, the smaller batches will allow you to apply the floor epoxy and chips without rushing and still have plenty of work time left over as a safety margin. Apply a bead of the mixed base color coat from the container in a left to right direction directly to the floor do not use a roller pan. Spread evenly over a 4-5 ft wide strip(you can do much larger sections if purchasing the optional spiked soles) with supplied notched squeegee. Then roller over to smoothen. Armor Granite Garage Floor Epoxy will automatically be at the proper thickness. Don't worry about the epoxy drying on the roller or squeegee, when you mix the next batch up it will reactivate the epoxy for another 45 minutes of pot life.
4. While the floor epoxy is wet, apply the supplied color chips by walking in the wet epoxy and simply tossing them slightly up into the air and at a 45 degree angle away from you so that they freely rain down onto the epoxy in an even pattern. You have 18lbs of color flakes to achieve the look your eye thinks is best. You can use as much of the flakes as you want without worrying about running out. Avoid tossing too many flakes at a time so that you don't wind up with piles of flakes which will spoil the look of your new floor. Tossing a little at a time is best. Leave the last 6 inches of the epoxy without flakes. You will overlap the epoxy from the next section onto this area and then apply the chips. All the sections will blend together to form a single monolithic seamless finished coating. Using the spiked soles you can see an alternate method a customer shared with us for spreading the flakes that works amazingly well at bottom of this page. It really just resulted in the perfect color pattern, we couldn't do it better ourselves!
5. Once you have completed the first section repeat steps 3 & 4 until done. Note: After the first section you may do larger areas as you get comfortable working with the epoxy. You should be done painting and applying chips in about 2 hrs per kit. Use Xylene for any clean ups(available at Home Depot or Lowes). Clean up any spills or splatters while epoxy is wet, once dry the only way to remove the epoxy is via grinding.
6. Let epoxy & chips dry to the touch, usually in approximately 5-6 hrs, you can let the epoxy cure overnight also. Once dry to the touch sweep the floor good with a stiff shop broom or shovel with plastic edge to remove any loose chips or any chips that are sticking straight up. Then apply the clear topcoat to seal in the chips and magnify the beautiful high gloss finish. The chips themselves give the floor some texture but we recommend you use the nonslip additive supplied for added traction, mix it right into the third final clear coat. Allow first coat to dry to the touch before applying second coat and the same for the third coat. Clear coat dries to a touch/walk on, in about 2 hrs(you can move all your stuff back in at that point). If you are using the upgraded Military Topcoat you only have to do one coat. Apply the Military Topcoat as soon as epoxy is dry to the touch or first thing the next morning for best results. Military Topcoat dries to the touch in 5-6 hrs to walk on. Let either topcoat cure for 36-72 hrs before driving on it. That's it!
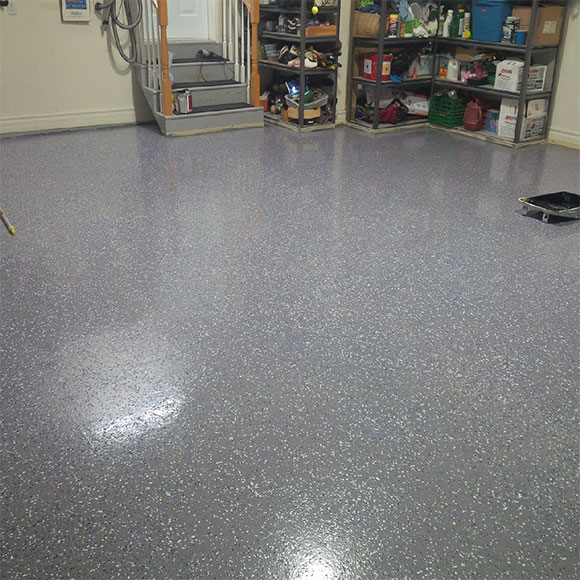
Easy to apply with showroom finish and unmatched durability. Stain proof, mold & mildew proof, water proof, resistant to all vehicle fluids and chemicals. Hot tire pickup proof.
Each kit contains the following:
2 gallons extra thick epoxy, Part A (your choice color)mixed in a 2:1 ratio with one gallon of Part B.(Thicker version of Armor Chip)
18 lbs of colored chips(8lbs in Armor Chip)Heavy Duty clear fortified topcoat for 3 coats(2 coats for Armor Chip).
12" Squeegee for spreading epoxy at proper thickness
Etching Solution
Neutralizing powder to bring slab back to the proper PH
4-9" professional epoxy rollers
Power Mixing Paddle
Gloves and cut in brush.
Spiked Soles
Clear non-skid additive
Complete instructions
The 2200 sf Kit contains the following:
8 gallons extra thick epoxy, Part A (your choice of color)mix in a 2:1 ratio Part B.(Thicker version of Armor Chip)
4 gallon epoxy activator/hardener, Part B.40 lbs of colored chips
12 gals. of crystal clear fortified topcoat for 3 coats(2 coats for Armor Chip). Or 5 Gallons of the Military Grade Topcoat for one super hard/durable coat.
Etching Solution & Neutralizing powder
Upgraded 18" Notched Squeegee for spreading epoxy at proper thickness
Upgraded 18" professional rollers & frames
3-Power Mixing Paddle
Gloves and cut in brush.
Spiked Soles
5-Clear grip non-skid additive
FREE SHIPPING
Complete instructions
Why are ArmorGarage Epoxy better than the other epoxy kits?
All our epoxy coatings are manufactured by us using online top of the line materials. This results in a much higher quality finished product that is thicker, 10 times harder, last up to 10 times longer and look 10 times better when you're done. Contractor and Franchise company products cannot measure up to this level of quality nor can big box store offerings.
Why does Armor Granite Garage Epoxy cost more than other epoxy kits?
As mentioned above it starts with the quality of the product and when you calculate everything you get with our complete packages and take into consideration the years of useful life of the product our epoxy flooring systems are by far dollar for dollar the least expensive on the market. Also with Big Box brands and other bargain type epoxies you have to grind and start over as soon as the floor gets scratched, starts to wear out or starts to peel up which happens a lot sooner then you think with those types of epoxies.
With ArmorGarage your epoxy floor will last 15-20 years before it needs a facelift. Then all you have to do is roll on a new layer of topcoat and your floor comes right back to new for the next couple of decades of service!
Bargain epoxy coatings are never a bargain! Plus your Armor Granite floor will have a real life granite look to it unlike most flake floors that are blotchy and or look like they have a case of the Measels.
What is the shelf life of the epoxy and topcoat?
If you're not sure exactly when you will be doing your floor there's no need to worry. ArmorGarage kits have a one year shelf life for the epoxy and standard topcoat and 6 months for the military grade topcoat.
Do I Have To Etch My Floor?
Yes, the purpose of etching is to get the floor clean so there's nothing between your concrete and the epoxy. More importantly etching opens millions of tiny pores in your concrete. Our epoxy is designed to flow into those pores and expand. Locking and binding the epoxy to your concrete making it virtually impossible to come off. The issue with most other paints and coatings is they either just sit on the surface and or they don't expand into your concrete which guarantees a failure in a short period of time. Armor Granite is Hot Tire Proof!
Do I need to etch if I grind the floor and what type of grinder do you recommend?
You don't have to etch if you grind your floor. Most floors can be prepped with the Floor Prep Machine you can rent from Home Depot. It's a very easy machine to use, its basically a floor buffer with diamond brushes. If available also get the Vac attachment, this will reduce the amount of dust you need to clean up. If renting a grinder from a tool rental store get the biggest grinder you can handle and again get the Vac attachment. Also always ask for new bits and try to get 25-30 grit bits.
Do I have to etch my new concrete?
Yes! New concrete should always be etched twice to remove curing residues. Old and very dirty floors should be etched twice as well as floors that were power trowelled very smooth. The objective is to get the pores of the concrete opened so that the epoxy locks into those open pores. Our Second Etch Option is great for doing your second etching.
Will The Floor Be Slippery?
All our epoxy kits come with nonslip additive as standard that you add into the final topcoat.
How do I order different color chips than what's standard with your kits and why don't you have a floor simulator?
In the "Custom Order Note Box simply list up to 5 colors that you choose from the Flake Color Chart located on the Color Chart Tab page. There is no extra charge for custom colors and you can order the flakes to ship separately instead of mixed so you can experiment with different color ratios. Plus ArmorGarage has a Color Satisfaction Guarantee. If your not happy with the colors of the flakes when you receive them will replace them with another set of your choosing at no cost! As for why we don't have a simulator, we feel the results you see don't match reality and more often than not it leads to disappointment. Best to look at our customer pictures for the best representations.
My floor is close to or slightly larger than the 550sf coverage of the Armor Granite Kit. What do I do?
If your floor is less than a 125 sf larger(under 700sf) than we recommend that you purchase the Epoxy Flooring Primer. This will do two things. It will extend the coverage of the epoxy and add another layer of coating which is never a bad thing. If your floor is more than 700 sf larger than purchase the Add On Half Kit
How long do I need to wait before coating a new slab and do I still need to etch it?
New slabs need to cure for 28 days minimum and they need to be etched or grinded. Grinding is preferred if the slap was power troweled very smooth. The Home Depot Floor Prep Machine does a great job to profile new smooth floors.
How long do I need to let primer dry?
The Primer will dry in 6-8hrs depending on temperature and humidity conditions. Cooler temperatures will require 8-12 hours. Once the primer is dry to the touch you can apply the epoxy. Do not let more than 20 hrs pass before applying the epoxy. Otherwise you will need to lightly sand the primer with 120 grit to rough up the surface.
I do a lot of work in my garage how good will this be for this type of application?
Armor Granite floors are extremely high rolling & static load resistant, high impact resistant, acid and chemical resistant, road salt resistant and even resistant to harsh cleaning solvents like bake and carb cleaners. We recommend the use of the military grade topcoat for the best protection, this will give you commercial auto service shop level protection. Jack stands, Engine hoists and large tool chests are child's play for our floors.
Should I fill in the saw cuts or expansion joints?
No we recommend that you do not. The last thing you want is to have a crack done the middle of your new high gloss epoxy floor. Once you've applied Armor Granite the saw cuts will add dimension to the floor and they will look like big slabs of stone. If your floor is older than 10 years it's probably ok to fill them since the floor is done settling. But you never know for sure what can happen.
Can I extend the epoxy out past the Garage door?
No we don't recommend that. The epoxy should end at the inside or outside edge of the garage door.
When should I fill in the cracks and will the epoxy fill the cracks in?
If the cracks are surface hairline cracks the epoxy will cover them. If the cracks are deep they may run the depth of the slab in which case you will be consuming a lot of expensive epoxy to fill them. Better to use either the Crack & Joint Compound or the Instant Crack Filler. Crack & Joint Compound goes in before the cleaning and etching, the Instant Crack Filler goes in after.
How long do I need to let the floor dry after etching?
It's a matter of temperature and humidity, 24hrs is usually sufficient but you should let it dry for 48 hrs to be sure all the moisture has dried out of the floor.
When can I put the topcoat down?
As soon as the epoxy dries to the touch, usually the next morning.
When can I put my stuff back in my garage?
The topcoat will dry to the touch in 4-5 hours at which time you can walk on it and put your stuff back in, keep the car and other heavy rolling objects off for 3-4 days.
Should I get the Military Topcoat?
We always recommend the Military Topcoat. It's less work since you do only one coat and it's a much harder finish that will keep your floor looking new for 15-20 years even in harsh climates with lots of road salts. If you have smaller vehicles that only go in and out of the garage a few times a day and or you live in a mild climate then you're fine with the standard topcoat. Our standard topcoat is very heavy duty and outperforms 99% of all other topcoats that are advertised as heavy duty. Next to properly prepping the floor the topcoat is the most important thing.
I had an accident and scratched my floor, what can I do?
While your ArmorGarage Armor Granite epoxy floor is hard to scratch it's easy to repair. Scratches are easily fixed, see the Care & Maintenance page for the answers.
I've had my floor for many years and it's finally starting to wear out, what do I do?
Easy just give a light sanding and roll on a new topcoat, that will bring the floor right back to new. The epoxy and chips should last indefinitely.
How long does this process take?
In actual hours it's not much at all but since you have dry times you should allow 3 days to get the job done. If you grind you can save a day or two since you don't have to wait for the floor to dry. Total working hours should be no more than 5-6 hours.
Can I paint my curbs?
You can coat your curbs whether they are concrete or block. Just allow a little more material when doing block curbs since they absorb more material. You can also do wood molding and steps in your garage.
First some tips on ordering. If your floor is a little oversized, lets say 600sf, it's better to order the primer rather than the Add On Half Kit, a primer extends the coverage of the epoxy because it's now being applied over a sealed surface rather than porous concrete. You'll get a thicker overall coating with even better adhesion which is why its never a bad idea to use a primer in any case. But you must order the larger size primer, otherwise if you order the standard size primer you will run short or have to stretch it out so thin that you defeat the purpose of the primer. Same goes for the Military Topcoat, order the larger size if using a primer on your oversized floor to increase the coverage of the epoxy. Do not use the standard size topcoat on an oversized floor, you'll get less durability. This is just another way we look out for you, other brands offer primer for additional coverage of their epoxy but don't offer a larger sized primer or topcoat for your oversized floor. That makes no sense since if you have a bigger floor you'll need more primer and more topcoat to do the job properly. The few extra dollars to do it right is well worth it to not have to do your floor over again later on.
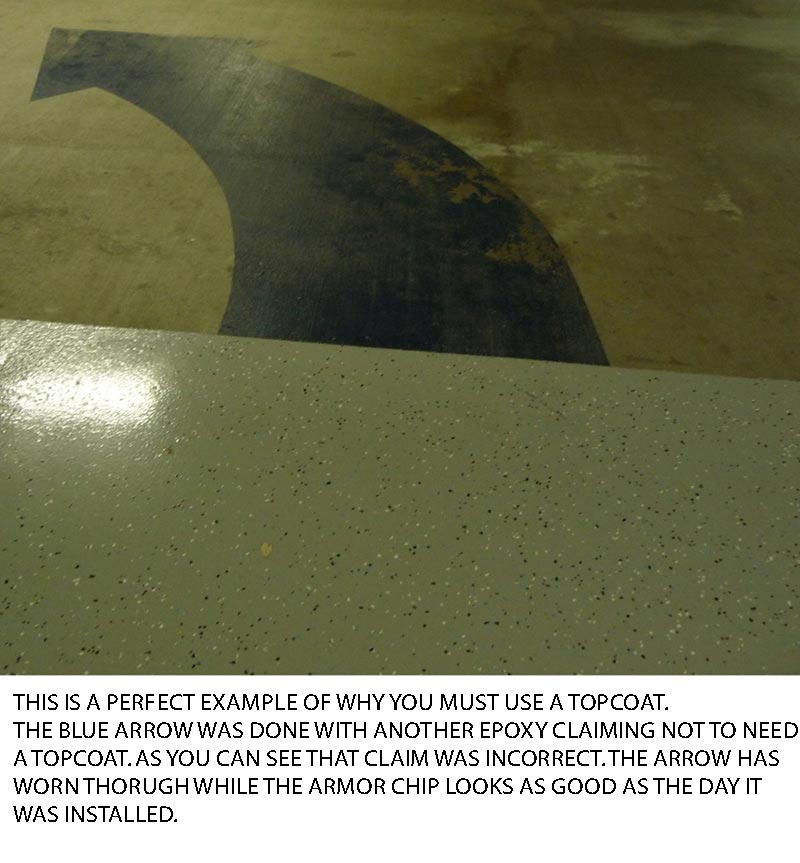
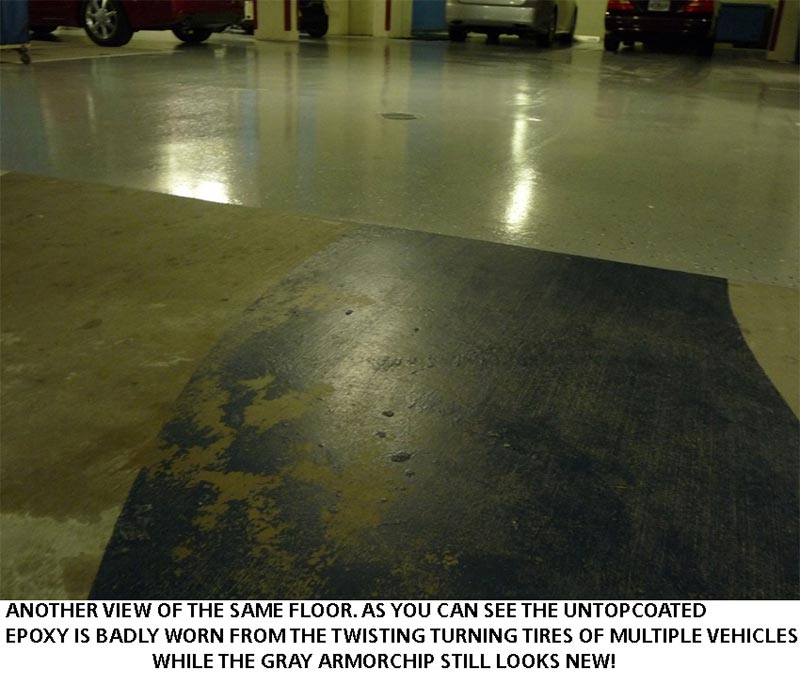
If you previously coated your garage floor with a water-based floor epoxy coating or any other type of epoxy without a true urethane fortified topcoat that's under 10 mils thick, it's more than likely your floor already resembles the worn out Blue Arrow in the images below.
The biggest mistake you can make is not using a topcoat! Did you know that ALL solids based epoxy coatings are NOT UV stable? Without a polyurethane epoxy topcoat, ALL solids based epoxies will yellow and lose their gloss. Real Topcoats are much more expensive to manufacture and have a much harder finish than epoxies! Moreover, any topcoat that does not have a 20mg or less abrasion rating will fade and wear out prematurely—that's an indisputable epoxy fact. This is especially true if a company's topcoat is just a clear version of their epoxy. This offers no additional abrasion or UV protection than the epoxy without a clear coat. Simply adding in a UV additive does not make an epoxy a topcoat! In other words, it's a waste of time and money to apply a clear epoxy over your color epoxy with chips. To be a real Topcoat it must be polyurethane fortified and have an Abrasion Rating LESS THAN the epoxy it's coating! Our standard topcoat as measured by the industry standard Taber CS-17 abrasion loss test has an abrasion loss rating of 20mg and the Military Grade option has an amazing 4mg loss rating(the lower the better), no other topcoat comes close. Typical epoxy abrasion loss ratings are 24-40mgs or higher which makes them much much softer our Armor Granite finish. This means they will wear out faster. To sum it up polyurethane is to epoxy what rebar is to concrete. Leave out either of those items and both epoxy and concrete will fail, it's just a matter of when.
 If you've got to us too late CLICK HERE to learn how to coat over an existing epoxy coating or even regular floor paint with one of our epoxy kits.


