
HOW TO AVOID AN EPOXY FLOORING FAILURE
Your Insurance Policy Against Costly Epoxy Floor Failure
If you're considering an epoxy floor coating, there are critical things you must understand before you begin. Failing to understand them will result in a floor that's stained, peeling, and prematurely destroyed.
★ Read This Before You Buy Any EpoxyWhy Most Epoxy Floors Fail
Epoxy floor failures are not random. They are almost always caused by one or more of four things: using a low-quality or thin-build epoxy, using a good quality epoxy in the wrong application, poor surface preparation, or defective concrete that was not addressed before coating. Any one of these — or any combination — results in a guaranteed floor failure.
Our epoxy coatings are engineered to be impervious to the conditions that destroyed the floor below — but only when the correct epoxy system with the right options is chosen and applied to a properly prepared concrete slab. For example, you can't put down a standard garage coating kit and then use your garage as a repair shop or park dual pickups, ATVs, and tractors on it without using a primer and the military topcoat. That's a misapplication of the product — not a product failure.
This garage floor is only 14 months old. The professional installer told the customer his epoxy was "10X stronger than standard epoxies." This floor required a full diamond grind back to bare slab and was recoated with our Armor Granite Pattern 2 Garage Epoxy flooring kit.
Epoxy Myths That Lead To Floor Failures
Epoxy formulations vary wildly in material quality, solids content, adhesion strength, and abrasion resistance. Most failures begin with low-grade products that were never designed for garage floor use or for anything other than light passenger vehicle parking in mild climates.
Not all products labeled 100% solids are truly 100% solids by weight and volume — those that aren't are what we call "fake 100% solids." Even full 100% solids epoxies vary in quality depending on the grade of materials used. The failed floor above was a 100% solids epoxy that got like that in just over a year. We use our 97% high-solids epoxy as a primer; most high-solids epoxies are less than 97%. We would never use our high-solids epoxy as the base layer for any of our floors, and neither should you.
Despite marketing claims, many polyaspartic and polyurea coatings have higher abrasion loss ratings than high-quality epoxy and polyurethane systems. We make and sell polyaspartics and polyureas and only use them in the right applications. Specifications matter more than buzzwords.
When You Should NOT Epoxy Your Floor: If your floor has uncontrolled moisture vapor, severely deteriorated concrete, or extreme operational conditions that cannot be corrected, epoxy may fail regardless of product quality. In these cases, garage tiles or doing nothing may be a better long-term solution. We had a customer who manufactured abrasive ceramic beads for oil drilling — every coating they tried got ground to dust within months. We advised them to install our interlocking tiles instead, and it worked perfectly.
Choosing & Using The Right Epoxy Floor Coating
Choosing the right epoxy flooring system for your specific application is the first and most important step — and we've made it easy. Visit our Interactive Epoxy Floor Selector Tool to select a coating properly rated for your traffic level, vehicle type, and usage conditions.
Using a product that is not up to the task — in quality, thickness, or performance rating — is a guaranteed failure that often requires diamond grinding and a complete redo. Very costly in both money and the heartache of living with an ugly floor.
Proper Surface Preparation
Using the right epoxy on a properly prepared slab is 50% of the battle — applying the right product the right way is the other half. We provide full, detailed, step-by-step instructions on how to prep and coat your floor correctly so your epoxy bonds permanently instead of peeling prematurely on our How To Prep & Epoxy Paint Your Floor The Right Way page. Also see this very informative article written by one of our customers: ArmorGarage Epoxy Application Suggestions And Lessons Learned.
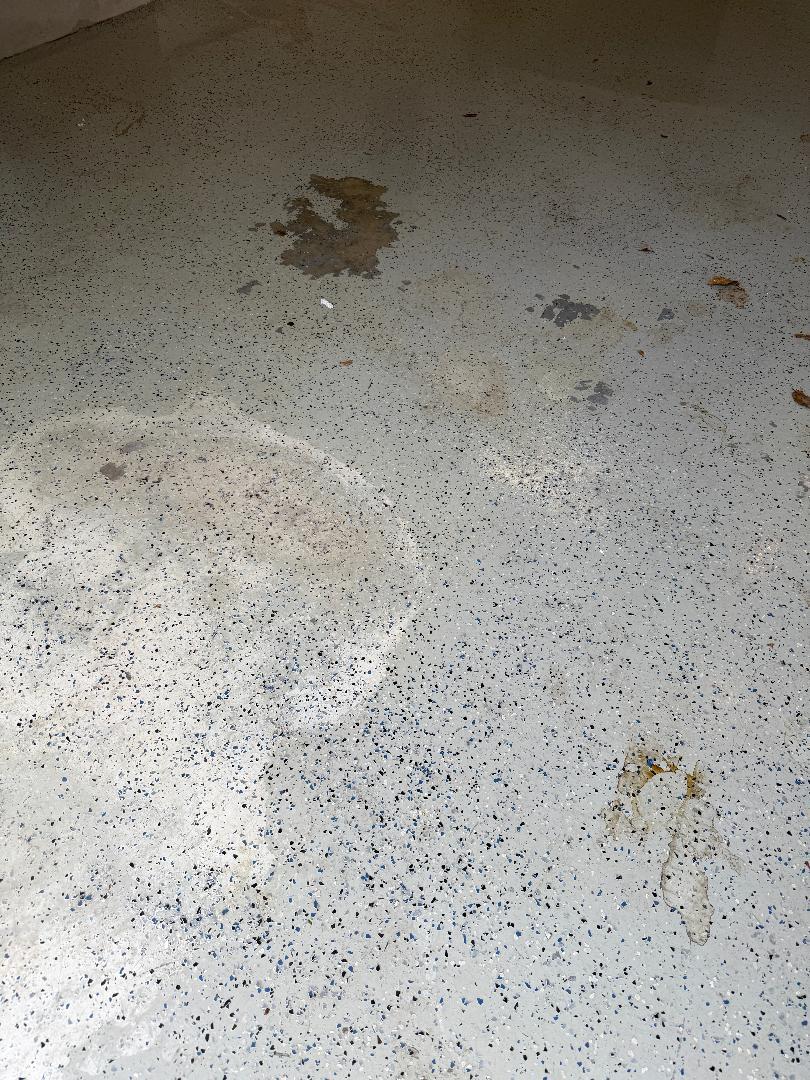
Here's what your floor should look like before coating it with any paint or epoxy.
These floors are NOT epoxy-ready! The reason for this information and other details on our website is so that you only do your floor once.


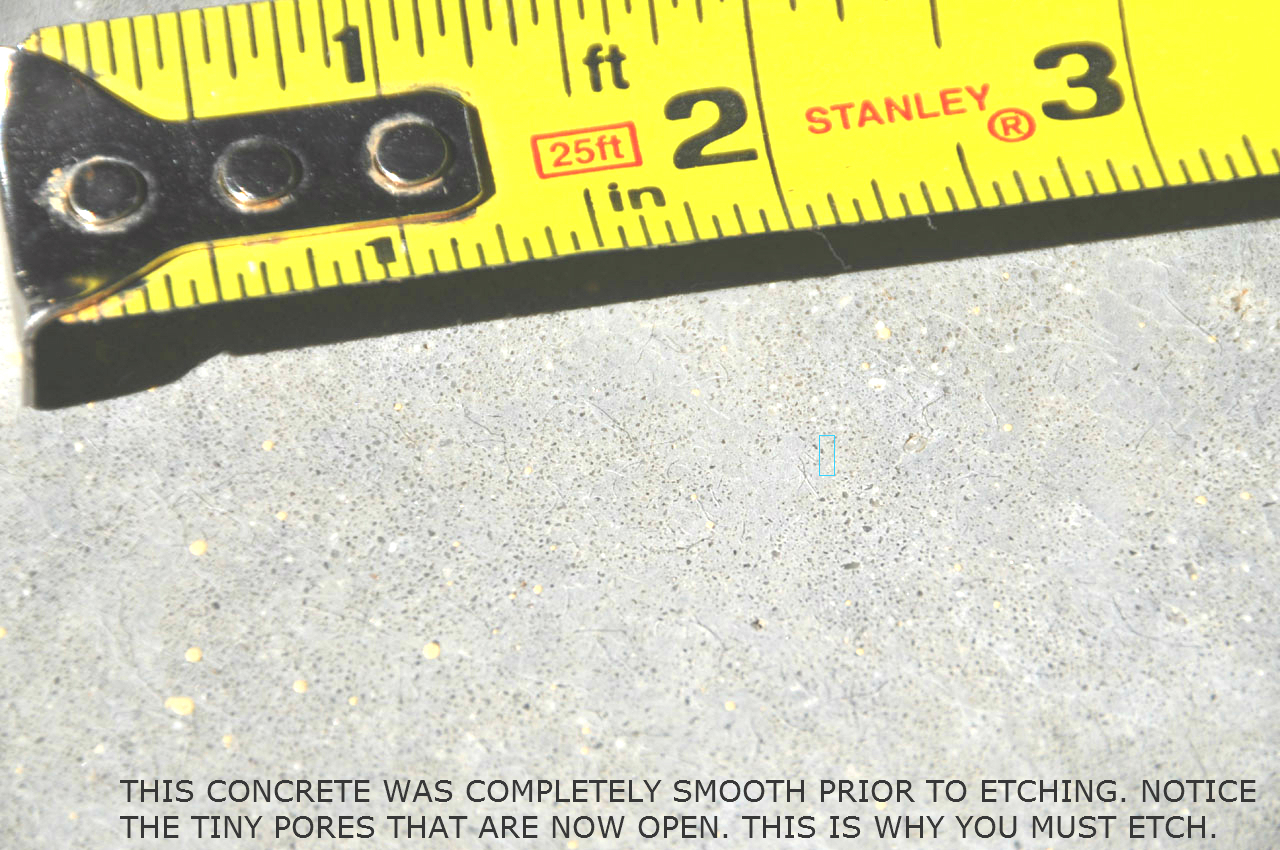
YOUR FLOOR MUST LOOK LIKE THIS — both in cleanliness and open pores:
Epoxy Quality Matters Just As Much As Proper Prep
With epoxy coatings, you truly get what you pay for. Most common garage floor "epoxies" are water-based products from big-box stores, high-solids epoxies incorrectly sold as base layers, "fake" 100% solids that aren't 100% by weight and volume, low-grade imported materials, or paints with additives to legally label them as epoxies. Most apply at 2–4 mils thick — essentially the same as wall paint. Paint belongs on walls, not floors.
A proper epoxy flooring system should be: 14–25 mils thick, a true high-grade 100% solids epoxy base coat, and finished with a high-performance polyurethane topcoat with abrasion resistance rated for the traffic on the floor.
The industry benchmark for durability is the Taber CS-17 abrasion loss test. It measures material loss in milligrams. Lower loss equals higher durability.
This is why ArmorGarage floors still look new after 15–20 years.
⚠️ Abrasion loss is exponential, similar to the Richter scale. One or two milligrams makes a massive difference. Ignore hype — read the technical data. Every epoxy floor looks great when you first apply it, but it's how long it stays looking that way that counts. That 14-month-old floor looked great in pictures right after the job was done!
When Failures Aren't The Epoxy's Fault
Once a floor is properly prepped and a high-quality epoxy is used, the only remaining causes of failure are incorrect mixing ratios, moisture vapor issues, or weak, chalky, or compromised concrete.
We batch-test every epoxy for adhesion and hardness. In pull tests, our epoxy and primers remove the top layer of concrete — proving the bond exceeds the concrete's own strength. In moisture or soft-concrete scenarios, the concrete fails, not the epoxy. This is why we strongly recommend using a primer when the slab shows any signs of compromise. Notice in the images below that the concrete is stuck to the underside of the epoxy — this is a concrete failure, not an epoxy failure.


Here's another type of concrete to look out for — a pea gravel slab. See all those black spots? They're pea gravel or river stones, which are very smooth and nonporous, making them extremely difficult to get anything to adhere to. If you have a slab like this, you need to use the Bonding Primer first. These floors are not very common — they're the result of the contractor cutting corners when pouring the floor. As long as you know what to look for, it's not a problem.

Garage Floors Demand The Toughest Coatings
If you park large vehicles, do mechanical work, or use your garage as a workspace, we strongly recommend our Military Grade Topcoat and a primer. Garages may seem like low-traffic spaces, but in reality, they are some of the harshest environments for floor coatings. Even slight turns of the wheel pulling in and out mean your tires are constantly twisting — with the dead weight of your car on them — grinding wear spots into the coating. Not mention the fact that when you do all the above after driving around, your tires get as hot as 180 degrees!
This puts enormous stress on the coating and can actually reliquify weak thin coatings so that when your tires cool back down, your floor coating is glued to your tires, resulting in the epoxy being torn off the floor as you pull back out.
Without high epoxy adhesion strength and a topcoat with excellent abrasion resistance, an epoxy paint or coating will wear through, peel, or delaminate very quickly. For maximum durability, we also strongly recommend using our primer for added adhesion — even though our epoxies are self-priming. If the budget allows, using a primer is never a bad idea, especially in garages.
Check Your Concrete Before You Buy
Before selecting any epoxy system, evaluate the condition of your slab. Perform a simple scratch test: if you can easily remove concrete by lightly scratching the surface, the slab is weak or compromised.
For weak or compromised slabs: Run a floor prep machine over the surface to remove weak concrete (available at Home Depot or local rental shops). For floors in very bad condition, use a commercial-grade diamond grinder. Follow up with a primer to soak into the slab and strengthen it.
Moisture Testing Is Critical
Moisture is one of the most common causes of garage floor coating failure. Do this test before coating:
Simple Moisture Test: Tape down a 3–4 ft square of plastic using high-quality duct tape. Seal 100% of the perimeter. Leave it in place for 2–3 days, then check for moisture underneath.
No moisture: You're good to go.
Moisture present: Contact us for proper prep recommendations before coating.
Many garages built in the 1970s or earlier do not have a vapor barrier under the slab. Almost all newer homes have vapor barriers. If you live in a high water table area, moisture may be unavoidable — in those cases, you may be better off using garage floor tiles or a garage mat instead of an epoxy coating.
Coating Over An Existing Paint Or Epoxy
With our Bonding Primer you can lightly sand the previous coating and apply any of our epoxy kits over it. Critical things to do and know before doing so:
If the existing coating is a low-quality product and is peeling off the majority of the floor, we recommend a full removal. If the floor has peeled off or worn off in 10% or less of the floor, then it's OK to coat over it.
Pull Test (Strongly Recommended): Take a sharp utility knife and cut 1/4" squares in a grid pattern over a 12" x 12" area. Firmly apply good duct tape over the entire section and then rip it off. If more than 10–15% of the squares come off, don't coat over it. Our epoxy can only stick to your existing coating — so if that comes loose, our epoxy comes loose with it.
We offer four primary epoxy garage floor kits designed for different vehicle traffic levels, usage conditions, and appearance goals. Don't guess when doing an epoxy floor project — see our Epoxy FAQ section for expert answers, or contact us with any questions.