Complete Do It Yourself Metallic Epoxy Floor Kit
FREE SHIPPING!
What's Included
We provide not only the most feature rich metallic epoxy floor kits, but also the best equipped metallic epoxy flooring kits which include:
- 3 gallons of our Ultra Black high performance epoxy primer (better than competition's actual epoxy)
- Metallic pigment powder of your color choice
- 6 gallons high build clear 100% military grade epoxy, provides deep luster marble finish
- Military grade clear topcoat for the longest lasting high gloss finish
- 4 lint free epoxy rollers
- 1 power mixer
- 1 metallic magic application squeegee (not just a standard epoxy squeegee—makes achieving special effects easier)
- 1 spike soles (very important to use) and acid etching solution with neutralizing powder for proper floor prep
- Mixing sticks and gloves
- Clear and easy to follow instructions
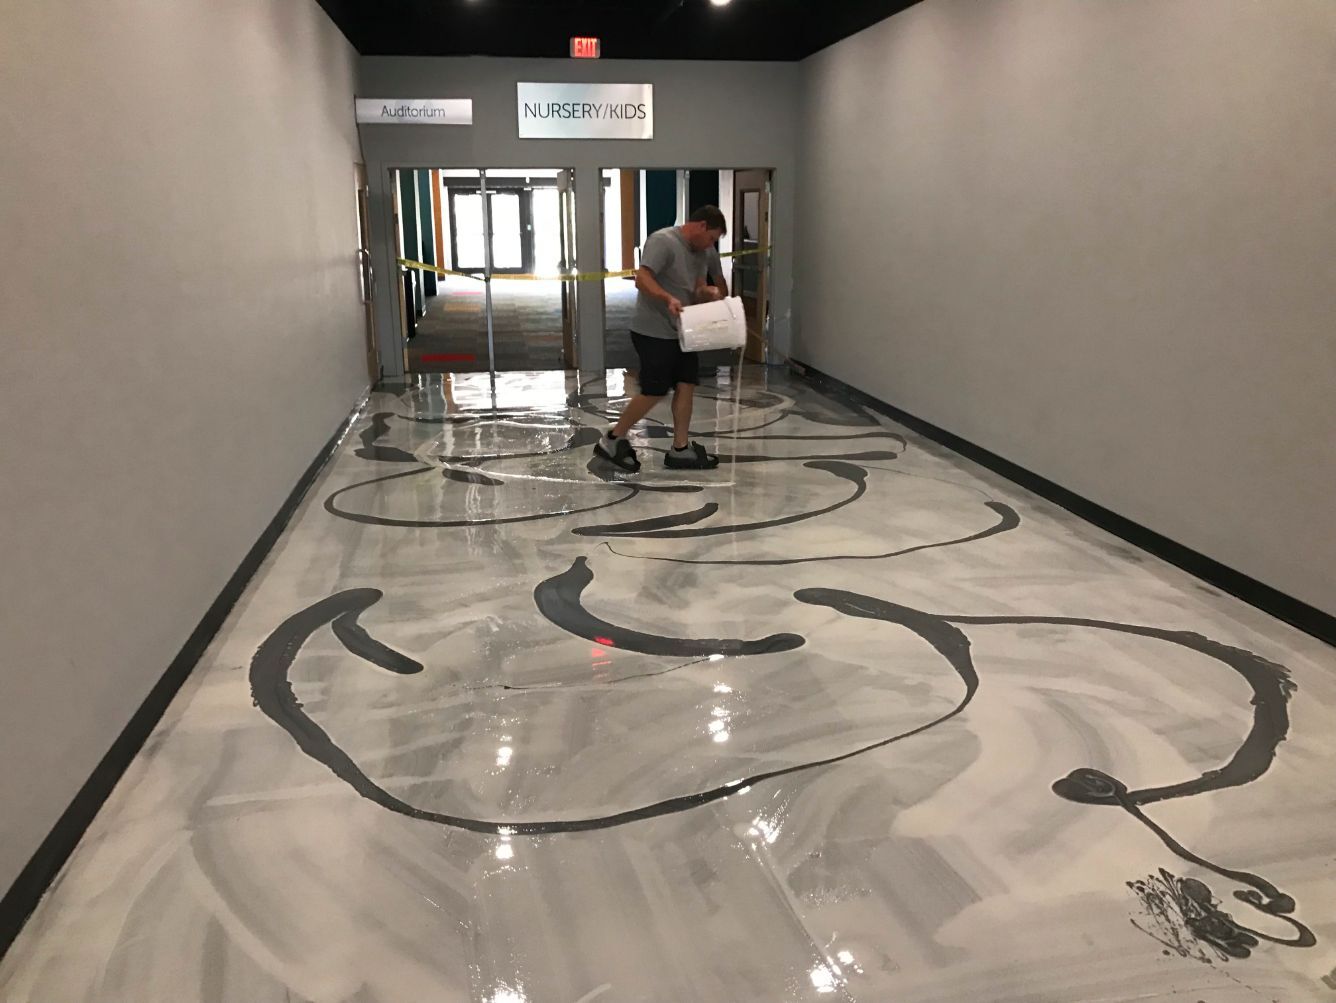
Transform your plain concrete floors into a 3D, luxurious marble-like finish. Create durable epoxy floors with an unlimited variety of patterns and colors. No two floors will ever be alike. Even when using the same metallic pigment powders, no two floors will come out exactly the same. That’s why the images of our customer floors do not exactly match the color chart colors. For epoxy floor kits with color flake finishes see the Garage Floor Epoxy Page, for a solid color epoxy floor finish see the Commercial Epoxy Floor Page.
What's the Difference
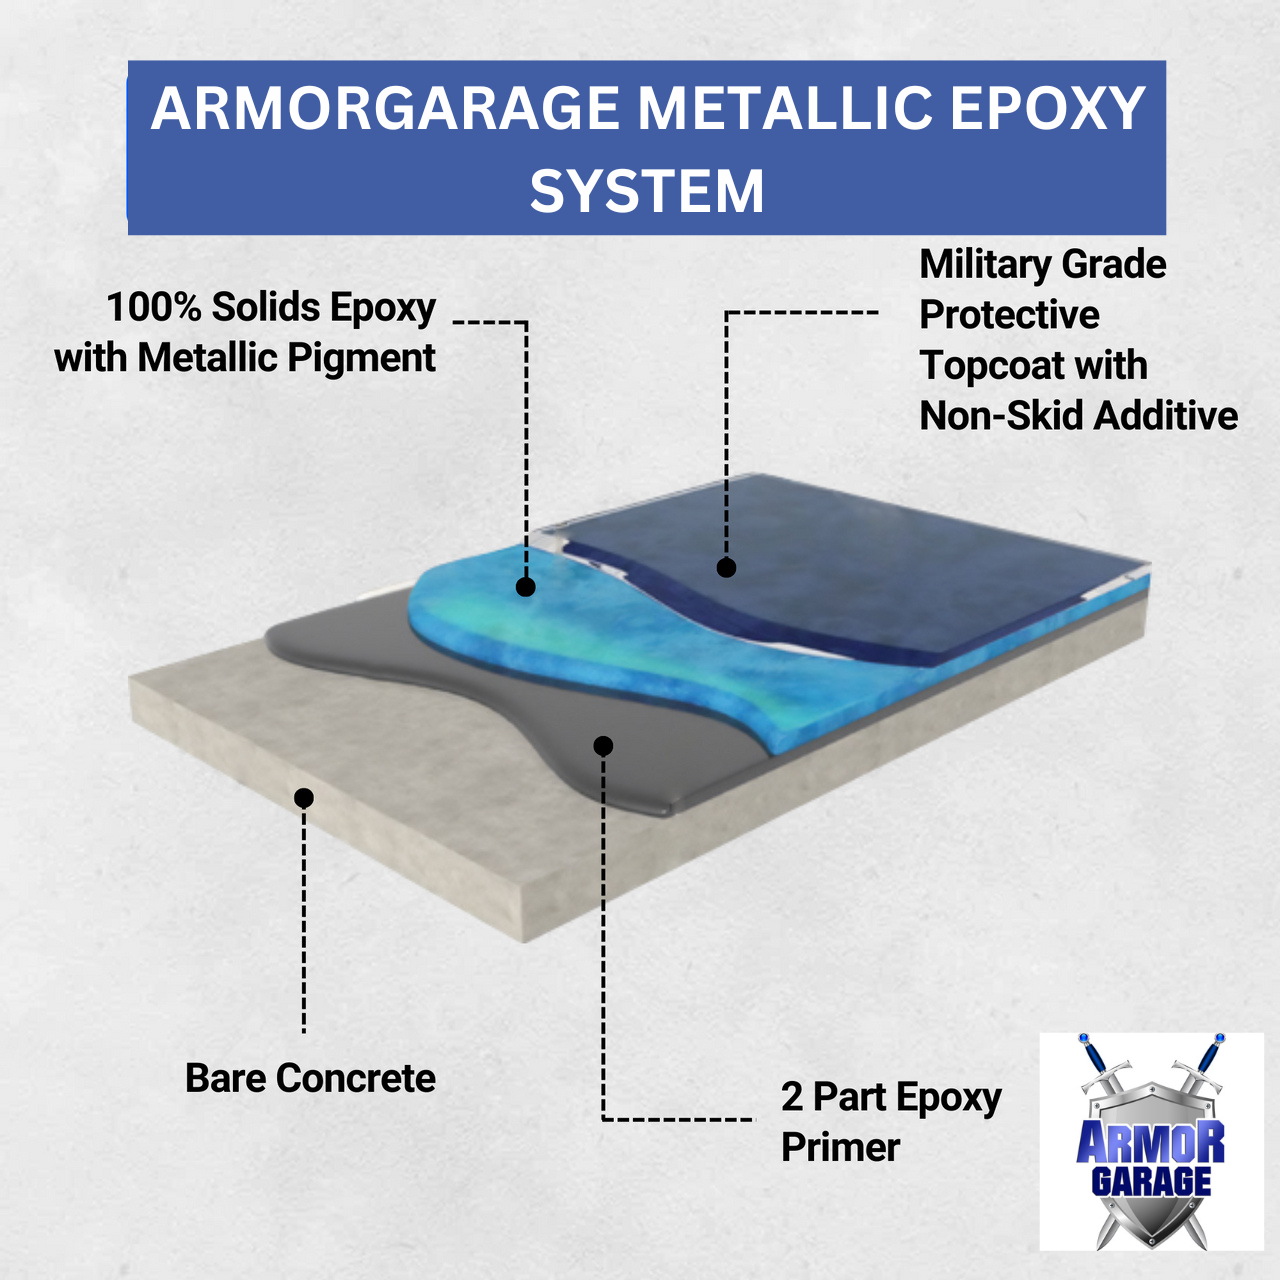
First and foremost, it’s our customers. We’d like to thank them all for making our product look fantastic and sending these great photos of your projects. ArmorGarage Metallic Epoxy Floor Coating has that 3D look because of our three distinct layers of epoxy. We start off with our high-performance epoxy primer in black (except for very light colors which require a medium gray). A brilliant black epoxy is much more expensive to produce than other colors, but it provides the best effects for the metallic epoxy look.
We then use our special high build epoxy in clear that you mix the metallic pigments into. Then we finish it off with our best-in-industry military grade topcoat for a 30 mil thick finished floor with an amazing best-in-class 4 mg abrasion loss rating (the lower the rating, the better). That means your gorgeous 3D high-luster floor will stay looking like the day you put it down for many years—unlike competing brands that look good on day 1 and then start to age poorly very quickly. Why is that?
Compare the abrasion ratings and you will see they are 25 mgs and higher. That is exponentially less durable than 4 mgs. Make no mistake—abrasion is what dulls and wears your floor out, so it’s the most important factor when considering any epoxy floor coatings.
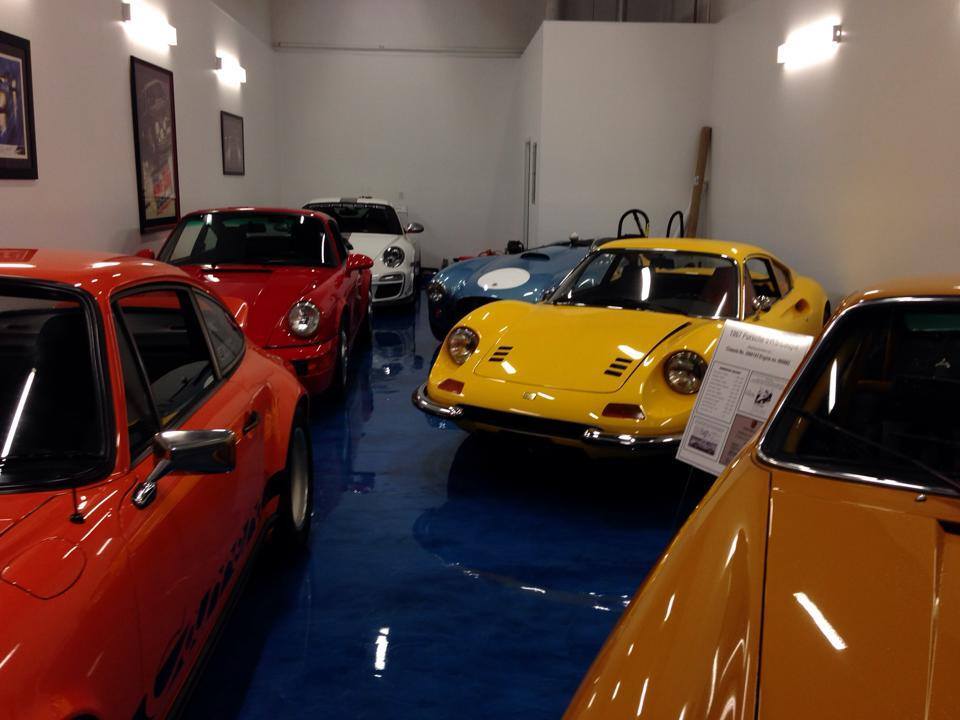
The Color of This Beautiful Floor Is the Ocean
One of a Kind Floors
Metallic floors are very technique and user dependent. That is why they never come out the same. One thing that will be the same is the ArmorGarage quality and durability not found in other brands.
Use any of our standard metallic pigment powder colors or any other brand of metallic pigment of your choice. There are literally hundreds of pigment colors available. We offer the most common pigment colors used that are commercially available. Our metallic epoxy is compatible with all metallic pigments so feel free to mix and match. The main thing to keep in mind is that the most important factor is the quality of the epoxy used. It doesn’t matter which pigments you use—if you use inferior primers, epoxy, and topcoats, you’ll end up with an inferior floor.
Each kit comes with enough metallic powder for one complete color. You can add any additional color you want as an accent color. The only limit is your imagination. To do an accent color, select either the One Spray Accent Color Option or the Two Spray Accent Color Option in the drop-down menu. Then select your accent color(s).
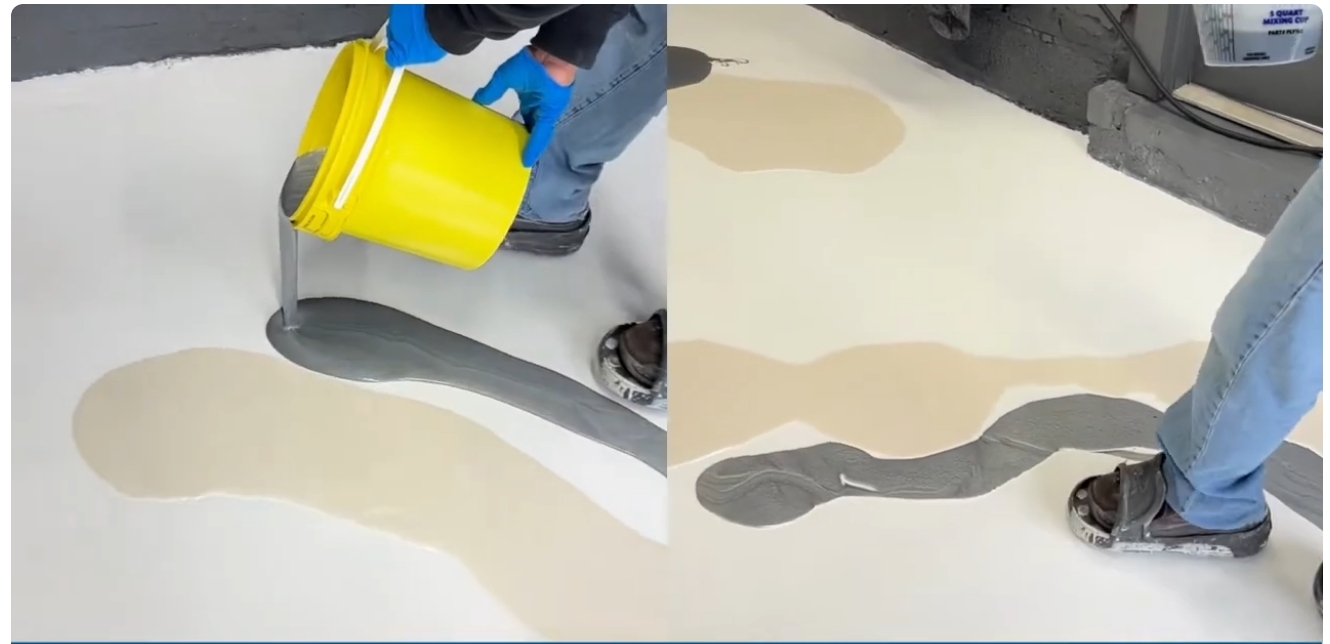
This allows you to spray on additional colors to your main floor color while the epoxy is still wet—giving you the ultimate in customization. See the image below of a second color being applied to the main color. This is done when you want two main colors mixed into one main color. See the Instruction Tab for additional details.
Why ArmorGarage Metallic Epoxy Floors Last the Longest
We use only 100% military grade epoxy and military grade topcoats. We do not use water based or any other kind of epoxies, and we don’t use clear versions of epoxy with just a UV additive and call it a topcoat. Our topcoat results in a 4 mg abrasion rating (the lower the number the better) as opposed to much higher loss ratings from every other brand, which will not keep your floor looking new for very long.
Don’t be fooled by lifetime guarantees—read the fine print. They cover only delamination and only if you do just about the impossible. You may save a few dollars by not choosing an ArmorGarage Metallic Epoxy kit and still get adhesion, but it will dull, yellow, and wear off in short order (not covered by guarantee).
PLEASE NOTE THAT WE DO NOT SHIP NONSLIP WITH THIS KIT AS IT TENDS TO DULL THE METALLIC SHINE AND THEREFORE THE FLOOR WILL BE SLIPPERY WHEN WET. IF NONSLIP IS DESIRED, ORDER ONE INDUSTRIAL NONSLIP UNIT PER KIT. YOU CAN USE A LITTLE LESS THAN A FULL UNIT TO LIMIT THE EFFECT ON THE FINISH AND STILL HAVE SOME GRIP.
Please be sure to read the instructions by clicking on the Instruction Tab. Results and actual color can vary drastically depending on user technique. With metallic epoxy floors there’s no way to actually know what the final finish will look like because it’s different every time. Color variations and final finish will differ from listed images and are not considered a product defect and therefore are not covered under any guarantee. We do not and cannot guarantee any type of final color pattern or finish—each floor is truly one of a kind.
SEE ALL OUR GARAGE FLOOR EPOXY KITS
SEE HOW TO PREP & EPOXY PAINT YOUR GARAGE FLOOR THE RIGHT WAY AND EPOXY BUYER'S COMPARISON GUIDE
Metallic Epoxy Color Chart & Order Guide
Select your main color or colors if ordering multiple kits. You can apply different color kits to achieve whatever custom color you want. Then if you want to add in accents choose your color(s) from the Spray Accent Color Chart. This makes it simple to add in accent effects by just spraying the color onto the Metallic Epoxy while it's still wet. Spray accents are the best choice on smaller floors, on larger floors you can order one 600 SF in one color and another 600 SF kit in a second color plus you can still add in highlight colors via the Spray Colors!


Epoxy Floor Coating Coverage Guide
Coverage will vary according to application technique and floor porosity. Every concrete slab is different and some absorb more product tham others. You can combine 600sf kits and 900 sf kits to best fit your floor size. We always recommend a 15% safety factor when doing a metallic epoxy floor project to ensure you have enough product. Don't try to order to the exact square footage of your floor! You don't want to run short when doing metallic epoxy.
Metallic Epoxy Flooring Application Instructions
FULL PRINTABLE METALLIC INSTRUCTIONS
ArmorGarage Metallic Epoxy System. In addition to our standard floor coating instructions, please see below for additional information to help you achieve excellent results. Be sure to follow both sets of instructions. Metallic epoxy is a three layer system that uses a colored based epoxy primer. Simply mix 1/2 gallon of A and 1/2 gallon of B of the primer (usually black) for 3 minutes on medium speed and roll out like regular paint. Once cured, about 5-7 hours the metallic clear epoxy coat with metallic powder additive gets applied in a decorative fashion to get the ‘look’. Do not go more than 20 hours between primer and epoxy coats.
Once this is cured, then a clear protective topcoat is applied. Use of spiked shoes to walk on the wet epoxy is strongly suggested. Please note that metallic epoxy is a somewhat artistic method of application, so check online videos for some helpful tips and suggestions as to technique. Note that in addition to technique, temperature, application timing, speed of application, color choices, primer color selection, and humidity can all greatly affect final outcome appearance and it is almost impossible to replicate results from project to project due to these variables.
NOTE FOR THE REASON THAT THERE ARE SO MANY VARIABLES TO METALLIC EPOXY APPLICATION, AND THE PROCESS IS VERY TECHNIQUE-DEPENDENT, ARMORGARAGE CANNOT GUARANTEE RESULTS, ‘LOOK’, APPEARANCE, MATCHING TO PHOTOS, OR THE OUTCOME OF A METALLIC EPOXY INSTALLATION. SUCH THINGS AS UNEVEN FINISH, ROLLER MARKS, AND OTHER RESULTS WHICH THE USER MAY NOT BE PLEASED WITH CANNOT BE GUARANTEED BY ARMORGARGE AND ARE NOT COVERED BY OUR WARRANTY.
1. Apply colored primer (usually black or gray) to the floor. Mix per label instructions. Let cure overnight.
2. Add the proper quantity of metallic powder to all of your Part A’s, 4 ounces per gallon. Mix in thoroughly. This step gives you an even Part A to work with. IF YOU PLAN ON USING TWO COLORS OF METALLIC, EVENLY DIVIDE YOUR PART As AND MIX YOUR COLOR POWDERS EVENLY INTO EACH PART A SO YOU HAVE ON HAND THE PRE- COLORED PART A WHICH YOU WILL LATER ON MIX WITH THE PART B.
3. DO NOT MIX WITH PART B YET.
4. Plan the metallic application step by figuring how much epoxy you can mix, apply and achieve your ‘look’ in about 40 minutes. The 100% solids epoxy has 35-45 minute working time, and then it starts to cure and you won’t be able to ‘work’ it after it starts hardening. Mixing up smaller batches of the epoxy and hardener and getting it out of the bucket and onto the floor will give you more time. We don’t recommend to mix more than 1.5 gallons (1 gallon of part A with ½ gallon of part B at a time). The mix ratio is 2 PARTS OF PART A WITH 1 PART OF PART B. You can mix as much or as little at a time as you want to, as long as you hold this 2:1 ratio, and mix A and B together very well. Using clear plastic measuring cups makes it easier to get accurate mix.
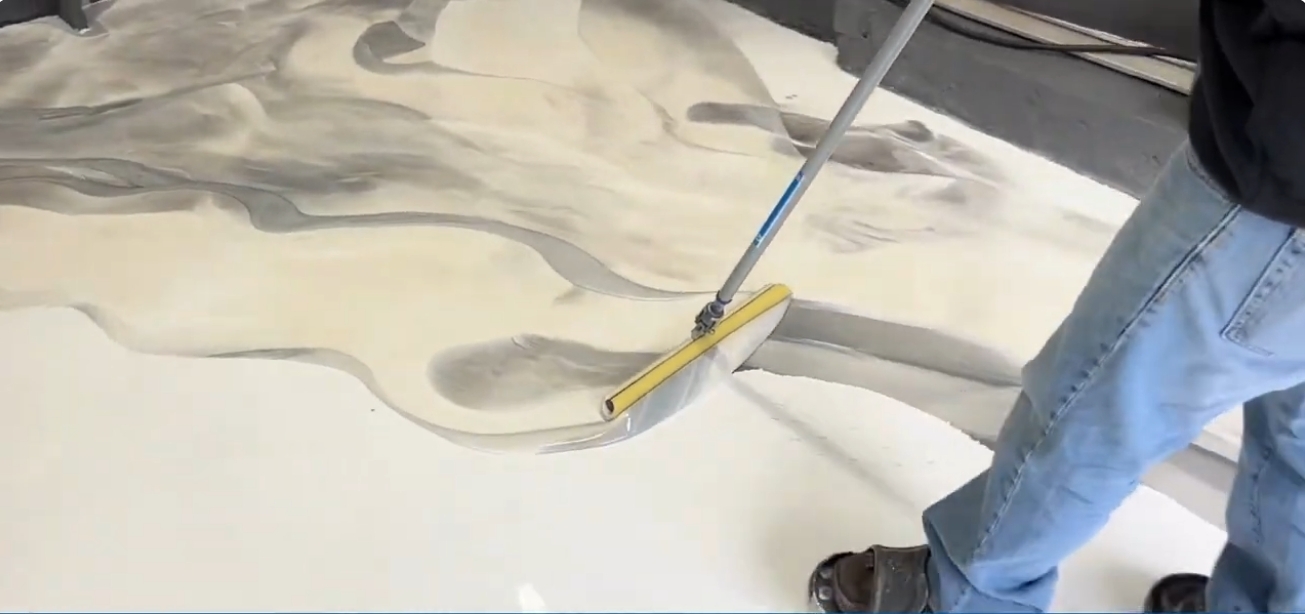
5. Mix your A and B together at the 2:1 ratio. Pour it on the floor in a ribbon left to right. Have your magic squeegee ready to go to spread it out evenly over the primer. Spread epoxy at about 100 sf per gallon rate with squeegee do not over work it. You can slightly twirl the squeegee while spreading. After it's spread, spraying on denatured alcohol from a hand pump sprayer or spray bottle can make the epoxy ‘dance and swirl’, do this after you spread epoxy out.
If you are using multiple metallic pigments, breakdown the Part As into even quatities to match the number of colors you are using, ie: 2 colors two Part As, 3 colors then 3 Part As. For best results mix all the pigments and Part As and let sit overnignt to allow Pigments to fully absorb into the Part As. Then when ready pour each color out in a ribbon from left to right leaving a little space inbetween then using your magic squeegee swirls the colors together as you spread the epoxy out. See images below.
If adding in accents, shake can very well and spray on the accents where desired in the amount desired. Keep can well shaken. You can apply some denatured alcohol to the accent color(s) as well. Please note the difference between using multiple colors is that you will be purchasing an additional kit(s) for each additional color and this will give you a much heavier presence of the additional colors versus applying accent colors.
Get as much of your mixed epoxy on the floor as fast as possible as the floor is cooler and this will slow down the curing process and give you more time to work. Keep mixed epoxy cool and in the shade, out of sun and heat.
6. Once you have achieved the look you want, let the metallic epoxy cure overnight. But no more than 20 hours later.
7. Apply clear protective topcoat, simply stir contents in can and apply with roller and roller pan. Please note that use of any non skid additive may de-gloss the floor so you may not want to use it, but this can make the floor very slippery if wet or greasy. Many customers add a little locally bought Shark Grip or Clear Grip to the topcoat to walking areas that may get wet.
SUPPLEMENTAL METALLIC INSTRUCTIONS: Each kit will have 24 ounces (2-12 ounce jars) of metallic color powder. Purchase the Spray Accent Kit to add in some accents by mixing it up and drizzeling it over the floor and swirl it in with the squeegee or roller or spray on denatured alcohol to make it dance. We recommend you apply the full kit to half your floor and then apply the accent to that half, then apply the rest of the full kit and then add the accent to that. This way you don't risk having the epoxy set up and get ruined when you walk back on it with your spikes to do the accents.
It's also important to read this page for additional Prep and Installation information HOW TO PREP & PAINT YOUR FLOOR