

HOW TO PREP & EPOXY PAINT YOUR FLOOR THE RIGHT WAY
How to Prep & Epoxy Paint Your Floor the Right Way
The complete step-by-step guide to preparing your concrete and applying a professional epoxy floor coating—from first-time prep through final topcoat
Concrete Floor Preparation Overview
At ArmorGarage we want to ensure your floor lasts 10–20 years — and after choosing the right product, properly preparing your concrete is the single most important factor in getting there. Improper prep and low quality epoxy is responsible for nearly every epoxy floor failure we've seen in 25+ years of manufacturing experience.
The following are the six steps in general — please read the full page below for detailed instructions on each:
- Inspect the concrete for moisture, contamination, surface defects such as cracks, and divots, and temperature conditions. Remedy as needed.
- Wash the floor and remove all oil and grease stains. Powerwash if possible. Do not wash if grinding.
- Etch with diluted muriatic acid or grind with a diamond grinder to open the concrete pores
- Neutralize the acid (we provide neutralizing powder with every kit) and rinse thoroughly
- Tape off the perimeter at the garage door. The epoxy should not extend beyond the garage door.
- Verify the surface is completely clean, dry, and slightly rough before any epoxy touches it. See images below of properly prepared concrete.
Read each step in detail below before starting your project. The 15 minutes you spend reading will save you days of frustration and the high cost of redoing your floor.
The Two Rules That Determine Success or Failure
Every successful epoxy floor comes down to two things: proper surface preparation and choosing the right product for your project. Get both right and you'll end up with a floor that outperforms anything a professional installer would deliver—at a fraction of the cost.
The #1 Mistake People Make: They treat their garage floor like painting a room—grab cheap off-the-shelf epoxy paint and slap it on. Within months they have a peeling, flaking disaster. Poor-quality products and prep are responsible for nearly every epoxy floor failure.
That's exactly why we offer the range of kits we do and provide this level of detail. We want you to avoid that experience entirely.
All of our garage epoxies are ASTM pull tested before shipping. When applied to a properly prepared surface, our epoxy will pull the top layer of concrete off before it separates from the slab. Keep a small can of Xylene (available at Home Depot) handy during application—clean up spills immediately, because once our epoxy cures it can only be removed by grinding.
Important Reading Before You Start: Visit our Technical Resource Hub for product specs and comparisons, and read How To Avoid Epoxy Floor Failures. Spending 5 minutes on those pages will save you significant time and money.
Watch the Transformation
See what a proper ArmorGarage epoxy application looks like from start to finish in under 60 seconds.
Choose Your Epoxy System
If you have decided or know what you need for your floor we recommend reading the full guide first, then visiting the product page for the system that fits your needs. Each link below takes you directly to the product with additional specs and ordering info.
Inspect Your Concrete
Before you do anything, take a close look at your concrete. Temperature should be between 55–95°F and it should not be raining. If room temps drop below 55°F during curing, use small electric heaters to maintain temperature.
Stop & Call Us If You See This: If your floor has exposed rocks and river stones (see image below), contact us before proceeding. These floors were poured with improper aggregate to cut costs—the stones make it like trying to epoxy glass. It's very difficult to get right without expert guidance. Fortunately, very few floors have this issue.

Wash the Floor
Power washing is strongly recommended for the best results. Remove any oil or grease stains first—we've found the most effective stain remover is Liquid Tide Detergent scrubbed in with straight muriatic acid. Stubborn stains may need multiple treatments. For floors heavily stained across most of the surface, use our Oil Primer first.
Etch or Grind the Surface
Option A: Acid Etching
Etching is a simple, necessary step if you're not grinding. Dilute the provided etching product with 3 gallons of water. For new floors, poor-condition floors, or very dirty surfaces, etch a second time using one gallon of muriatic acid per 500 square feet. This is not the time to be conservative—using more acid is always better than not using enough.
Safety First: Always pour acid into water—never the other way around. Your floor should already be wet from power washing or hosing down. Use a plastic garden sprinkler can for the most even distribution. If not using a sprinkler can, pour the solution out in a small bead, a little at a time—never dump the entire pail at once.
Work in approximately 300 sq ft sections for smaller floors and 1,000 sq ft sections for larger ones. Always work from the farthest point toward the exit or drain. Scrub the solution into the entire floor with a stiff bristle brush or shop broom. Pool brushes work great.
New floors should always be etched twice—they have curing residues at the surface that must be completely removed. After etching, let the floor dry for 1–2 days.
Neutralizing: We provide neutralizing powder with all of our epoxy kits. After your final etch (and only after the final etch), sprinkle the powder over the floor and lightly scrub it in before rinsing. This brings your slab back to the proper pH for maximum epoxy adhesion. A power washer is recommended for rinsing. Wet down any surface the rinse will flow over, such as driveways.
Option B: Grinding
If you grind your floor, etching is not required. However, if you're rinsing to remove grinding dust, you might as well scrub in the provided etch anyway—it ensures concrete pores are clean and fully open. Our epoxies are specially formulated to form a permanent molecular bond into those open pores.
For very old or poor-condition floors, rent a floor prep machine from Home Depot or use a diamond floor grinder, then apply our epoxy flooring primer to strengthen the slab. Priming is always a good idea—it increases coverage and adds thickness for long-term durability.
Very Pitted Floor? That's different from open pores. See our How To Repair & Paint a Pitted Floor page for specific guidance.
What Your Floor Should Look Like After Prep
Your floor should be completely clean, dry, and have a slightly rough texture. Those tiny opened pores allow the epoxy to penetrate into the slab and lock in for an unbreakable bond. If your concrete is light in color, there should be no dark spots remaining—if there are, re-etch.


Left: Ready to coat — clean, dry, slightly rough | Right: STOP — needs more washing, etching, or grinding
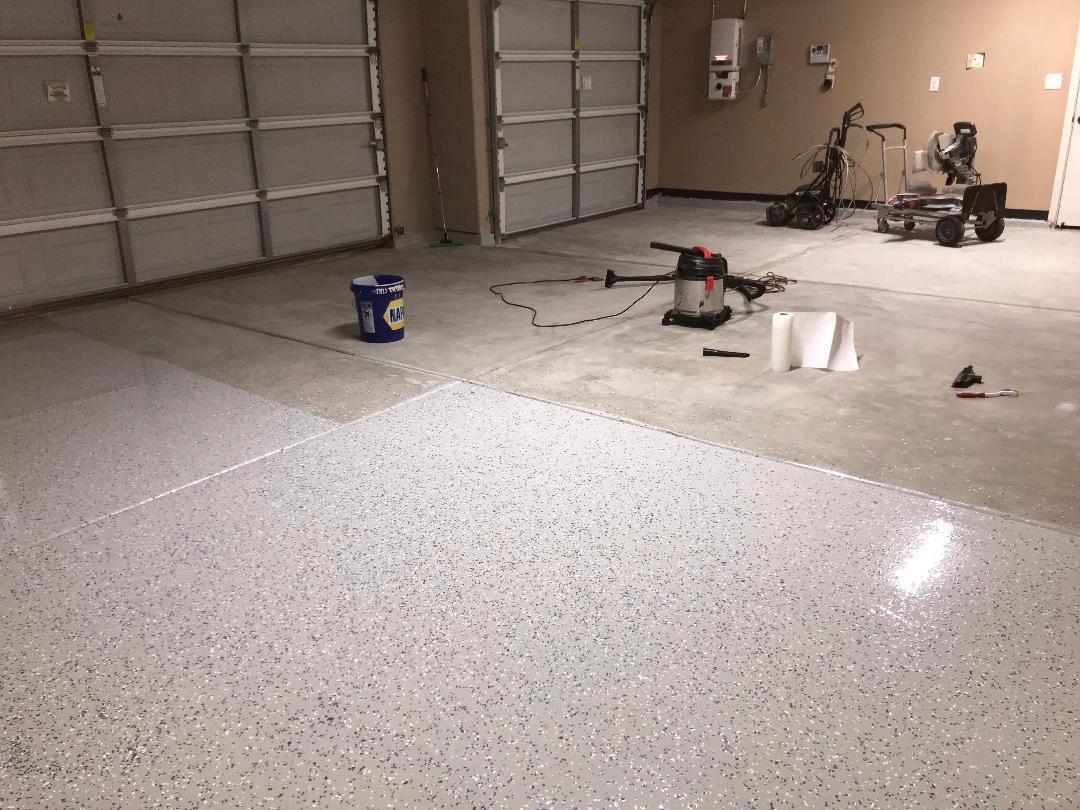
After Power Washing, Etching & Oil Stain Removal
Notice the dramatic difference between the clean side and the dirty side. Your floor should be this clean and dry before any epoxy touches it. Also notice how evenly the epoxy application and chip dispersal go when the surface is properly prepped.

Tape Off the Floor
Apply good-quality duct tape at the inside edge of the garage door. We do not recommend applying epoxy past the door opening—even UV-rated epoxies are not designed for continuous outdoor exposure. Only specially formulated coatings like our Military Industrial Ultra Fast Epoxy can be applied outdoors.
What About That Little Piece Past the Door? If you have a short strip of concrete between the door and your driveway, the best approach is to coat it with an inexpensive outdoor concrete paint color-matched as close as possible. When it wears from the elements, just roll on another coat of cheap paint rather than ruining your high-end epoxy. If you're using color flakes, they help blend the two sections even better. Most people choose to leave that 4"–6" strip alone since the garage door is closed most of the time.

Mix the Epoxy — Do NOT Mix It All at Once
First, stir Part A thoroughly with the provided power mixer. Then measure Parts A and B according to the mix ratio on the label and combine. Mix until all streaks disappear and the epoxy is a uniform color.
Critical Warning: This is NOT like store-bought epoxy—do NOT mix all of it at once. Our 100% military-grade epoxy works on catalytic reaction. The more you mix together, the faster the reaction, the faster it cures, and the thicker it gets. Mix no more than one gallon per person rolling: 80 oz of Part A and 40 oz of Part B. If mixing more than one gallon, split it into separate pails immediately and pour it onto the concrete to slow the reaction.
Pot life is approximately 30 minutes—more than double the time it should take to complete one section. There's no need to rush when doing proper-sized batches. For larger floors, have one person dedicated to mixing who can distribute into each roller's individual pail.
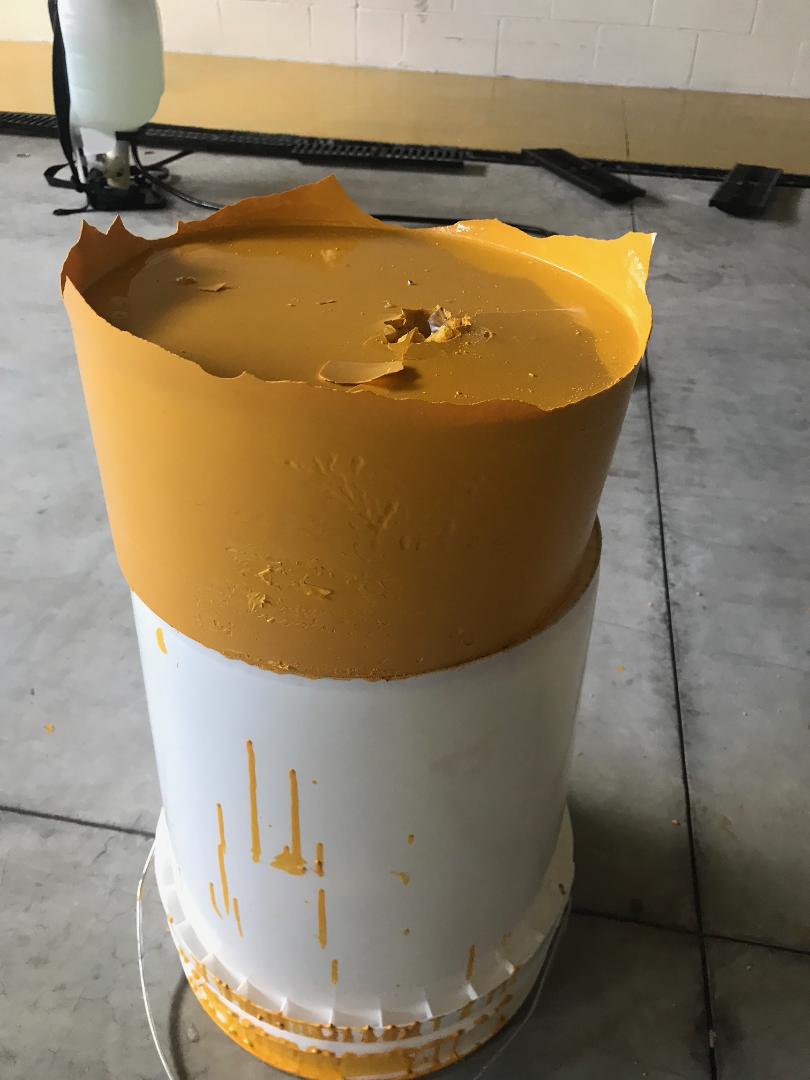
This is what happens in about 5 minutes if you mix too much at once!
Apply the Epoxy
For Military-Industrial, Armor Chip, or Armor Granite: Pour epoxy directly from the bucket onto the floor. Squeegee it out evenly for initial spreading, then back-roll over it with the supplied roller for final smoothing. The squeegee is for initial distribution only—use the roller for the final spread. We now supply a Magic Squeegee that makes this even easier.
For the Ultra Military primer, or the ArmorGarage II Commercial base coat and topcoat: These coatings are thinner and can be applied using a roller pan and the supplied rollers. Apply the epoxy coat between 6 and 20 hours after the primer.
Wet Edge Technique: Work the floor in sections. Leave a wet edge of at least 12" with no chips at the boundary. When you apply the next batch, slightly overlap that wet edge—it reactivates the epoxy and everything blends and self-levels into a seamless monolithic coating. All large-format and flake floor packages include Spike Soles so you can walk right in the epoxy.
If you get epoxy on anything you don't want coated, wipe it off immediately with Xylene (available at Home Depot or Lowe's). Once dried, it has to be ground off.
Disperse Decorative Chips (If Using)
Take small handfuls and toss them upward at a 45-degree angle so they fall randomly onto the wet epoxy. This is where the spike soles really come in handy—they let you walk right into the epoxy to disperse flakes evenly. Have a "spotter" check for bare spots from different angles.
Remember to leave that 12" chip-free wet edge so your roller stays clean when overlapping the next section. Once the floor is dry, scrape the chips with a floor scraper, ice chopper, or anything with a wide flat blade to knock down any chips sticking up, then vacuum all the loose ones.
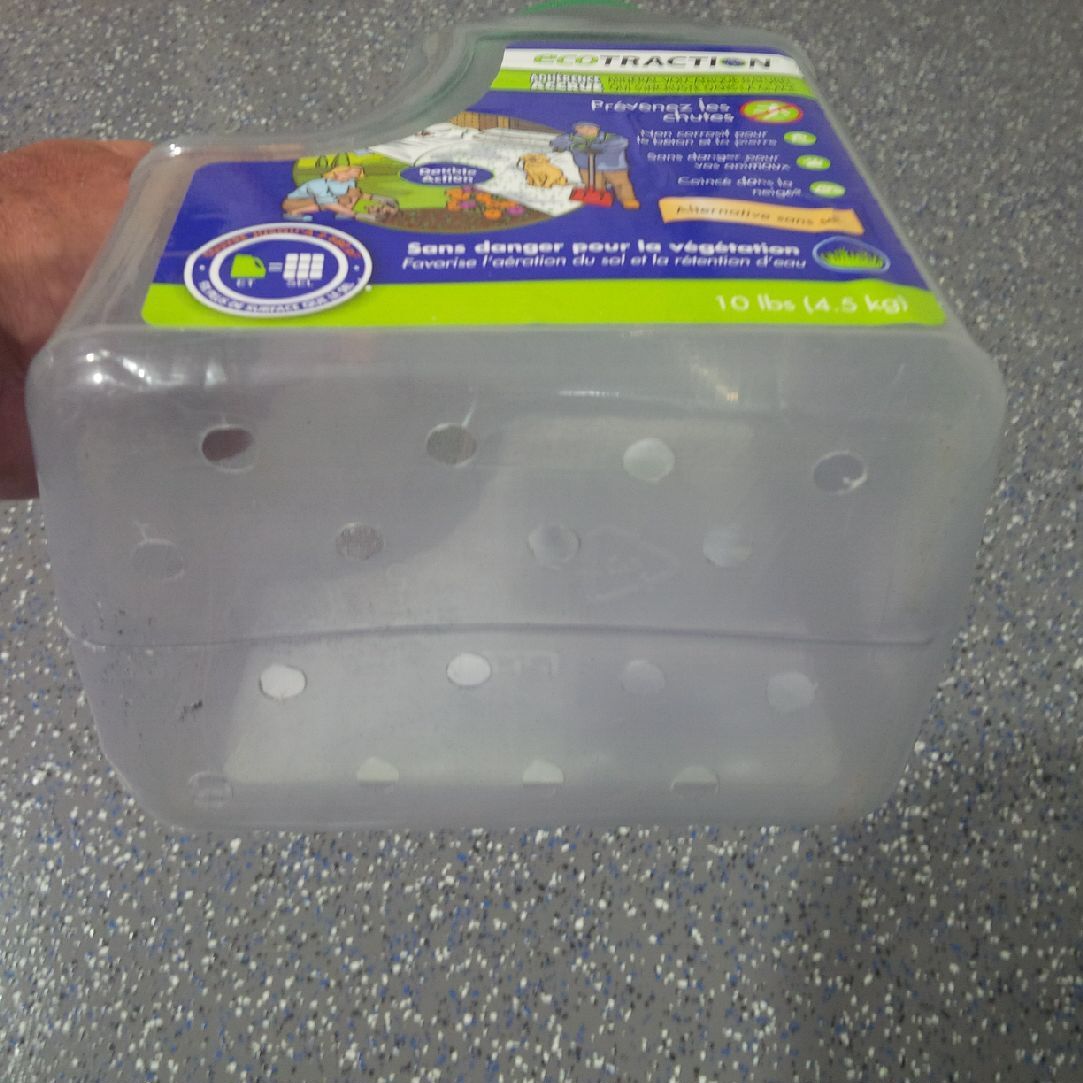
Pro Tip: The Container Method for Perfect Chip Coverage
A customer came up with this simple, effective technique—and the results speak for themselves. Get a plastic container (one with a handle is ideal). Drill 3/8" holes in the bottom. Fill it halfway with chips, hold the container sideways until you're in position, then turn it upright and shake while walking through the epoxy with spike soles. The chips won't come out until you start shaking, and they fall straight down for even coverage. Step back to check for bare spots—a pinch and a quick shake fills them right in.

What a Wet Edge Looks Like
Notice how the flakes stop about 6"–12" before the edge of the epoxy. This keeps your roller clean when overlapping the next section. The fresh epoxy reactivates the edge, and everything blends into a seamless finish.

Apply the Topcoat
After the base coat is dry to the touch (usually 6–8 hours), apply the next coating—whether that's another layer of epoxy or the topcoat. You can also wait until the next morning, but don't let more than 20 hours pass between coats for the best bond.
- Armor Chip & Armor Granite (multiple topcoats): Add the non-skid additive to the final coat only. Let each coat dry before applying the next.
- Optional Military-Grade Topcoat for Armor Chip/Granite: Apply one coat only (do NOT apply two coats of the military topcoat). Mix the non-skid additive directly into the can.
- Ultra Military & ArmorGarage II Commercial: One topcoat only. Mix the non-skid into the can.
Non-Skid Tips: We strongly recommend using the supplied non-slip additive—it will NOT dull the finish. Keep stirring the topcoat to prevent the non-skid from settling at the bottom. Always use a roller pan when applying topcoat with non-skid mixed in—pouring directly onto the floor causes concentrated patches that create dull spots.
Before rolling the topcoat, remember to scrape the flakes to knock down any chips sticking up. Don't worry about scratching the floor—any scratches disappear under the topcoat.
Check the floor at different angles for missed spots, or have a spotter help. The topcoat is clear, so it's easy to miss an area. If you find one after the floor has dried, don't panic—scuff the spot with 120-grit sandpaper and brush on a bit of topcoat. Don't throw the can away until the next day.
Congratulations! You now have a higher-quality floor than a professional company would typically install—and at a fraction of the cost.
What About Control Joints?
Our recommendation: don't fill them in unless the sight of them truly bothers you and your floor is at least 10 years old. Those joints exist for a reason—they prevent cracks from forming right in the middle of your brand-new high-gloss floor.
Once properly epoxied over, control joints look nothing like they did bare. They give the floor more of a natural stone slab appearance. Just lightly feather the epoxy in and out of the joint and lightly sprinkle chips on both sides. The joints become non-stick after coating, and a leaf blower cleans them out easily.

Learn from DIY Dan's Real-World Installation
Customer DIY Dan documented his entire ArmorGarage installation step by step—including what he'd do differently. We love his videos because they give you honest, first-hand experience from someone who went through the process. He also did a one-year follow-up review showing how the floor has held up.
Below are both videos, followed by our commentary on a few things Dan encountered and how to avoid them.
DIY Dan's Installation Video
Watch Dan's complete installation process on YouTube:
Dan's One Year Review
Our Tips Based on Dan's Experience
Dan did a great job, but there are a few things to learn from his experience. Keep these points in mind while watching:
- Always order at least a 10% safety factor. Every floor absorbs differently. Dan's floor was 525 sq ft but he ordered only the 550 sq ft kit due to budget, leaving him tight on material.
- High-pigment colors need primer. Dan chose black, which requires more pigment for that deep luster—meaning less coverage. Black, white, and red (red gets the least) all benefit significantly from a primer coat. Our red kits include red primer for this reason. Primer would've eliminated Dan's coverage stress—and he wouldn't have needed to etch four times. Over-etching can open pores too much, causing excess product absorption.
- The squeegee is for initial spreading only. Dan was light on coverage and tried to stretch the epoxy further than intended. The squeegee distributes after the pour; the roller does the final spreading. We now supply a Magic Squeegee that makes this even easier.
- Never mix a double batch. Dan got impatient and mixed double. As stated above: more mixed epoxy = faster reaction = thicker material = less spread. Stick to 80 oz Part A + 40 oz Part B per person.
- Spot-check the topcoat from multiple angles. The topcoat is gin-clear—easy to miss a spot. Have a spotter help. If you find a missed area after drying, scuff with 120-grit and brush on a bit of topcoat. Don't toss the can until the next day.
- Use the non-slip additive. Dan skipped it. We strongly recommend it—our non-slip will not dull the finish. Also, scrape the flakes flat before rolling the topcoat. Any scratches from scraping disappear under the topcoat.
To Save Yo Time Here's A Quick Recap of Concrete Prep Questions
How do you properly prepare a concrete garage floor for epoxy coating?
Proper concrete preparation requires six steps: inspect the slab for moisture and contamination, power wash the surface, remove oil and grease stains with Liquid Tide detergent and muriatic acid, etch the concrete with diluted muriatic acid (or grind with a diamond grinder), neutralize and rinse, then verify the floor is clean, dry, and slightly rough before applying epoxy.
Do I need to etch a concrete floor before applying epoxy?
Yes — concrete must be etched OR mechanically ground to open the pores so epoxy can penetrate and form a permanent molecular bond. Skipping this step and using inferior quality products are the most common reasons epoxy floors peel within months. Acid etching with diluted muriatic acid (1 gallon per 500 sq ft) is the most common DIY approach. Diamond grinding is the alternative method preferred for previously coated or heavily contaminated floors. New floors should be etched twice to remove ALL curing residues and open the pores after power trowelling.
How long should concrete dry before applying epoxy?
After power washing, etching, and neutralizing, allow the concrete to dry for 1–2 days before applying epoxy. The slab must be completely dry — any residual moisture will cause the epoxy to bubble, blister, or fail to bond. New concrete should cure for at least 30 days before coating, and previously coated or contaminated floors may need additional drying time. Always perform a moisture test before coating: tape a 2'×2' plastic sheet to the floor for 24–48 hours and check for condensation underneath.
What is the best way to clean a concrete floor before epoxy?
The best method is power washing combined with detergent and muriatic acid for stain removal. For oil and grease stains specifically, scrub Liquid Tide detergent into the stain with straight muriatic acid — this is the most effective combination most people don't know about. For floors heavily stained across most of the surface, use an oil-blocking primer instead of trying to remove every stain. Power washing is strongly recommended over mopping or hosing because it physically removes contaminants from the open pores of the concrete.
Can you apply epoxy to a damp concrete floor?
No — epoxy must be applied only to fully dry concrete. Applying epoxy over damp concrete causes the coating to bubble, fail to bond, or trap moisture beneath the surface, leading to delamination within months. If you have moisture intrusion problems, use a moisture barrier primer designed specifically for damp slabs before applying the standard epoxy system. Always perform a 24–48 hour plastic sheet test before coating to verify the slab is dry.
What temperature should it be to apply epoxy to concrete?
Apply epoxy when both ambient and slab temperature are between 55°F and 95°F. Below 55°F, the curing process slows or stops entirely, leaving the coating vulnerable to damage. Above 95°F, the catalytic reaction accelerates, dramatically reducing pot life and making application a little more difficult. In temperatures above 95 degrees cut the mix amount in half this will increase your working time. If your garage drops below 55°F during curing, use small electric heaters to maintain temperature. Avoid applying epoxy when heavy rain is forecast within 24 hours.
Should I etch or grind my concrete floor for epoxy?
Either method works for proper concrete prep, but they're suited to different situations. Etching with muriatic acid is the standard DIY approach for new concrete, lightly contaminated floors, and most residential garages — it's effective and inexpensive. Diamond grinding is preferred for previously coated floors, heavily contaminated surfaces, or floors with existing failed coatings. If you grind, etching becomes optional, though scrubbing in the etch after grinding ensures the pores are fully open. For very old or poor-condition floors, grinding plus a primer coat is the most reliable approach.
How do I know if my concrete is properly prepped for epoxy?
Properly prepped concrete is completely clean, completely dry, and has a slightly rough texture similar to fine sandpaper. Light-colored concrete should have no remaining dark spots or stains — if you see any, re-etch those areas. Run your hand across the surface: it should feel uniformly textured, not smooth or polished. Open pores are essential because they allow the epoxy to penetrate and form a permanent molecular bond with the slab. If the floor still looks shiny or feels smooth in places, the etching wasn't aggressive enough and needs to be repeated.
Additional Resources
Keep learning before you start your project:
- See How an Epoxy Floor Failure Transformed Into a Bulletproof Floor In Case Studies with Armor Granite
- ArmorGarage Epoxy Application Suggestions & Lessons Learned — an informative write-up from a customer
- Visit our Video Library for short animated and live-action guides covering all our products
- Click the "Buyers Guide" tab in the top menu for our full series of epoxy floor coating articles
Remember: When you understand the process and follow the steps, this is an easy, straightforward project. The information here, combined with our detailed in-box instructions, is more than enough for you to coat your floor like a professional.
Questions? Talk to an expert at 866-532-3979 — info@armorgarage.com or Request a Quote for fast project pricing. We provide free, unlimited customer support.