


Extra Thick 100% Solids Epoxy Paint
True two-part military grade epoxy paint — up to 5x thicker than store-bought. Bonds permanently to concrete, wood, tile, curbs and walls. Use standalone or as a base coat in any multi-layer system.
What Is 100% Solids Epoxy Paint?
Epoxy floor paint is a two-part coating system — a resin and a hardener that chemically bond when mixed, curing into a hard, high-gloss protective layer. Unlike regular paint that air-dries and sits on the surface, epoxy paint penetrates into concrete pores and forms a molecular bond, becoming part of the slab itself.
ArmorGarage's 100% military grade solids epoxy paint contains zero water or solvents that evaporate away during the drying process — meaning every drop you apply stays on the floor as a thick, protective film. Our epoxy paint is up to 5x thicker than standard epoxy paints found in hardware stores, providing a high level of scratch, impact, chemical, and hot tire abrasion resistance.
The key difference from store-bought epoxy paint: Water-based "epoxy paints" sold at big-box stores are diluted — sometimes up to 50% water. When that water evaporates, you're left with a thin film. Our 100% solids formula cures at full thickness. What you apply is what you get — a dense, hard, permanent coating.

Coverage Options
(3 × 5-Gallon Pails)
*Coverage rate varies by surface texture and porosity. Pitted floors or grout lines require double quantity — see application instructions below.
Works on 6 Surface Types
This is where the Extra Thick Epoxy Paint stands apart from complete kit systems — it applies to virtually any surface that needs a durable, protective, high-gloss finish.
Ideal for any application where you need to:
- Protect concrete floors from ugly stains, pitting, and chemical attack
- Prevent surface wear from high-volume repetitive foot and vehicle traffic
- Stop pitting from road salts, chemicals, and vehicle fluids
- Reduce cleaning and maintenance with a non-stick, wipe-clean surface
- Brighten areas with a high-gloss, light-reflective finish
- Apply a base coat as part of a multi-layer system with color flakes or topcoat
Perfect for just about any heavy-duty application. Cures to a porcelain tile-like finish. Color flakes and topcoat can be added for a decorative finish. No odor — approved for use in all 50 states. Note: Protective topcoats have a strong odor.
Performance Specifications
Enhanced Protection with Topcoats
For extra durability, we recommend using one of our optional Urethane Epoxy Topcoats. The lower the abrasion rating number, the better the protection.
Topcoats add: Extra UV protection, impact resistance, scratch and wear resistance, plus non-slip grip when using non-slip additive. The lower the abrasion rating, the better.
Critical Application Instructions
Step 1 — Surface Preparation
- Concrete floors: Must be acid etched or diamond ground to provide the proper profile for the epoxy to bond to
- Tile and wood surfaces: Must be primed with our Epoxy Bonding Primer first
- Previously coated concrete: Pull test required — score 12"×12" square, press Gorilla tape firmly, pull rapidly. If more than 20% comes off, remove existing coating by grinding
Step 2 — Mixing (Critical)
⚠ CRITICAL MIXING INSTRUCTIONS — This is NOT like store-bought epoxy
Follow these rules exactly or you will waste the product:
- ✓ Mix only 1 gallon combined Part A & Part B per person rolling
- ✓ Use jiffy mixer in power drill on medium speed for 2½ minutes
- ✓ Split into two separate pails if mixing more than 1 gallon
- ✓ Pour epoxy directly from pail onto floor in a bead immediately after mixing
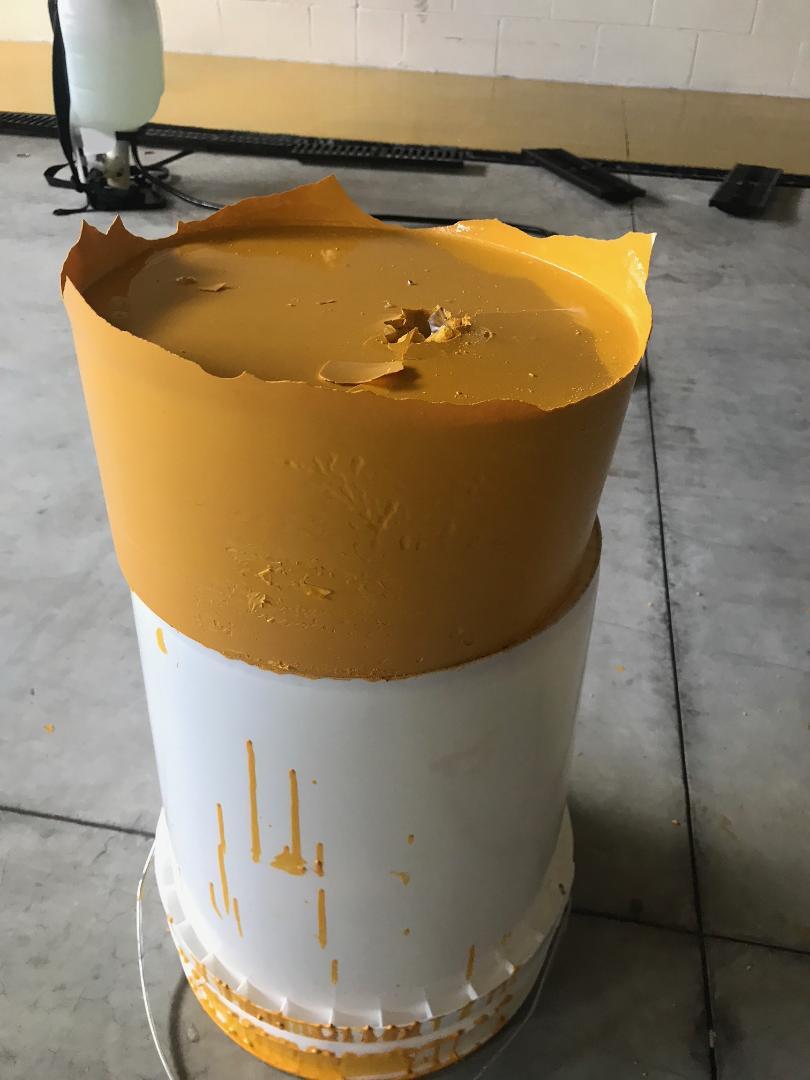
- ✗ DO NOT LEAVE IN THE PAIL
- ✗ DO NOT MIX A WHOLE SET AT ONCE
If you ignore these instructions, this is what you'll get in 5 minutes — not covered under warranty:
Step 3 — Application
Pot life: About 30 minutes per batch — more than enough time to apply one gallon. Optimal spread rate: approximately 170–185 SF per gallon depending on surface porosity and texture.
Tool cleanup: Don't worry about epoxy on rollers or mixing buckets between batches — each new batch reactivates the previous one. When finished, dispose of everything in a trash bag immediately. Once dry, epoxy can only be removed by grinding. Always have Xylene or Mineral Spirits on hand for spill cleanup.
Filling Grout Lines or Pitted Floors
- Use a flat squeegee for the first coat — push material into grout lines, pits, and voids, leaving as little as possible on the surface
- Allow to dry overnight (no more than 24 hours), then apply second coat with notched squeegee and roller method
- Important: Order double the quantity of epoxy when filling grout lines or pits
Curing & Timing
- Cure time: 12–14 hours depending on temperature and humidity
- If topcoating: Do not let more than 24 hours pass or you'll need to lightly sand first
- If using primer: Allow primer to dry completely — 5–6 hours, no fingerprint when pressed
⚠ Temperature Warning: Do NOT apply if floor temperature will drop below 55°F during curing. This stops the curing process and leaves sticky epoxy on your floor. Heating the floor may restart curing but does not always work — plan your application accordingly. Radiant heat floors are ideal for epoxy application in cold weather.
Hiring a contractor or handyman? Make sure they read these instructions. Contractors used to lower-quality epoxy paints often mix all the epoxy at once, then blame the product when it smokes and solidifies in the pail. A two-minute conversation with us before they start will ensure they do the job right. Call 866-532-3979.
Color & Topcoat Options
Color topcoat ships in the same color as the epoxy you choose. Additional colors (black, bright red, bright white) and custom colors available — call for pricing at 866-532-3979.
Need a Complete Epoxy Floor System?
See our complete kits with color flakes, metallic finishes, primers, and topcoat — sized for 1 to 8 car garages.
Questions before, during, or after application?
Call 866-532-3979 or email info@armorgarage.com
Our support team is ready to help you get professional results.


