


Heavy Duty Solid PVC Garage Floor Tiles – Continuous T-Joint Design
American-made interlocking tiles rated best by the US Army — engineered for extreme vehicle loads with zero floor prep required and backed by a lifetime warranty.
Not Peg & Loop
Not Hollow Core
No Adhesive Needed
Expert Support
Why ArmorGarage Tiles Are Superior
These are our standard heavy duty 20.5" x 20.5" Garage Floor Tiles that are a fast and great looking solution for just about any floor regardless of its condition! Their continuous interlocking T-Joints ensure they will never split apart or come out of alignment.
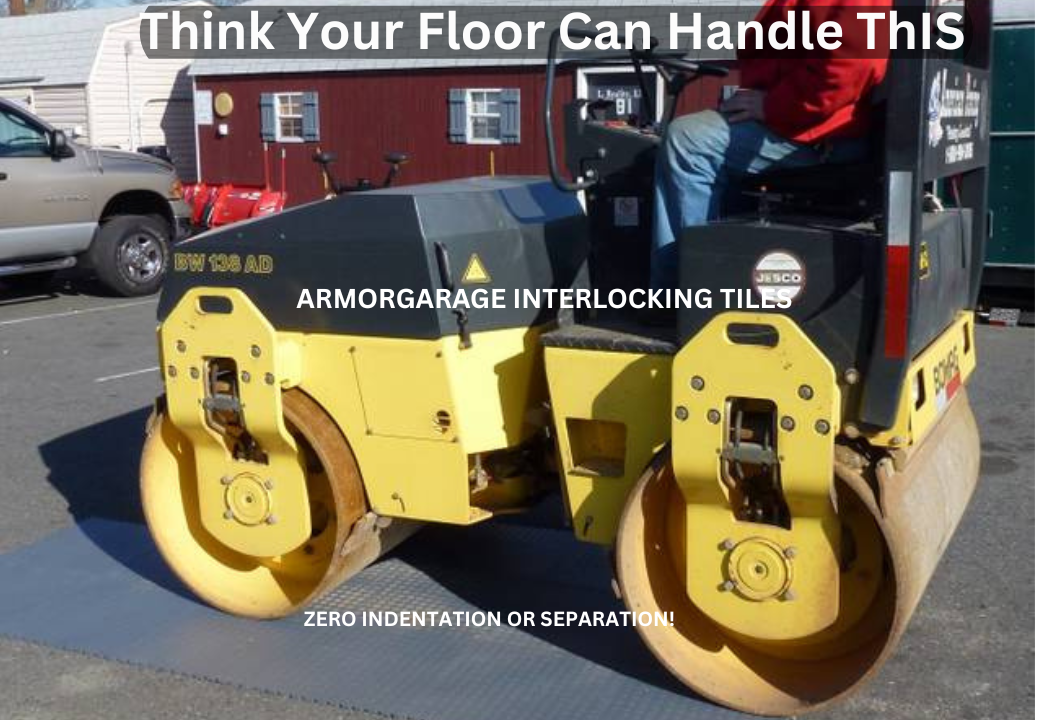
160,000 lbs Roll-Over Capacity + 80,000 lbs Static Load: Our unique formulation has the highest rated roll over capacity while still being flexible to conform to uneven surfaces. Perfect for vehicles as heavy as fully loaded fire engines!
- Zero Floor Prep Required: No need to repair or resurface deteriorated concrete—just sweep off debris
- Bridges Cracks & Divots: Can bridge over cracks and divots 3" wide, perfect for floors in poor condition
- American Made: Highest quality solid PVC in the industry, rated best by the US Army
- Continuous Interlocking: Locking tabs around the entire tile, not spaced out every few inches
- Lifetime Guarantee: Indestructible construction—guaranteed for life but will last 2-3 lifetimes!
US Army Rated Best: American made with the highest quality solid PVC in the industry and rated best by the US Army. See document in images. You simply cannot get a better made garage floor tile.
See the Difference for Yourself
Don't Try This With Hollow Core Peg & Loop Polypropylene Tiles!
How ArmorGarage Tiles Beat the Competition
No other garage tile comes close to the performance of ArmorGarage Tiles. There's a big difference between roll over capacity and static load capacity. Some garage tiles have nice sounding roll over capacities but their static load capacity are only a fraction of that and will deform into a U shape with the edges sticking up when you have a heavy static load on them.
Shore D Hardness 94: Our proprietary PVC formulation tests at 94 on the Shore D hardness scale—harder than construction hard hats but also flexible. This is where all Hollow Peg & Loop type tiles come up short.
- 4 lbs Per Tile: Our tiles weigh in pounds while competitor tiles weigh in ounces (less than 1 lb)
- 100% Solid PVC: Not hollow underneath—take a hammer to our tile vs a hollow core tile and see the difference
- No Tile Rattle: Sound deadening and super strong—no popping, clicking, or clacking noises
- No Tire Ruts: Won't form ruts and indents from repetitive traffic like soft competitor tiles
- Machined to Tight Tolerances: Fit together properly and won't buckle up
Don't Be Fooled by "Solid Tiles": Look at the bottom of so-called "Solid Tiles" from the competition—they're only solid on the wear surface and completely hollow underneath. That's why they weigh in ounces while our tiles weigh in pounds.
Don't be fooled by thicker tiles—they are thicker because they have to be because they're hollow. So although most popular tiles are 3/8"–1/2" thick you are only getting a 1/16" wear surface versus our solid 1/4" tile. Also their Peg & Loop joints are very flimsy!
When We Say Heavy Duty, We Mean It!
YOU COULD NEVER PUT THIS EQUIPMENT ON ANY PEG & LOOP TILE AND HAVE IT SURVIVE!


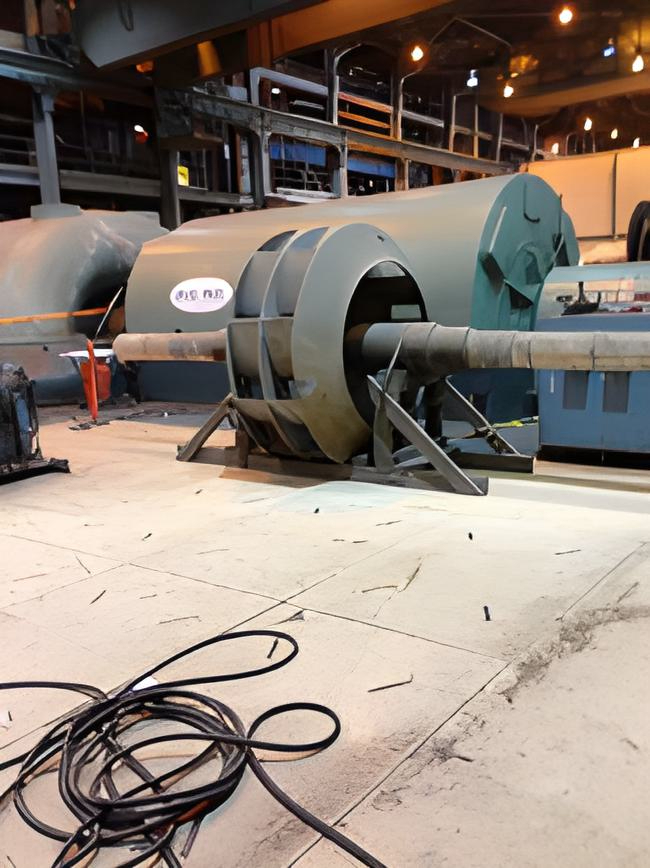
Before & After: Kyger Creek Power Station Turbine Room
See the dramatic transformation of a high-traffic industrial turbine room floor. From deteriorated concrete to a professional, durable tile installation that handles extreme loads daily.


Ordering Information & Important Notes
Flat Tiles Recommended for Rolling Equipment: We strongly suggest you order Flat Style Tiles (orange peel surface) if you do a lot of work with rolling tool chests, rolling carts or hydraulic floor jacks. Flat tiles offer a smoother surface for your wheeled equipment to roll over vs the raised coin pattern.
How to Order
GARAGE TILES ARE SOLD BY THE SQUARE FOOT AND NOT BY THE TILE. Enter the total square footage you need into the QTY box (NOT the number of tiles). Please remember to add 5% for cutting waste.
Two-Color Floors: Simply enter the square footage of the first color into the quantity box, add to cart, continue shopping, then enter the square footage of the second color and add to cart.
Shipping & Lead Times
- Orders $1500+ Ship Free: Free shipping on a pallet via truck with liftgate service
- Orders Under $1500: $200 shipping charge added due to weight
- Gray & Black: Ship in 2-3 business days
- Other Colors: Allow 3-4 weeks for fabrication. Two color floors 6-8 weeks.
- Custom Colors: Available for orders 3000 SF or more—allow 6-8 weeks for delivery
Recommended Accessories
Heavy Duty Ramp Edge: Makes a small "ramp" from the tiles to the floor to reduce any chance of tripping on the edge. Sold separately by the lineal foot in the length you order.
Anti-Stain Treatment: We strongly recommend Hillway Direct Plus Cleaner and Maintainer for all tiles. This very high-quality product prevents tire staining and adds a little shine to your floor. You can even order the microfiber mop from the same website.
Important Pricing Note: Tile price is per square foot and NOT per tile. Please note that due to the weight of our tiles, it is very costly to ship small quantities by the box.
Armor Interlocking Garage Flooring Tiles
Our garage tiles come in a standard size of 20.5" x 20.5" (2.9 sq. ft/tile). Therefore you need to install less tiles than standard 1 sq ft tiles. You can easily trim or cut Armor Tiles with any type power saw! They cut smoothly and cleanly with no ragged edges! Install a 3 car garage in 3 hrs! Our larger Tile give your floor a far superior look compared to 12" tiles.
ORDERING INFO:Tiles are sold per the sq ft, we suggest you add a minimum of 5% to the square footage of your floor to account for cutting waste or a cutting mistake. Simply enter the adjusted square footage of your floor into the qty order box and we'll determine the amount of tiles needed, we round up to the nearest full tile. Please note that orders of garage tiles UNDER 200 SF are not returnable. We very seldom sell floors that small and each batch of tiles varies slightly in color so that a small amount of the garage tiles being returned would not be resell-able due to the fact that they wouldn't match any new tiles being produced.
ORDER EXAMPLE: Floor is 22' x 20'= 440 sq/ft * 5% = 462 sq/ft. You enter the adjusted square footage of "462" in the qty order box. We'll determine the amount of tiles when we process your order, in this example the total number of tiles is 159 tiles.
Installing Your ArmorGarage Garage Tiles
No special tools, no messy coatings, no waiting for cure times. Start in the morning and park on your new floor by the afternoon.
Step 1: Floor Preparation
For standard residential garage installations, floor prep is simple — just sweep the floor clean. The interlocking tiles float over your existing concrete and do not require adhesive in most garage applications.
For commercial installations where tiles will be glued down: Power wash the floor to remove all dirt and loose debris. Mix one cup of TSP (trisodium phosphate) with 5 gallons of water and scrub the floor to degrease it. Oil or grease in the concrete can affect adhesive bonding. Allow the floor to dry completely before installation.
Step 2: Tile Installation
- Start from front to back, installing full tiles first. Work row by row from the garage door toward the back wall, interlocking each tile as you go. Use a rubber mallet to firmly seat the connections.
- Check for small side pieces. If your layout leaves you with only 1–3” pieces along a side wall, shift the entire floor toward one side to give yourself a larger, more stable piece to work with.
- Knock in the main field with a rubber mallet. Once the full-tile area is complete, go back and make your cuts along the side walls and back wall.
- Cut tiles to fit along walls using any power saw. For circular cuts and cuts around door jambs, use a jig saw. A utility knife can handle a few intricate cuts in a pinch, but a jig saw is a must if you have more than a few complex cuts.
Step 3: Ramp Edge Installation
The ramp edge creates a smooth transition from your garage floor to the tile surface at the garage door opening:
- Trim the tabs off the front row tiles where the ramp edge will attach. This allows the ramp to slide on flush.
- Apply a bead of construction adhesive under the ramp edge and under the first row of tiles. This locks the transition in place and prevents shifting.
- For extra strength, apply a high-quality epoxy adhesive (such as JB Weld) inside the U-slot of the ramp edge to bond the tile into the ramp channel.
This is the only area that requires adhesive in a standard garage installation. The rest of the floor floats freely, allowing for natural expansion and contraction.
Working Around Floor Drains

If your garage has a floor drain or trench drain, you can tile right over it while maintaining full drainage:
- Glue the tiles over the drain area to prevent them from shifting or lifting
- For small circular drains, use a jig saw or large hole saw to cut a circular piece out of the tile. Drill drainage holes into the cutout piece and fit it back into the tile for a clean, professional look
- For trench drains, drill holes or router slots into the tiles covering the drain to allow water to pass through
Pro tip: Cutting a removable drain insert rather than permanently modifying the tile gives you easy access to clean the drain when needed.
When to Glue Tiles Down
Gluing is unnecessary for most standard garage installations. The interlocking system holds the floor together under normal use. However, gluing is recommended in these situations:
How to Glue Properly
- Dry-lay approximately half the floor first — install the tiles without glue to ensure everything is perfectly square. If you're off even slightly, the interlocking tabs won't align at the far end
- Once confirmed square, remove the first half and reinstall with adhesive
- Repeat for the second half. Remove the dry-laid section and reinstall with adhesive
Why the two-step process matters: A small alignment error compounds across the floor. It's not a big deal when tiles are floating, but if tiles are glued down crooked, the interlocking tabs won't fit together and you'll have a permanent problem. Always dry-lay first.
After Installation: Protect Your New Floor
Apply the recommended tile sealer after installation. Modern tires contain additives and plasticizers that can cause rubber to leach onto tile surfaces and leave stains. This is true of any tile product, not just ours. The tile sealer creates a protective barrier that prevents tire marks and makes routine cleaning easier.
Cleaning & maintenance is simple. See the FAQ section for detailed cleaning and maintenance tips to keep your floor looking new for years.
A note on tire marks; we get asked a lot if tires will leave marks on our tile. Staining is caused by a component used by manufacturers of car tires called ‘6PPD’ [phenaline diamine].
6PPD is an anti-oxidant and is added to rubber products to resist environmental attack by ozone and ultraviolet light. It also has other beneficial effects in the molding of rubber itself. Since it adds to the cost of making tires, manufacturers usually only add it to the softer high performance tires. So there are some off road tires and high performance tires with soft compounds that leach rubber onto the tiles. Recently we have seen these stain causing additives in regular street tires also so we strongly recommend Hillway Direct Plus Cleaner and Maintainer for all tiles. You can even order the micro fiber application mop from the same website which from our research has the best prices. This is a great product that will give you years of maintenance free service. We have never had a complaint about this product.
Our 19.5 x 19.5(nominal size) Garage Floor Tiles come standard in Coin Pattern or Flat Pattern, please note that other tiles of similar size that look the same will not interlock with our tiles. Our other size tiles are available in Textured, Slate and Diamond finish.


