


Armor Chip Garage Floor Epoxy Kit
The only DIY color flake epoxy kit with a 10-year brand new floor look guarantee. Professional results — no experience needed. Everything included, nothing else to buy.
Free Shipping • 10-Year Guarantee with Military Topcoat • Complete Turnkey KitSee the Transformation
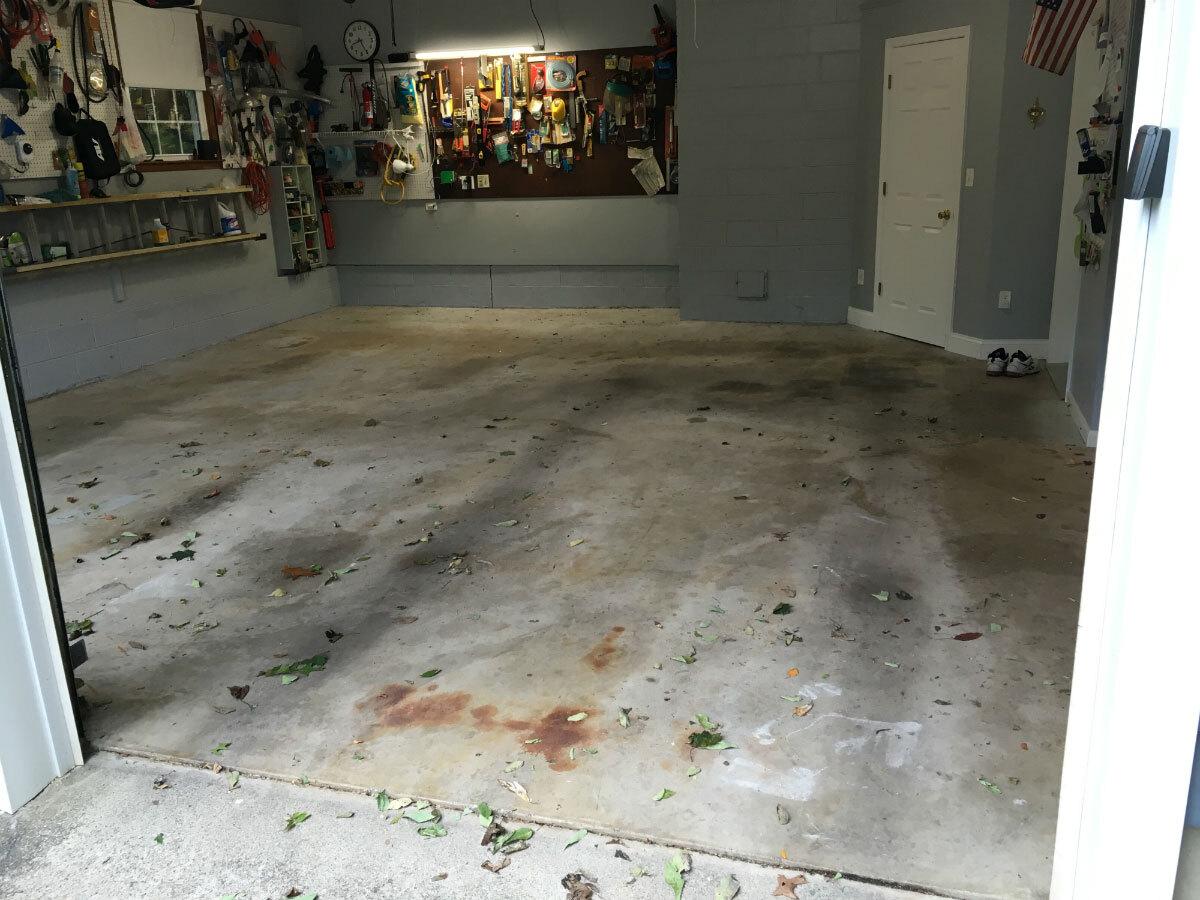
BEFORE
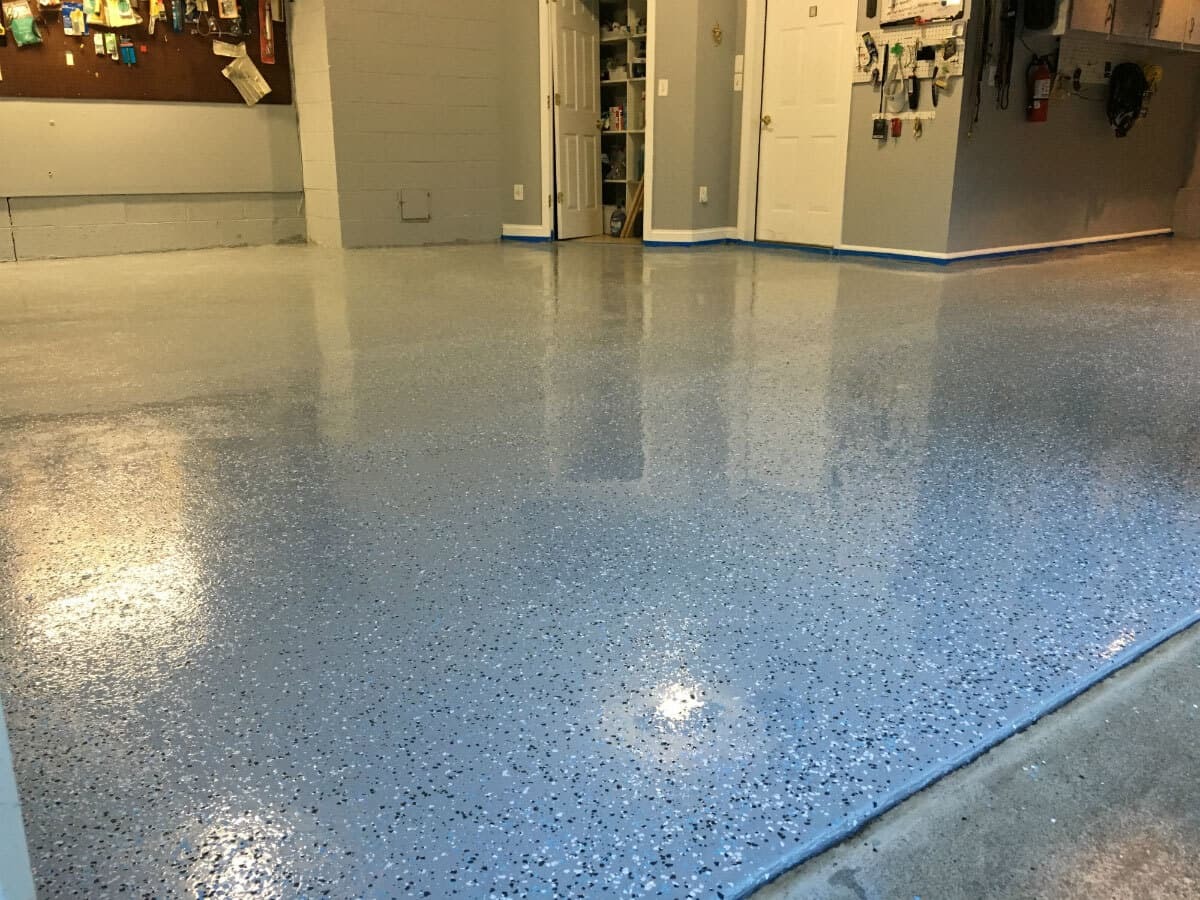
AFTER
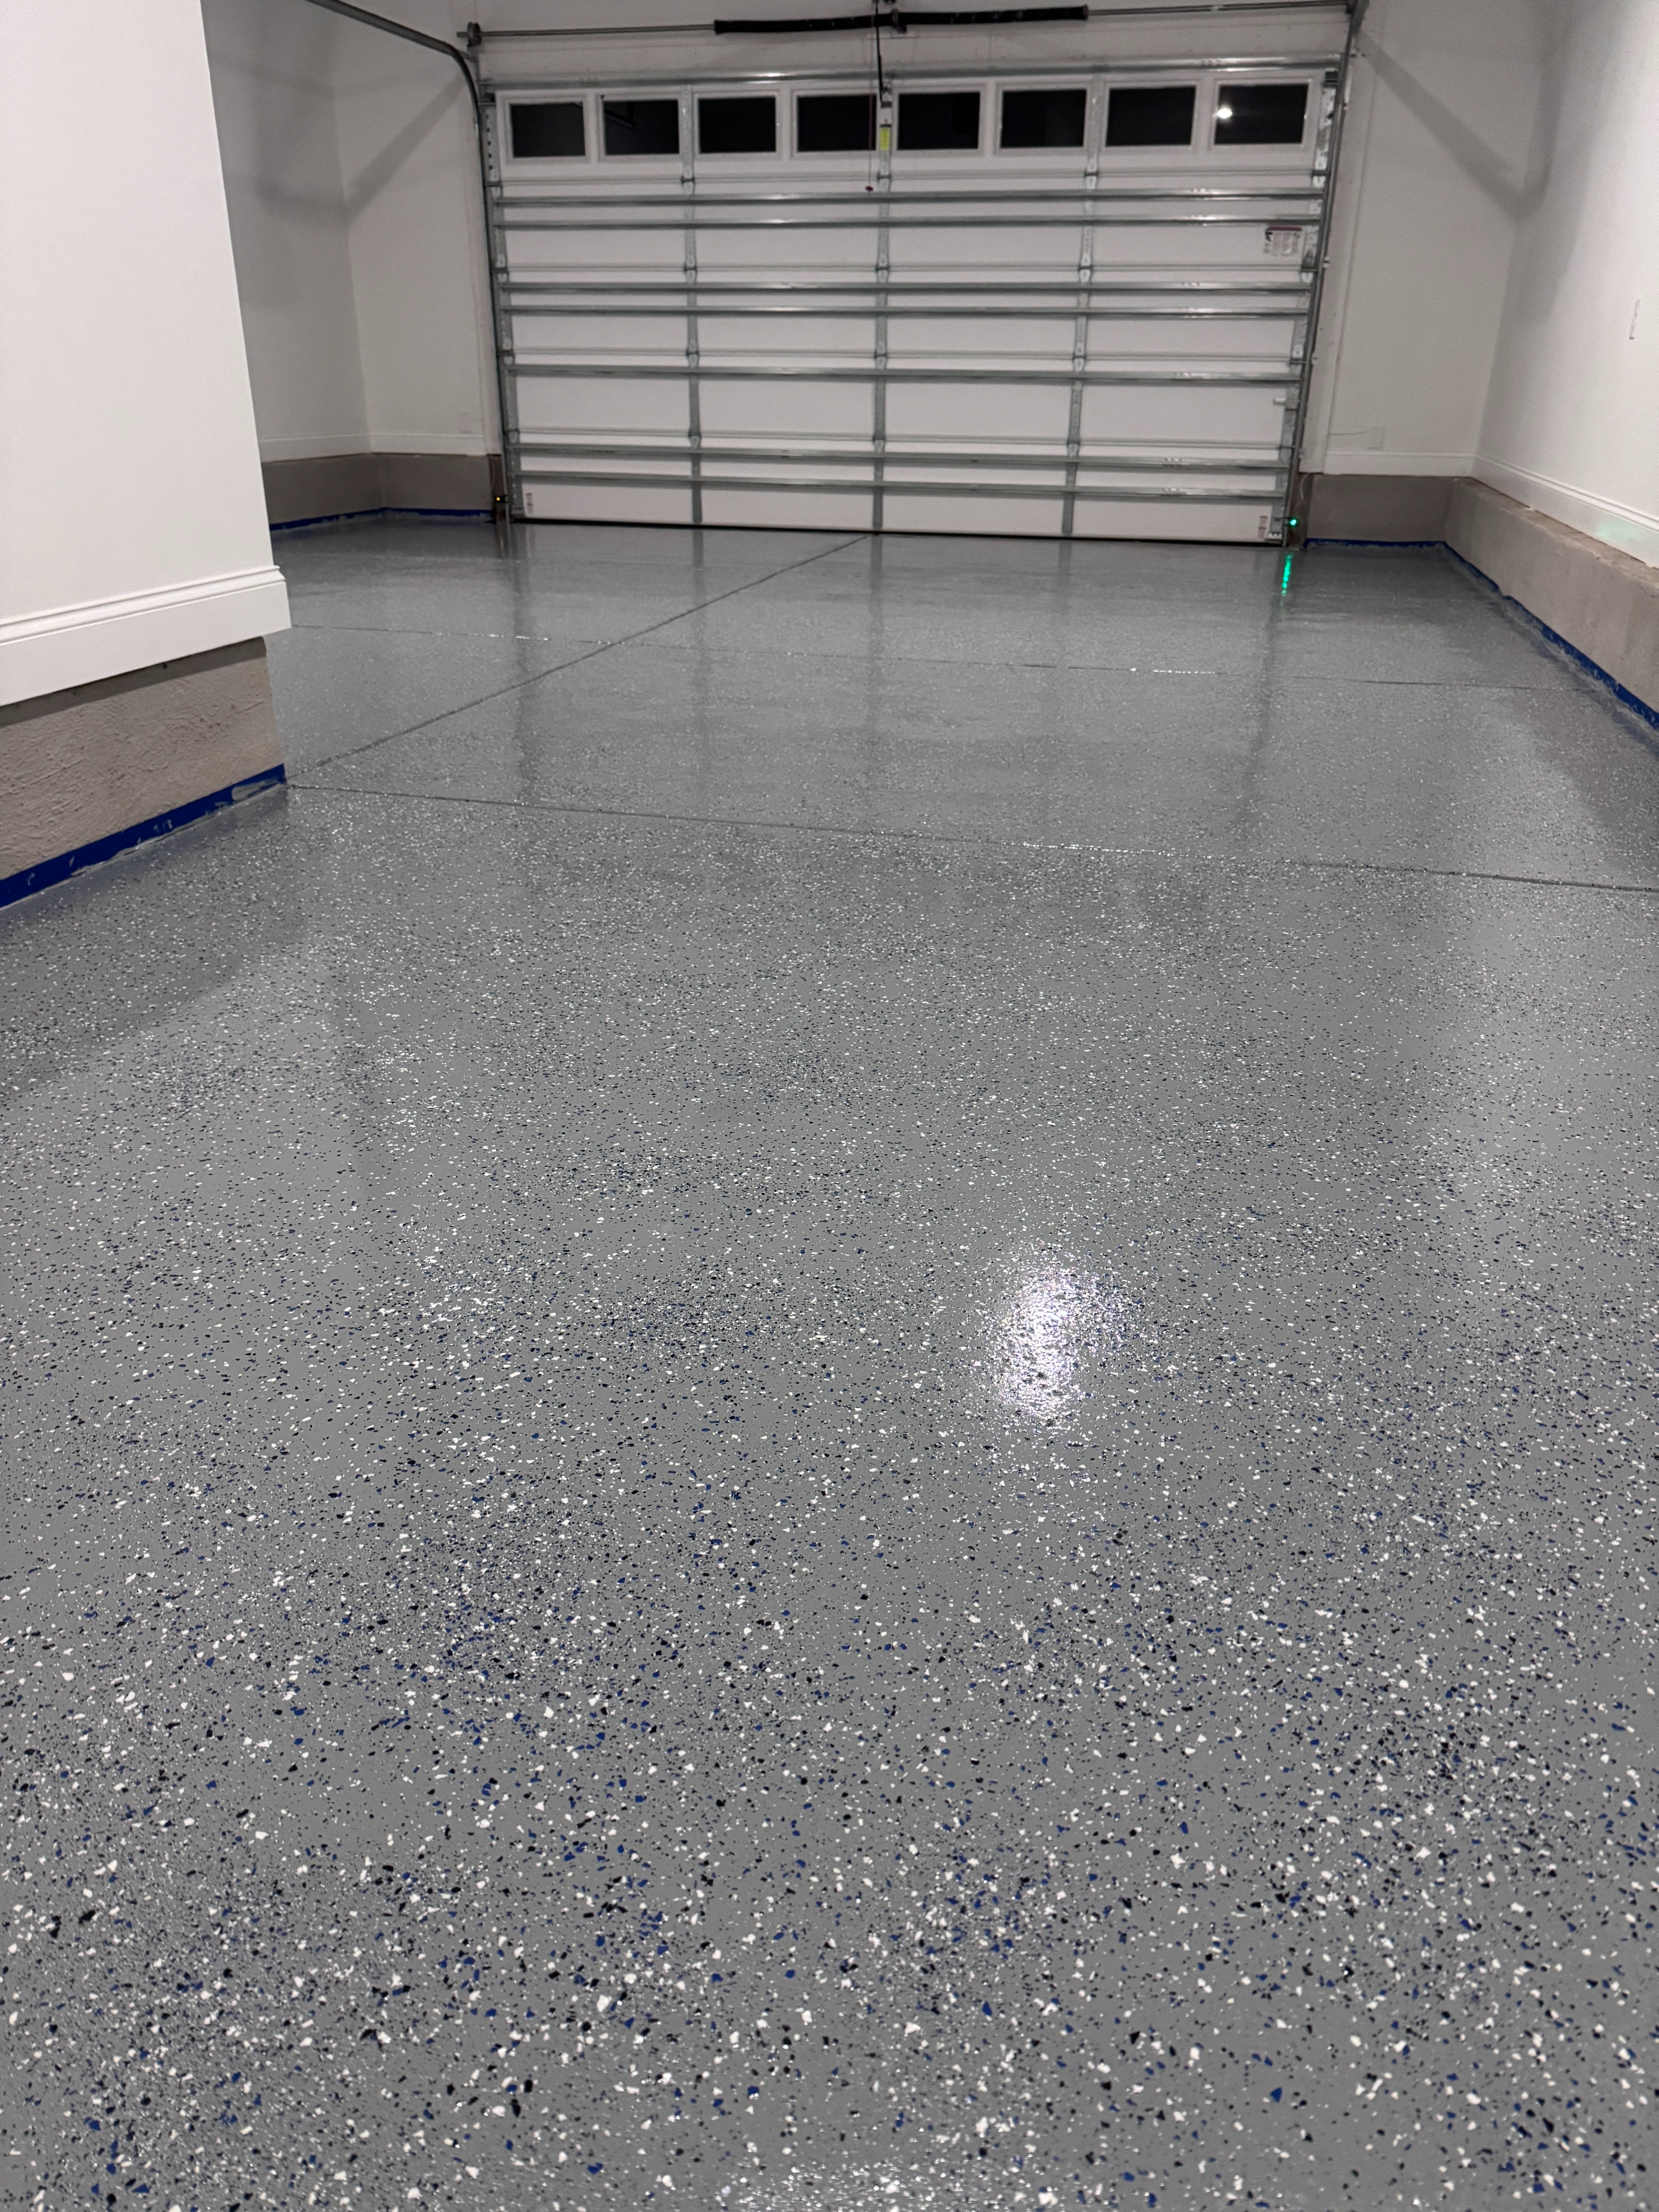
Medium gray with black, white & light blue flakes + Military Grade Topcoat
“What an amazing before and after difference. This is the best DIY enhancement ever to our garage.”
— Larry L.
10-YEAR BRAND NEW FLOOR LOOK GUARANTEE
The only DIY color flake kit that guarantees your floor will still look brand new after a decade — when you use our Military Grade Topcoat.
Military topcoat abrasion: 4 mg | Standard topcoat: 20 mg | Competitors: 30+ mg (lower is better)
Everything’s Included — Nothing Else to Buy
Core System
• 100% military grade solids two-part epoxy
• Two coats of heavy duty 20mg rated clear topcoat
• Optional one coat 4mg (best) rated military grade topcoat for highest protection level and 10 yr new look guarantee
• 6 lbs premium color flakes
• Premium non-slip additive
Professional Tools
• Magic Squeegee ($25 value — included free)
• Spike soles for application & flake broadcasting
• Rollers, mixer, mixing bucket, cut-in brush, gloves
• Acid etch solution & neutralizing powder
• Clear & Easy to follow instructions
Upgrade Options for Maximum Performance
Primer
For additional coverage, poor condition floors, workshops, oversized vehicles, added durability and adhesion.
Military Grade Topcoat
Chemically hardened clear coat. One coat replaces two. Includes 10-Year New Look Guarantee. Best-in-class 4 mg durability rating (the lower the number the better).
Why Armor Chip Outperforms Everything Else
14 Months Old vs. 17 Years Old
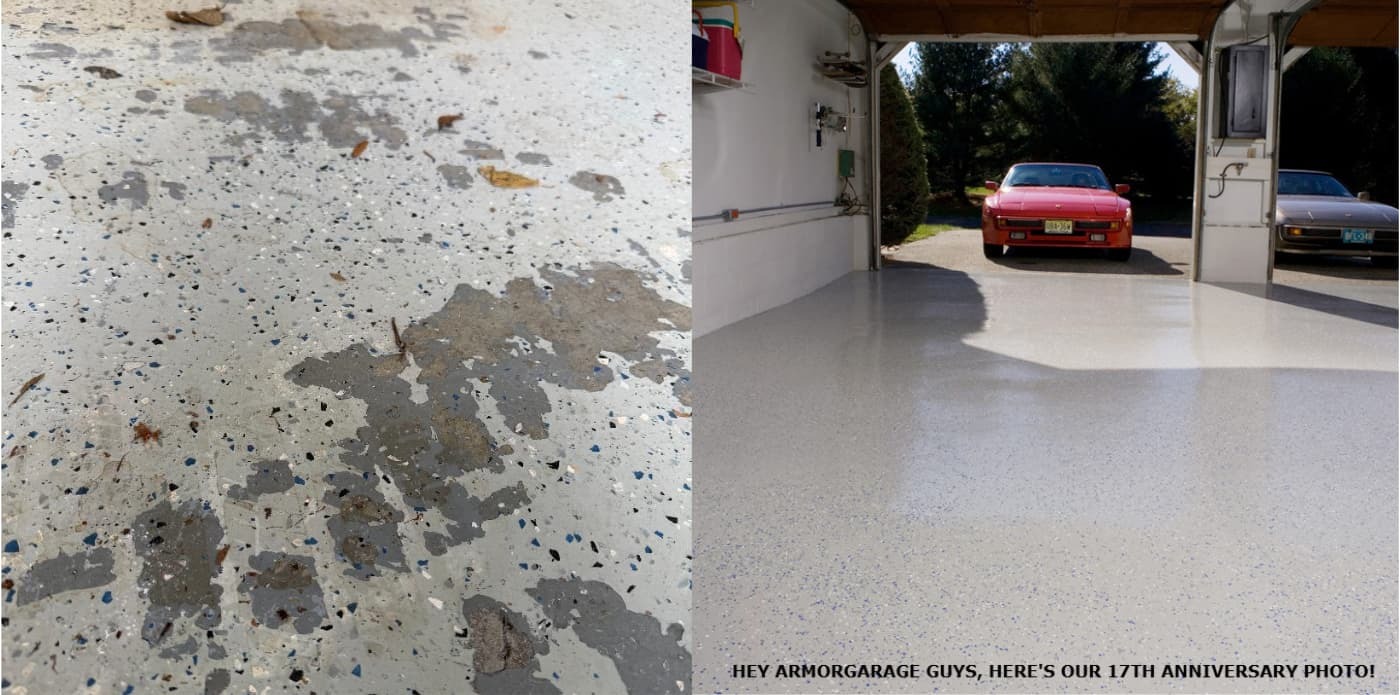
The floor on the left is 14 months old. The floor on the right is 17 years old. You can be the person regretting their coating choice — or the person who installs Armor Chip once and is done.
Even the Worst Floors Can Look Like This
BEFORE

AFTER

“I purchased an Armor Chip kit with the military-grade topcoat in January 2020. Now, over four years later, it still looks brand new. In rentals where I used products from Home Depot or Lowes, I’ve had to redo the floors every two years. Thanks for a fantastic product that’s better than advertised.”
— J. Worley
Includes the Magic Squeegee (a $25 Value)
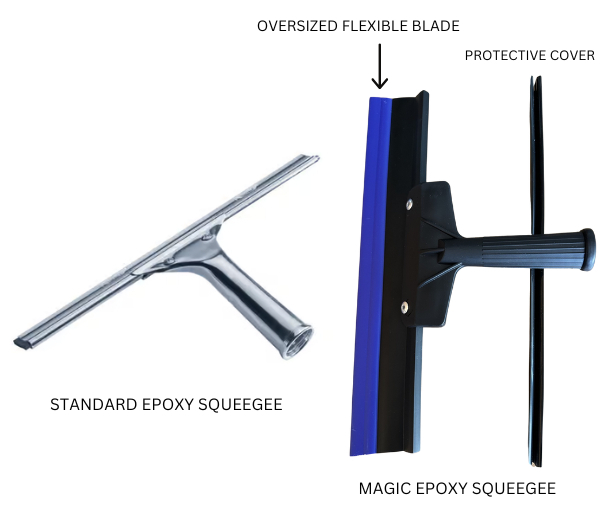
The Magic Squeegee ensures your coating goes on at the proper thickness for maximum performance and longevity. Included free with every Armor Chip kit.
Customer Spotlight
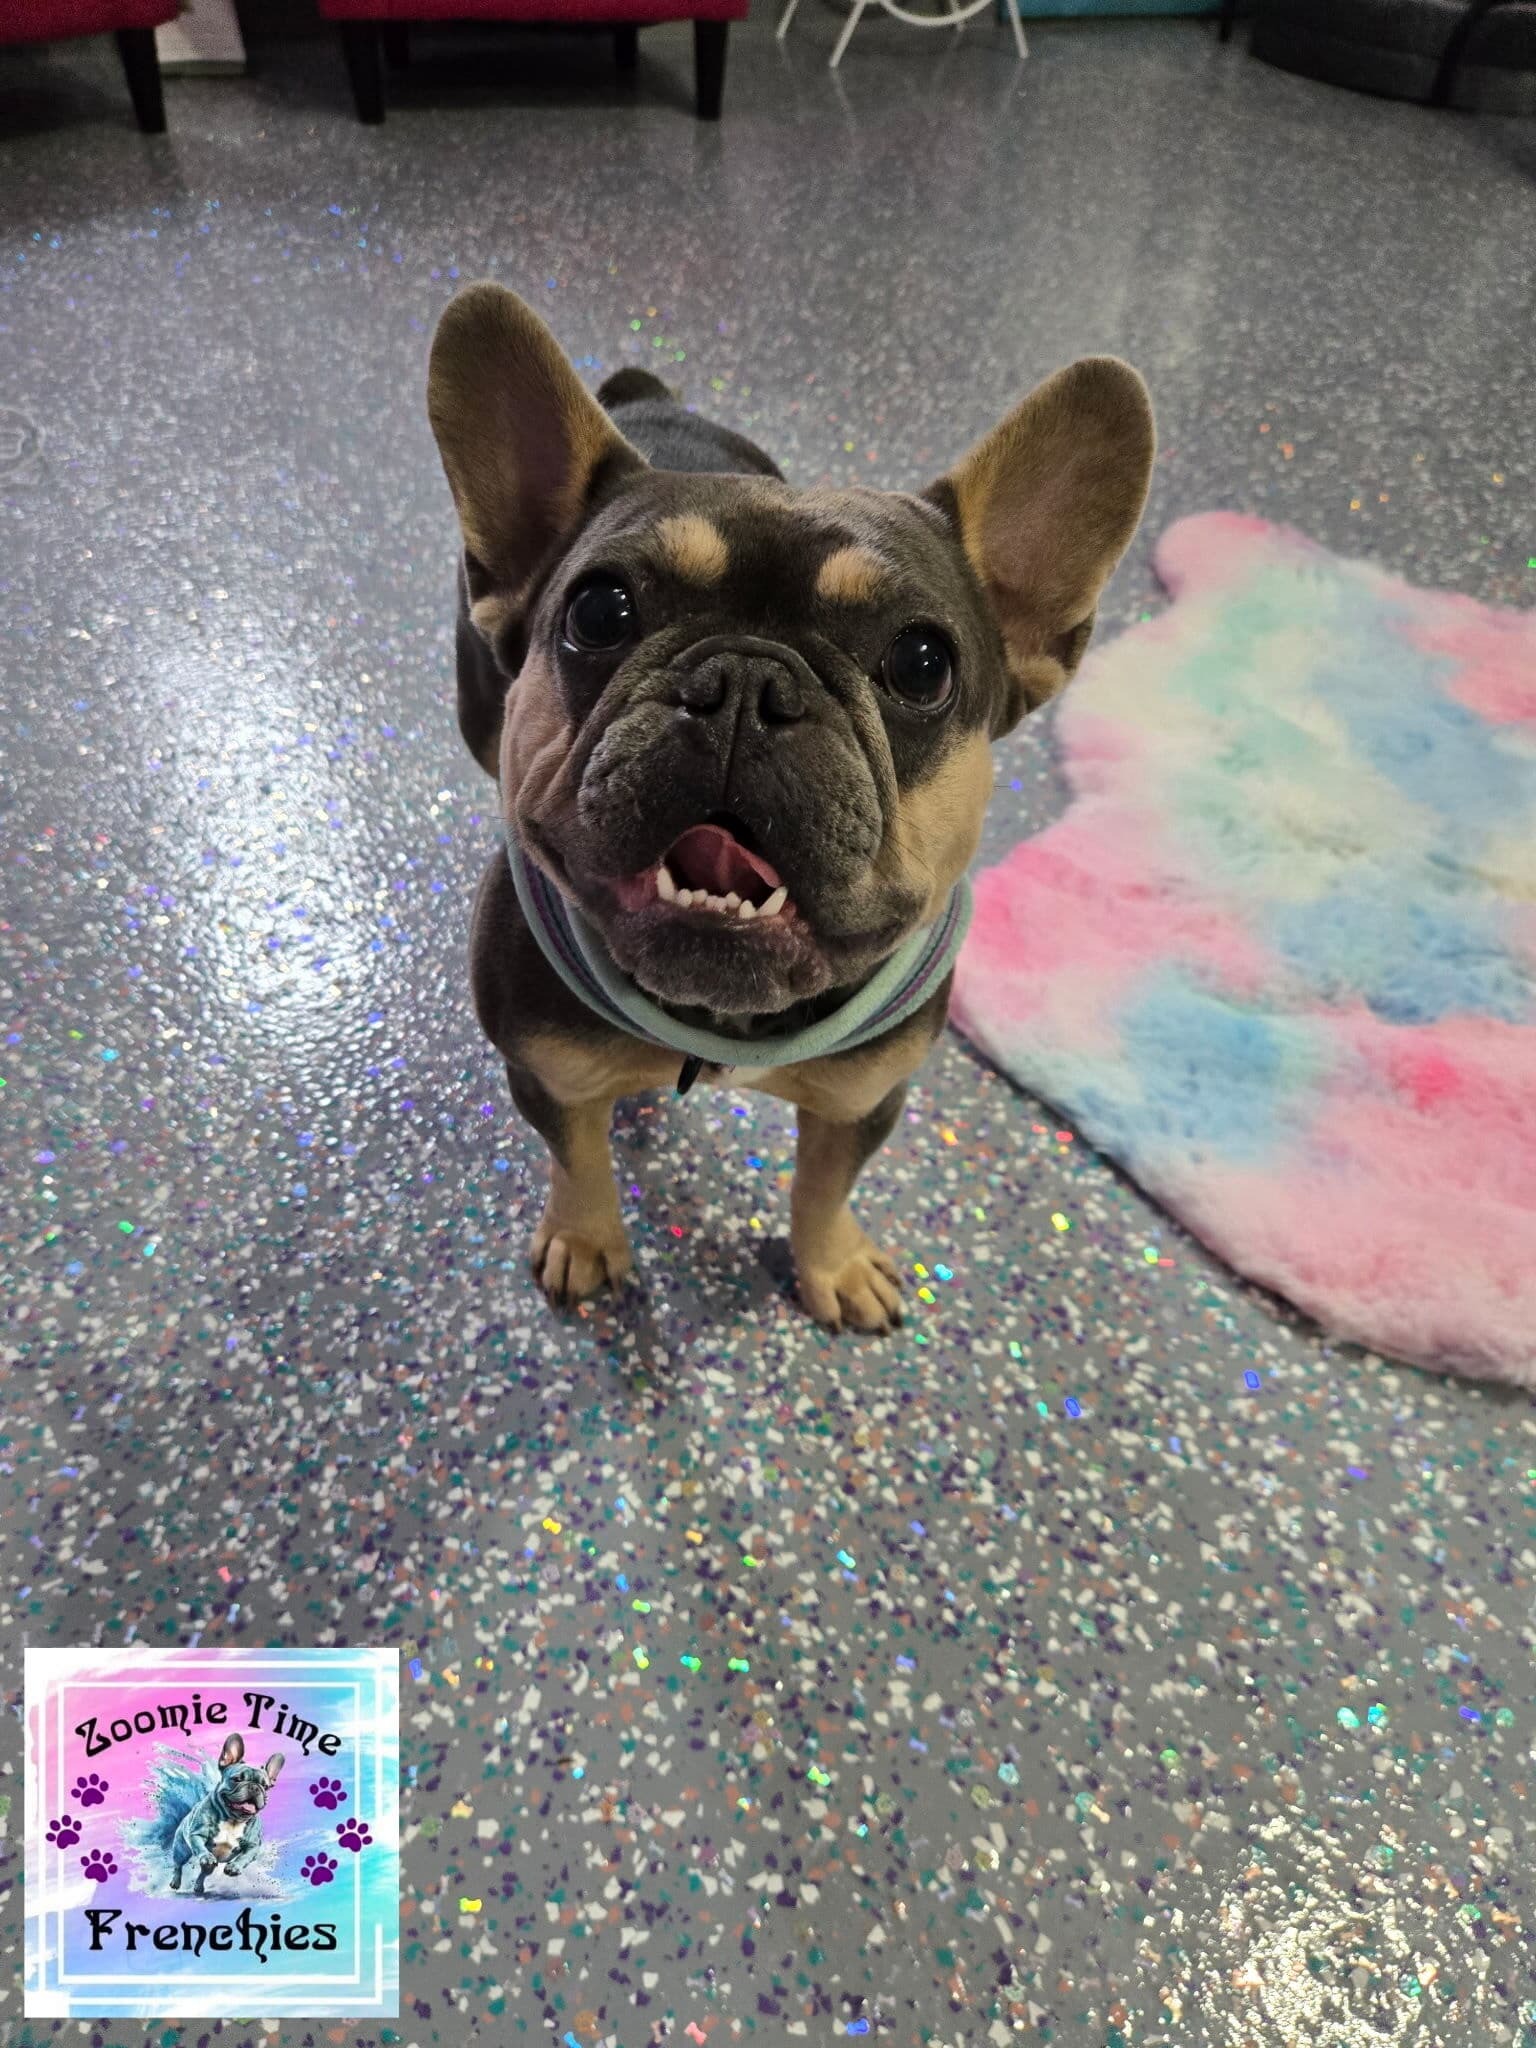
First-time user Lee Tiller of Zoomie Time Frenchies in Arkansas chose medium gray with Teal, White, Amethyst & Hot Pink flakes, plus primer and Military Grade Topcoat for extra durability against sharp nails.
“At Zoomie Time we love Frenchies and our new floor! Thanks ArmorGarage!” — Lee Tiller
Customer Review Video
Tony in Michigan walks through his entire installation step by step.
Good to Know
Used the wrong product? If your existing coating is dull, yellowed, stained, or peeling, you may be able to coat over it if it isn’t too far gone. See the MUST READ tab for details on coating over existing floors.
Considering full broadcast? Full broadcast requires significantly more flakes (up to 10x) and more topcoat. Call us first — we’ll guide you through it. Most DIY users get a better result with our Armor Granite Kit (90–95% flake coverage vs. Armor Chip’s 70–75%).
Low temperature application? Need to install in temps down to 38°F? See our Ultra Fast Dry System.
Helpful Resources
What Is Garage Floor Epoxy? Epoxy Coating Selector Tool Coating FAQ Case Studies: 16+ Year Floors All Garage Coating Products
Free Shipping • Complete Turnkey Kit • Expert Support 7 Days/Week
Not sure which kit size or color? We’ll help you pick the perfect combo for your garage.
Call: (866) 532-3979 | Email: info@armorgarage.com | Request a Quote
How to Order Your Garage Epoxy Kit
Getting the right color in the right size is simple. Follow these steps:
- Select a flake and epoxy color pattern you like from one of the color swatches
- Our most popular kits are our pre-matched flake and epoxy combination shown in the swatches — no guesswork needed
- In the "Size" dropdown, select the matching color and appropriate size for your garage.
- If ordering primer or military topcoat options, simply select the size matching your kit size.
Premium Color Note: Dark Gray, Charcoal, and Black are premium base colors and are now at no additional charge!
11 Pre-Matched "Wife Approved" Combos: Out of hundreds of possible color combinations, we've curated 11 pre-packaged epoxy and chip pairings that are by far the most popular with customers — never a complaint. Simple ordering, guaranteed great results.
Epoxy Base Coat Color Chart
Click any color to enlarge
Customize Your Color Flake Selection
Want to create your own custom combination? Mix and match epoxy base colors and flake colors to build a one-of-a-kind floor. Here's how:
- Select the kit with your desired base epoxy color (use the base coat color chart as a guide, don't worry about the flake colors, they will change to the custom colors you select)
- Browse the flake color charts below and choose up to 5 chip colors
- List your custom chip color & number selections in the "Custom Color Flake Order Note Box" and we'll swap them with the standard flake colors at no charge
Specialty Chips: Green & Blue Glow-in-the-Dark chips are available for $45/lb additional (currently out of stock). Metallic Silver chips are $30/lb additional. Indicate color and quantity in the Custom Chip Comment Box.
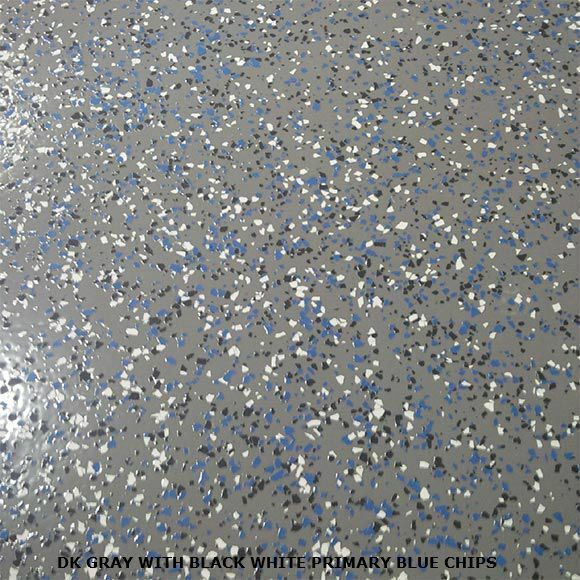
Close-Up: Armor Chip Epoxy Floor Texture
This is what the finished chip texture looks like up close. Dark Gray base epoxy with Black, White, and Primary Blue color flakes — one of our most popular combinations. The multi-color chips create depth and visual interest while hiding imperfections and dirt between cleanings.
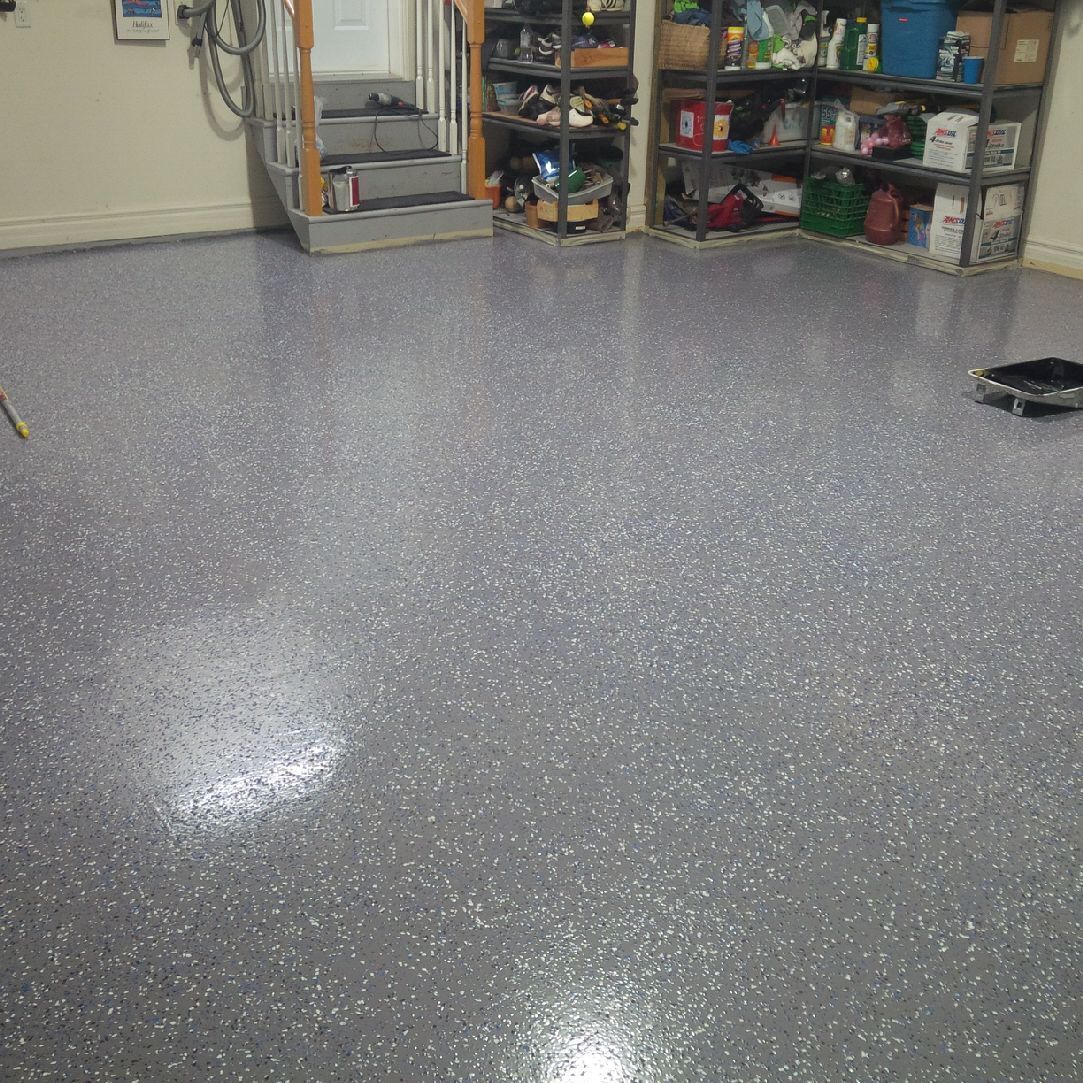
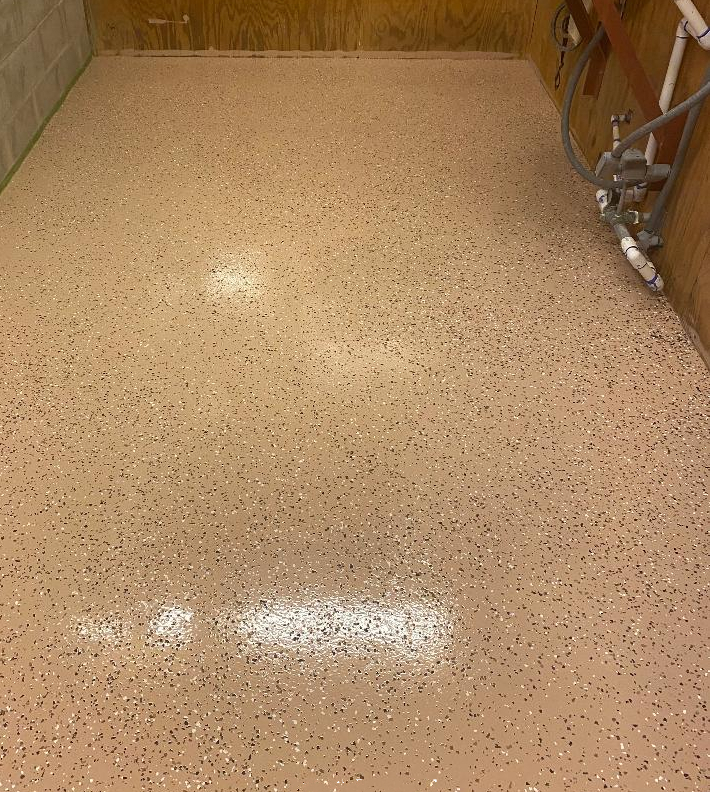
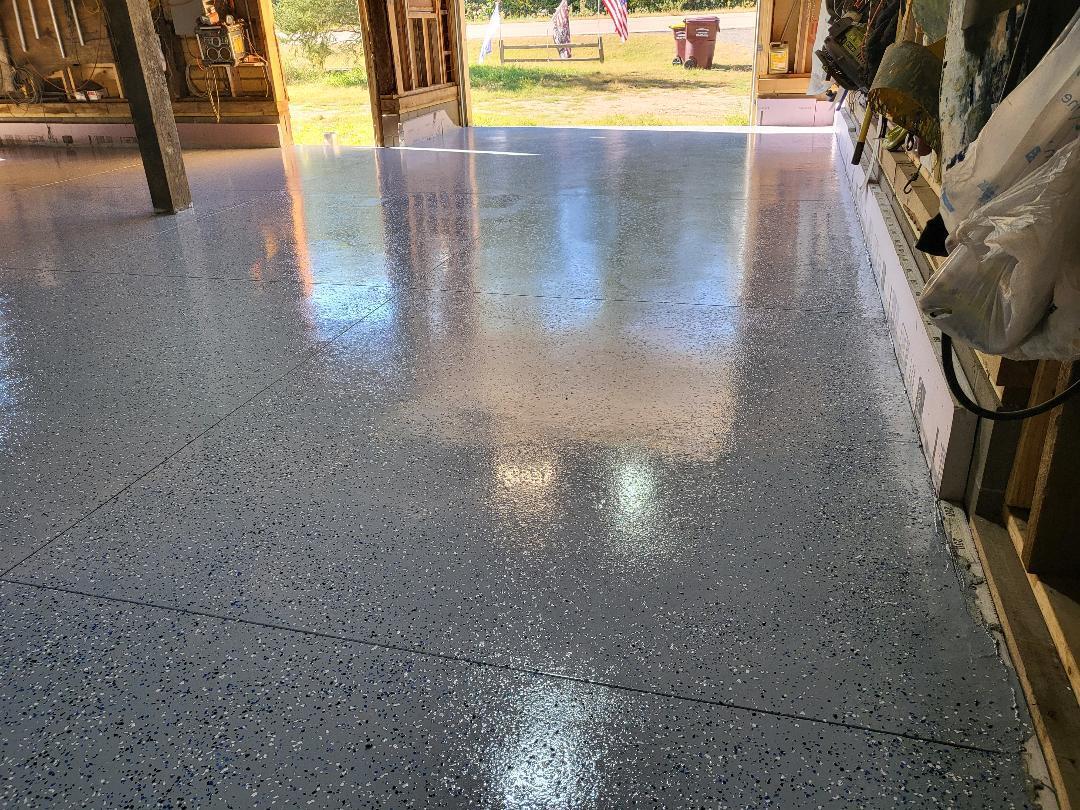
Customer Floor Gallery
Real floors, real customers, real results. Every floor below was installed by the homeowner on their first try using our Armor Chip Garage Epoxy Kit with Military Grade Topcoat. Click any image to zoom in.
Need Help Choosing Your Colors?
Not sure which base color and chip combination will look best in your garage? We've helped thousands of customers pick the perfect combo. Tell us about your space and we'll make a recommendation.
Talk to an expert at 866-532-3979 — info@armorgarage.com or Request a Quote for project pricing. We're here to help you get the garage floor you've always wanted.
Watch This Step By Step 90 Second Video Transforming Larsa Pippen's Failed Garage Floor Epoxy
This video is a longer narrated version explaining each application step of the epoxy application in greater detail
Installation Overview (Armor Chip)
- Clean floor, powerwash if possible & remove oil stains
- Profile concrete (acid etch or diamond grind)
- Patch cracks, spalls, and surface defects. Use the Instant Crack Repair to avoid waiting for repairs to dry
- Apply primer if required by slab condition or desired extra adhesion
- Apply epoxy build coat
- Broadcast decorative flakes
- Scrape and vacuum excess flakes
- Apply clear protective topcoat(s)
- For very detailed instructions, click the link below.
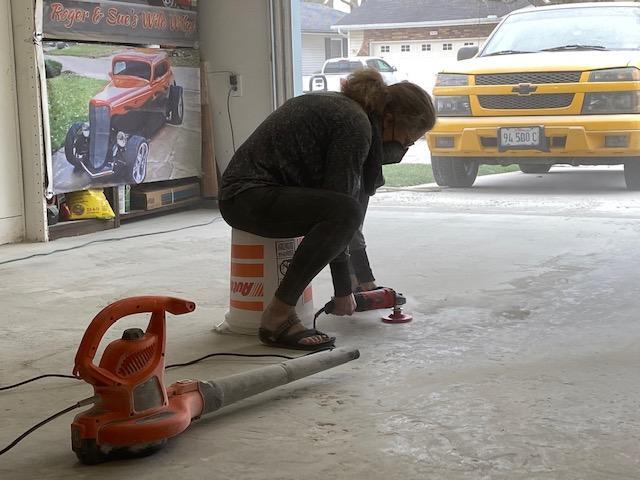
Installation Tips & Real-World Lessons
We’ve included real-world installation videos from DIY customers so you can see exactly how the Armor Chip system is applied — and learn from their experience.
These videos cover common questions like material coverage, mixing batches, using primers, applying flakes, and topcoating for a professional finish. See this very informative article from a customer ArmorGarage Epoxy Application Suggestions And Lessons Learned
▶ And watch the full step-by-step prep & installation by DIY DAN here
HERE'S A GREAT IN PROGRESS IMAGE OF A PROPERLY PREPPED FLOOR THAT WAS DIAMOND GRINDED.
THE FLOOR PREP MACHINE FROM HOME DEPOT DID A GREAT JOB, OIL STAINS WERE CLEANED WITH LIQUID TIDE AND MURIATIC ACID
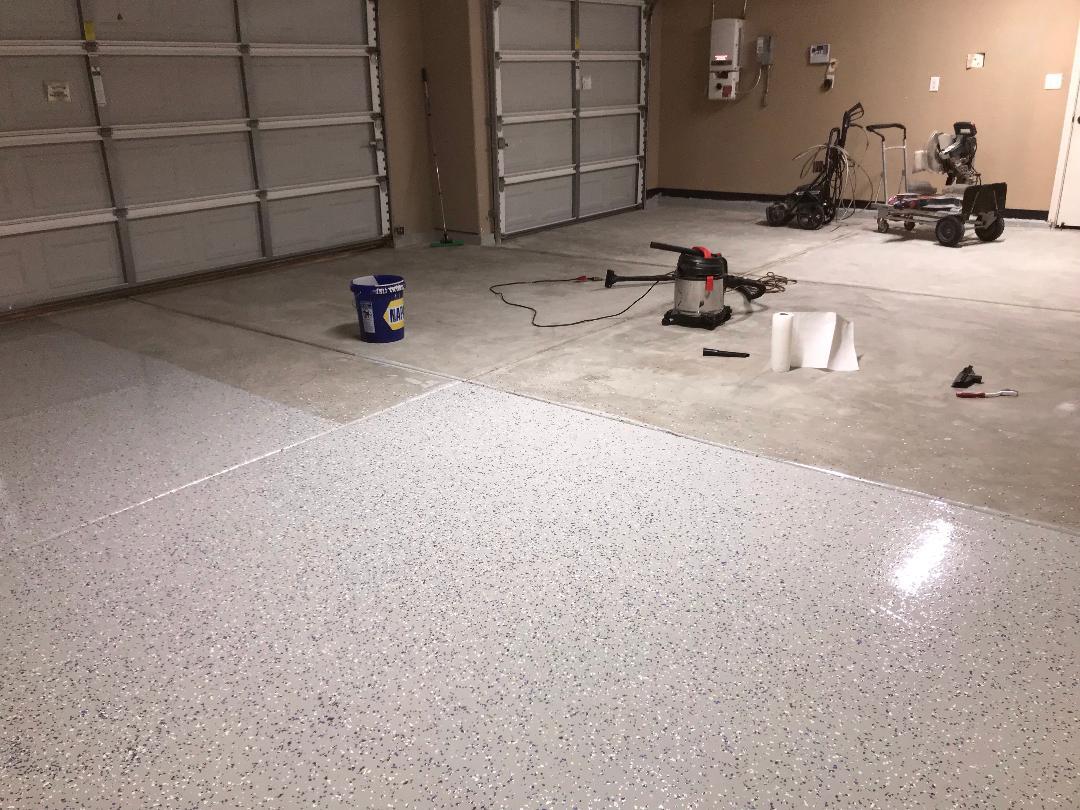
This Is A Good Before & After Prep Shot. This Customer Used A Heavy Duty Grinder. The Floor Actually Looks Almost Like New Concrete.


This is how your floor should look like prior to coating with any type of epoxy paint.

If your floor looks like this STOP and power wash and etch again!


Even If Your FLoor Is badly Pitted You Can Still Apply Our Garage Epoxy Over It. This Customer Used The Carck & Joint Compound That Completely Hid All The Deteriorated Contcrete.
AS YOU CAN SEE FOLLOWING OUR INSTRUCTIONS RESULTS IN A BEAUTIFUL CHIP PATTERN THAT IS AS GOOD AS IT GETS.

Helpful Pro Tips To Ensure Your Epoxy Floor Project's Success
Why & When to Use Military Grade Topcoat
Garage floors are subjected to daily destructive forces, some more than others, and having the right topcoat makes all the difference in how long your floor stays looking new.
For a deeper understanding about abrasion and why it matters, see Why ArmorGarage Is The Best Epoxy.
Why & When to Use a Primer
Your ArmorGarage epoxy is self-priming, so a primer is not required. However, if the budget allows, it's always a good idea to prime.
When Primer is Recommended
- Poor condition floors – Chalky, flaky, or very rough concrete (primer strengthens as it soaks in)
- Heavy vehicles – Large SUVs, trucks, tractors, or off-road equipment
- Extend coverage – Floor slightly over kit coverage (primer seals porous concrete)
- Maximum adhesion – Extra bonding strength for peace of mind
- Added thickness – Increases total system thickness for durability
Doing Curbs & Cut-Ins with the Epoxy
Coating Concrete/Brick Curbs
- Calculate curb square footage and double it – curbs use extra material
- No taping needed for curbs
- Squeegee epoxy to about 1/2" from curb edge
- Use cut-in brush to brush epoxy against and onto curb
- Apply flakes with sideways underhanded motion (few at a time to avoid piles)
Garage Door Edge
- Put duct tape line at inside or outside edge of garage door
- Don't extend beyond outside edge of door
- Leave tape down until done, then run razor down line and remove
- Small concrete strip outside door can be painted with inexpensive color matched outdoor concrete paint
Items You'll Need & Setting Up
Required Items (Not Included)
- 9" roller handle and extension pole
- Roller pan
- Large calibrated measuring cups
- Power drill
- Small can of Xylene or Mineral Spirits
Mixing Station Setup
- Place tarp or large plastic sheet to work on (prevents driveway spills)
- Keep primer cans and epoxy containers separate (color-coded differently)
- Have only one person do all mixing for consistency
- If using multiple kits, mix all Part As together to blend pigments
- Mark measuring cups: 80 oz for Part A, 40 oz for Part B
Coverage & Ordering Guide
Coverage is a very important factor to consider. Many competing brands do not come close to yielding their stated coverage, resulting in purchasing additional product or a streaky, washed-out finish. Each ArmorGarage kit will cover up to the stated coverage with a beautiful, luxurious finish.
Coverage Facts to Know
- Rougher/porous surfaces yield less coverage
- Lighter colors (Beige) yield less coverage
- High pigment colors (black, white) yield less coverage
- Red gets least coverage – highest pigment amount (most expensive)
• Floor 725 SF or less → Order oversized primer (900 SF) to extend epoxy coverage
• Using Military topcoat → Order 750 SF topcoat option
• Floor larger than 725 SF → Order 900 SF kit
• Smart tip: Have leftover? Store in small jars for emergencies
Previously Coated Failing Floors
If you previously coated your floor with a big-box epoxy or had a contractor apply a coating "10X stronger than epoxy," it's more than likely your floor already shows wear and tear.
• High Solids Epoxy ≠ True 100% Solids Epoxy
• 100% Solids Epoxy ≠ 100% Military Grade Solids Epoxy
If you pour ArmorGarage 100% military grade epoxy next to competing "high solids" or fake "100% solids," they would seem like water in comparison. Even our 97% high solids primer is only used as a primer – not a topcoat!
If you applied an epoxy coating before finding us and your floor is failing, learn how to coat over existing paint with one of our epoxy kits.
If you've applied an epoxy coating before you found us and your floor looks like the blue arrows below. Learn How To Coat Over An Existing Paint with one of our epoxy kits.
FAQs About Garage Epoxy Flooring
The following is a list of questions we get asked the most. If you have a question that is not addressed here or on "The Garage Epoxy Flooring FAQ" page which answers additional questions, please give us a call - 866-532-3979 (Mon-Fri. 9-5) or send us an email to: info@armorgarage.com. Our reps are happy to help you 7 days a week with any application, product or prep questions you may have.
How do I order different color chips than what's standard with your kits?
First select any kit with the base epoxy color you want, then In the "Custom Flake Color Box simply list up to 5 colors that you choose from the Flake Color Charts. There is no extra charge for custom colors. We'll ship you the kit in the epoxy color you chose and the your custom color flakes.
My floor is bigger than the 600 sf coverage of the Armor Chip Kit. What do I do?
See the Ordering & Covergae Guide section in the "Must Read" Tab for what to do in your situation.
How long do I need to wait before coating a new slab and do I still need to etch it?
New slabs need to cure for 28 days minimum and they need to be etched. In fact we like you to do an extra strong second etch to make sure we burn out all the curing residues at the surface. You can do this buy simply buying a gallon of Muriatic Acid and mixing it with our etching solution. This will give our etch solution a little extra zing to clean and open the pores of your concrete slab. As you will undoubtedly see elsewhere on the site this is extremely important, it allows the epoxy to get into the open pores and make an unbreakable molecular bond with the concrete.
How long do I need to let primer dry?
The Primer will dry in 5-8hrs depending on temperature and humidity conditions. Once the primer is dry to the touch you can apply the epoxy. Do not let more than 20 hrs pass before applying the epoxy. Otherwise you will need to lightly sand the primer with 120 grit to rough up the surface. You'll know when the primer is ready for the epoxy coating when you can press your thumb into it and not leave a thumbprint.
Should I fill in the saw cuts or expansion joints?
No we recommend that you do not. The last thing you want is to have a crack down the middle of your new high gloss epoxy floor. Once you've applied an Armor Chip or Armor Granite garage floor kit, the saw cuts will add dimension to the floor, and they will look like big slabs of stone. If your floor is older than 10 years it's probably ok to fill them since the floor is done settling. But you never know for sure what can happen. And don't worry about dirt and stuff getting in the saw cuts, once coated they will be nonstick and anything in there will easily come out with a leaf blower or sweep of a brrom.
Can I extend the epoxy out past the Garage door?
No we don't recommend that. The epoxy should end at the inside or outside edge of the garage door. Apply a color matched inexpensive outdoor patio type of paint. This way when the elements beat it up you're only replacing cheap outdoor paint rather than an expensive epoxy coating.
When should I fill in the cracks and will the epoxy fill the cracks in?
For the best and quickest results use the Instant Crack Filler. It lets you fill cracks, divots and holes and apply the epoxy right over it without having to wait for the repair compound to cure. Big time saver. Just mix Part A & Part B to form a putty and apply where needed and scrape flat to surface.
If you repair area is large or you have cracks larger than 1/2" wide and holes deeper than 1" use the Crack & Joint Compound goes in before the cleaning and etching, once it cures overnight you can grind it smooth if need be. The Instant Crack Filler goes in after and allows you to apply the epoxy or primer immediately after the filler is applied.
For very deep holes and cracks we recommend filling the space with backer rod available on our repair products page.
How long do I need to let the floor dry after etching?
It's a matter of temperature and humidity, 24hrs is usually sufficient but you should let it dry for 48 hrs to be sure all the moisture has dried out of the floor. Applying the epoxy prior to 100% of the moisture drying out of the floor will result in what we call a "pop". Somewhere down the road, you will see a small chip of epoxy pop off the floor. This is not an epoxy failure, it's latent moisture forcing its way out of the slab, and if you look at the underside of the epoxy you'll see part of your slab stuck to it.
When can I put the topcoat down?
As soon as the epoxy dries to the touch, usually the next morning. The epoxy should not show a fingerprint when you press your thumb into it.
When can I put my stuff back in my garage?
The topcoat will dry to the touch in 5-6 hours at which time you can walk on it and put your stuff back in, heavy rolling objects the next day, keep the car off for 2-3 days. Be sure to do the thumprint test before walking on the topcoat!
I had an accident and scratched my floor, what can I do?
Scratches are easily fixed, see the Care & Maintenance page in the "NEED TO KNOW" section for the details. But it's simply a matter of sanding the scratch with 120 grit and brushing on some topcoat to bring it back to new.
I've had my floor for many years and it's finally starting to wear out, what do I do?
Easy, just give it a light sanding to scuff it up and roll on a new layer of topcoat, that will bring the floor right back to new. The epoxy and chips should stay indefinitely.
How long does this process take?
In actual hours it's not much at all but since you have dry times you should allow 3 days to get the job done. Total working hours should be no more than 4-5 hours. To shorten the timeline, you can grind the floor which eliminates waiting for your floor to dry. It allows you to prep and prime or prep and epoxy the floor in the same day.


